测试驱动式编程(Test-Driven-Development)在RoR中已经是非常普遍的开发模式,是一种十分可靠、优秀的编程思想,可是在Android领域中这块还没有普及,今天主要聊聊Android中的单元测试与模拟测试及其常用的一些库。
关于Kotlin中的单元测试,请移步这篇文章: Kotlin
I. 测试与基本规范 1. 为什么需要测试? 为了稳定性,能够明确的了解是否正确的完成开发。 更加易于维护,能够在修改代码后保证功能不被破坏。 集成一些工具,规范开发规范,使得代码更加稳定( 如通过 phabricator differential 发diff时提交需要执行的单元测试,在开发流程上就可以保证远端代码的稳定性)。 2. 测什么? 一般单元测试: 模拟测试: 根据需求,测试用户真正在使用过程中,界面的反馈与显示以及一些依赖系统架构的组件的应用测试。 3. 需要注意 考虑可读性,对于方法名使用表达能力强的方法名,对于测试范式可以考虑使用一种规范, 如 RSpec-style。方法名可以采用一种格式,如: [测试的方法]_[测试的条件]_[符合预期的结果]。 不要使用逻辑流关键字(If/else、for、do/while、switch/case),在一个测试方法中,如果需要有这些,拆分到单独的每个测试方法里。 测试真正需要测试的内容,需要覆盖的情况,一般情况只考虑验证输出(如某操作后,显示什么,值是什么)。 考虑耗时,Android Studio默认会输出耗时。 不需要考虑测试private的方法,将private方法当做黑盒内部组件,测试对其引用的public方法即可;不考虑测试琐碎的代码,如getter或者setter。 每个单元测试方法,应没有先后顺序;尽可能的解耦对于不同的测试方法,不应该存在Test A与Test B存在时序性的情况。 4. 创建测试 选择对应的类 将光标停留在类名上 按下ALT + ENTER 在弹出的弹窗中选择Create Test II. Android Studio中的单元测试与模拟测试 control + shift + R (Android Studio 默认执行单元测试快捷键)。
1. 本地单元测试 直接在开发机上面进行运行测试。
./gradlew test
通过添加以下脚本到对应module的build.gradle中,以便于在终端中也可以直接查看单元测试的各类测试信息:
1
2
3
4
5
6
7
8
9
10
android {'passed' , 'skipped' , 'failed' , 'standardOut' , 'standardError' false }true
代码存储 如果是对应不同的flavor或者是build type,直接在test后面加上对应后缀(如对应名为myFlavor的单元测试代码,应该放在src/testMyFlavor/java下面)。
src/test/java
Google官方推荐引用 1 2 3 4 5 6 dependencies {'junit:junit:4.12' 'org.mockito:mockito-core:1.10.19'
JUnit Annotation Annotation 描述 @Test public void method()定义所在方法为单元测试方法 @Test (expected = Exception.class)如果所在方法没有抛出Annotation中的Exception.class->失败 @Test(timeout=100)如果方法耗时超过100毫秒->失败 @Test(expected=Exception.class)如果方法抛了Exception.class类型的异常->通过 @Before public void method()这个方法在每个测试之前执行,用于准备测试环境(如: 初始化类,读输入流等) @After public void method()这个方法在每个测试之后执行,用于清理测试环境数据 BeforeClass public static void method()这个方法在所有测试开始之前执行一次,用于做一些耗时的初始化工作(如: 连接数据库) AfterClass public static void method()这个方法在所有测试结束之后执行一次,用于清理数据(如: 断开数据连接) @Ignore或者@Ignore("Why disabled")忽略当前测试方法,一般用于测试方法还没有准备好,或者太耗时之类的 @FixMethodOrder(MethodSorters.NAME_ASCENDING) public class TestClass{}使得该测试方法中的所有测试都按照方法中的字母顺序测试 Assume.assumeFalse(boolean condition)如果满足condition,就不执行对应方法
Exception 处理 比如我们希望执行某方法之后,该方法需要抛出IOException,最简单的方法如下:
1 2 3 4 5 6 7 8 9 @Test public void thrownExceptionTestMethod () {try {"Should have thrown IO exception" );catch (IOException e) {
如果仅仅只需要检验是否有抛出,我们可以通过expected来简化:
1 2 3 4 @Test(expected = IOException.class) public void thrownExceptionTestMethod () {
如果需要校验Exception的内容,也可以通过ExpectedException来简化:
1 2 3 4 5 6 7 8 9 10 11 @Rule public ExpectedException thrown = ExpectedException.none();@Test public void shouldTestExceptionMessage () throws IndexOutOfBoundsException {new ArrayList <Object>();"Index: 0, Size: 0" );0 );
2. 模拟测试 需要运行在Android设备或者虚拟机上的测试。
主要用于测试: 单元(Android SDK层引用关系的相关的单元测试)、UI、应用组件集成测试(Service、Content Provider等)。
./gradlew connectedAndroidTest
代码存储: src/androidTest/java
Google官方推荐引用 1 2 3 4 5 6 7 8 9 10 11 dependencies {'com.android.support:support-annotations:23.0.1' 'com.android.support.test:runner:0.4.1' 'com.android.support.test:rules:0.4.1' 'org.hamcrest:hamcrest-library:1.3' 'com.android.support.test.espresso:espresso-core:2.2.1' 'com.android.support.test.uiautomator:uiautomator-v18:2.1.1'
常见的UI测试 需要模拟Android系统环境。
主要三点: UI加载好后展示的信息是否正确。 在用户某个操作后UI信息是否展示正确。 展示正确的页面供用户操作。 Espresso 谷歌官方提供用于UI交互测试
1 2 3 4 5 6 7 8 9 10 11 12 13 14 15 16 17 18 19 20 21 import static android.support.test.espresso.Espresso.onView;import static android.support.test.espresso.action.ViewActions.click;import static android.support.test.espresso.assertion.ViewAssertions.matches;import static android.support.test.espresso.matcher.ViewMatchers.isDisplayed;import static android.support.test.espresso.matcher.ViewMatchers.withId;"ABC" ))).check(matches(not(isEnabled()));"Start new activity" ))));"YYZZ" )))));"NewText" ), closeSoftKeyboard());
启动一个打开Activity的Intent 1 2 3 4 5 6 7 8 9 10 11 12 13 14 15 16 17 18 @RunWith(AndroidJUnit4.class) public class SecondActivityTest {@Rule public ActivityTestRule<SecondActivity> rule =new ActivityTestRule (SecondActivity.class, true ,false );@Test public void demonstrateIntentPrep () {Intent intent = new Intent ();"EXTRA" , "Test" );"Test" )));
异步交互 建议关闭设备中”设置->开发者选项中”的动画,因为这些动画可能会是的Espresso在检测异步任务的时候产生混淆: 窗口动画缩放(Window animation scale)、过渡动画缩放(Transition animation scale)、动画程序时长缩放(Animator duration scale)。
针对AsyncTask,在测试的时候,如触发点击事件以后抛了一个AsyncTask任务,在测试的时候直接onView(withId(R.id.update)).perform(click()),然后直接进行检测,此时的检测就是在AsyncTask#onPostExecute之后。
1 2 3 4 5 6 7 8 9 10 11 12 13 14 15 16 17 18 19 20 21 22 23 24 25 26 27 28 29 30 31 32 33 34 35 36 37 38 39 40 41 42 43 44 45 46 47 48 49 50 51 52 53 54 55 56 57 58 59 60 61 62 63 64 65 66 67 68 69 70 71 72 public class IntentServiceIdlingResource implements IdlingResource {private Context context;public IntentServiceIdlingResource (Context context) { this .context = context; }@Override public String getName () { return IntentServiceIdlingResource.class.getName(); }@Override public void registerIdleTransitionCallback ( ResourceCallback resourceCallback) { this .resourceCallback = resourceCallback; }@Override public boolean isIdleNow () {boolean idle = !isIntentServiceRunning();if (idle && resourceCallback != null ) {return idle;private boolean isIntentServiceRunning () {ActivityManager manager = (ActivityManager) context.getSystemService(Context.ACTIVITY_SERVICE);for (ActivityManager.RunningServiceInfo info : runningServices) {if (MyIntentService.class.getName().equals(info.service.getClassName())) {return true ;return false ;@RunWith(AndroidJUnit4.class) public class IntegrationTest {@Rule public ActivityTestRule rule = new ActivityTestRule (MainActivity.class);@Before public void before () {Instrumentation instrumentation = InstrumentationRegistry.getInstrumentation();Context ctx = instrumentation.getTargetContext();new IntentServiceIdlingResource (ctx);@After public void after () {@Test public void runSequence () {"Broadcast" )).check(matches(notNullValue()));
自定义匹配器 1 2 3 4 5 6 7 8 9 10 11 12 13 14 15 16 17 18 19 20 21 22 23 24 25 public static Matcher<View> withItemHint (String itemHintText) {null )));return withItemHint(is(itemHintText));public static Matcher<View> withItemHint (final Matcher<String> matcherText) {return new BoundedMatcher <View, EditText>(EditText.class) {@Override public void describeTo (Description description) {"with item hint: " + matcherText);@Override protected boolean matchesSafely (EditText editTextField) {return matcherText.matches(editTextField.getHint().toString());"test" )).check(matches(isDisplayed()));
III. 拓展工具 1. AssertJ Android square/assertj-android
1 2 3 4 5 6 7 8 9 10 11 12 13 14 15 16 17 18 19 20 21 22 23 24 25 26 27 28 29 30 31 32 import static org.assertj.core.api.Assertions.*;MyClass test = new MyClass ("Frodo" );MyClass test1 = new MyClass ("Sauron" );MyClass test2 = new MyClass ("Jacks" );new ArrayList <>();"Frodo" );"Fro" )"do" )"frodo" );2 )"name" )"Frodo" , "Sauron" )"Jacks" );
2. Hamcrest JavaHamcrest org.hamcrest:hamcrest-junit:(version)
1 2 3 4 5 6 7 8 9 10 11 12 13 14 15 16 17 18 19 20 21 22 23 24 25 26 27 28 29 import static org.hamcrest.MatcherAssert.assertThat;import static org.hamcrest.Matchers.is;import static org.hamcrest.Matchers.equalTo;5 , 2 , 4 );3 ));5 , 2 , 4 ));2 , 4 , 5 ));1 )));"race" , is(not((ORC))))));new Integer [] { 7 , 5 , 12 , 16 };7 , 5 , 12 , 16 ));
几个主要的匹配器 Mather 描述 allOf所有都匹配 anyOf任意一个匹配 not不是 equalTo对象等于 is是 hasToString包含toString instanceOf,isCompatibleType类的类型是否匹配 notNullValue,nullValue测试null sameInstance相同实例 hasEntry,hasKey,hasValue测试Map中的Entry、Key、Value hasItem,hasItems测试集合(collection)中包含元素 hasItemInArray测试数组中包含元素 closeTo测试浮点数是否接近指定值 greaterThan,greaterThanOrEqualTo,lessThan,lessThanOrEqualTo数据对比 equalToIgnoringCase忽略大小写字符串对比 equalToIgnoringWhiteSpace忽略空格字符串对比 containsString,endsWith,startsWith,isEmptyString,isEmptyOrNullString字符串匹配
自定义匹配器 1 2 3 4 5 6 7 8 9 10 11 12 13 14 15 16 17 18 19 20 21 22 23 24 import org.hamcrest.Description;import org.hamcrest.TypeSafeMatcher;public class RegexMatcher extends TypeSafeMatcher <String> {private final String regex;public RegexMatcher (final String regex) { this .regex = regex; }@Override public void describeTo (final Description description) { description.appendText("matches regular expression=`" + regex + "`" ); }@Override public boolean matchesSafely (final String string) { return string.matches(regex); }public static RegexMatcher matchesRegex (final String regex) {return new RegexMatcher (regex);String s = "aaabbbaaa" ;"a*b*a" ));
3. Mockito Mockito org.mockito:mockito-all:(version)
1 2 3 4 5 6 7 8 9 10 11 12 13 14 15 16 17 18 19 20 21 22 23 24 25 26 27 28 29 30 31 32 33 34 35 36 37 38 import static org.mockito.Mockito.mock;import static org.mockito.Mockito.verify;MyClass test = mock(MyClass.class);43 );43 );43 );new IOException ()).when(test).close();2 )).getUniqueId();2 )).getUniqueId();3 )).getUniqueId();"test string" );List list = new LinkedList ();List spy = spy(list);"foo" ).when(spy).get(0 );"foo" , spy.get(0 ));
对访问方法时,传入参数进行快照 1 2 3 4 5 6 7 8 9 10 11 12 13 14 15 16 17 18 19 20 21 22 23 24 25 26 import org.mockito.ArgumentCaptor;import org.mockito.Captor;import static org.junit.Assert.assertEquals;@Captor private ArgumentCaptor<Integer> captor;@Test public void testCapture () {MyClass test = mock(MyClass.class);3 , 4 );4 ));3 , (int )captor.getValue());"param-1" , "param-2" );"param-1" , "param-2" );
对于静态的方法的Mock 可以使用 PowerMock :
org.powermock:powermock-api-mockito:(version) & org.powermock:powermock-module-junit4:(version)(For PowerMockRunner.class)
1 2 3 4 5 6 7 8 9 10 11 12 13 14 15 16 17 18 19 20 21 22 23 24 25 26 @RunWith(PowerMockRunner.class) @PrepareForTest({StaticClass1.class, StaticClass2.class}) public class MyTest {@Test public void testSomething () {"anything" );1 ));"what ever" );
或者是封装为非静态,然后用Mockito:
1
2
3
4
5
class FooWraper {void someMethod () {
4. Robolectric Robolectric Handler、HandlerThread)都需要使用Robolectric,或者进行模拟测试。
主要是解决模拟测试中耗时的缺陷,模拟测试需要安装以及跑在Android系统上,也就是需要在Android虚拟机或者设备上面,所以十分的耗时。基本上每次来来回回都需要几分钟时间。针对这类问题,业界其实已经有了一个现成的解决方案: Pivotal实验室推出的Robolectric 。通过使用Robolectrict模拟Android系统核心库的Shadow Classes的方式,我们可以像写本地测试一样写这类测试,并且直接运行在工作环境的JVM上,十分方便。
5. Robotium RobotiumTech/robotium
1
2
3
4
5
6
7
8
9
10
11
12
13
14
15
16
17
18
19
@RunWith(RobolectricTestRunner.class) @Config(constants = BuildConfig.class) public class MyActivityTest {@Test public void doSomethingTests () {Application application = RuntimeEnvironment.application;WelcomeActivity activity = Robolectric.setupActivity(WelcomeActivity.class);Intent expectedIntent = new Intent (activity, LoginActivity.class);
通过模拟用户的操作的行为事件流进行测试,这类测试无法避免需要在虚拟机或者设备上面运行的。是一些用户操作流程与视觉显示强相关的很好的选择。
6. Test Butler linkedin/test-butler
通常我们在进行UI测试的时候,会遇到由于模拟器或者设备的错误,如系统的crash、ANR、或是未预期的Wifi、CPU罢工,或者是锁屏,这些外再环境因素导致测试不过。Test-Butler引入就是避免这些环境因素导致UI测试不过。
该库被谷歌官方推荐过 ,并且收到谷歌工程师的Review。
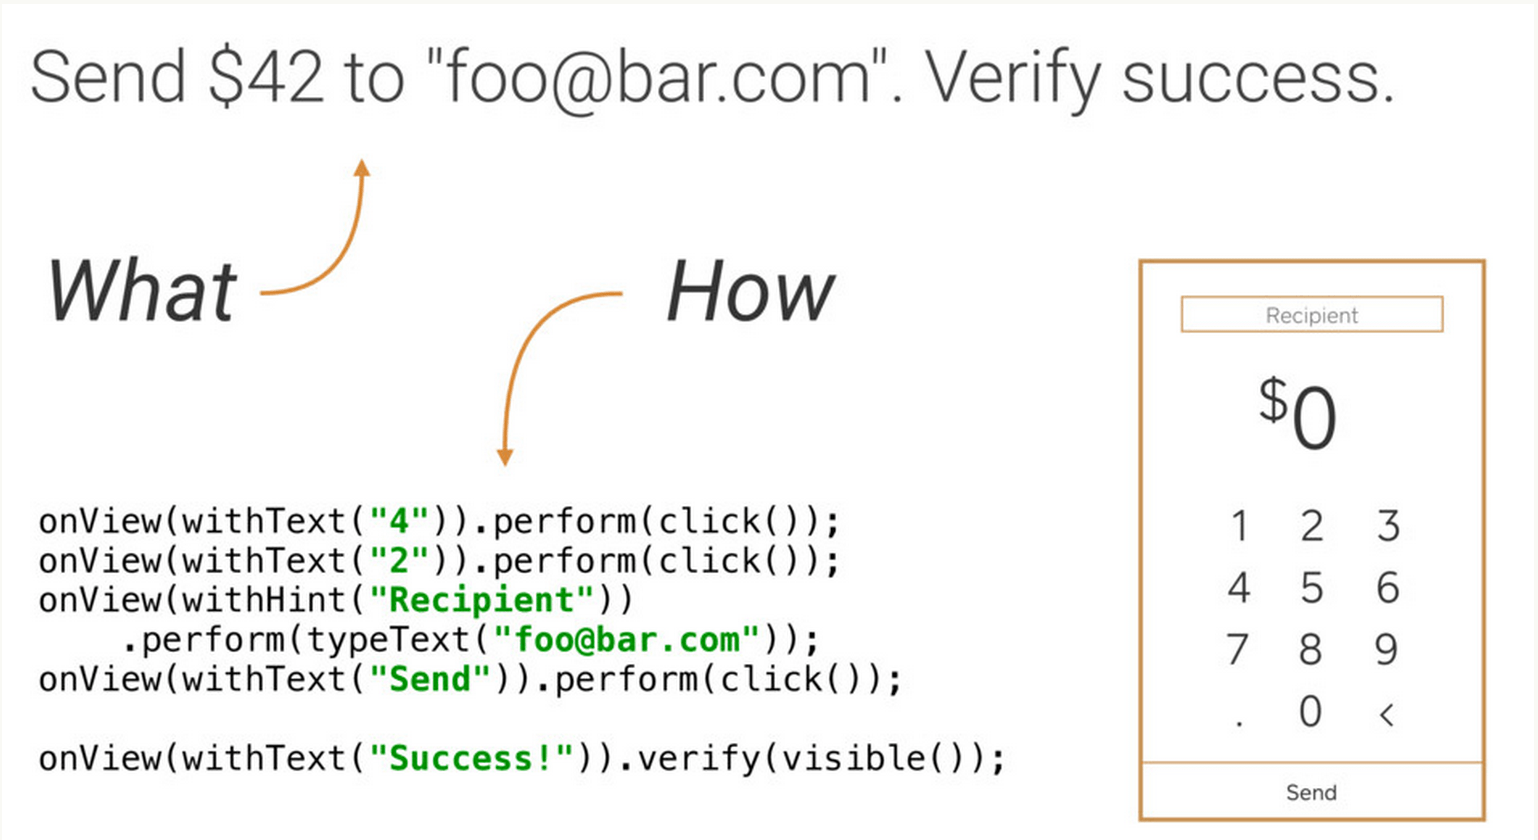
IV. 拓展思路 1. Android Robots Instrumentation Testing Robots - Jake Wharton
假如我们需要测试: 发送 $42 到 “foo@bar.com “,然后验证是否成功。
通常的做法
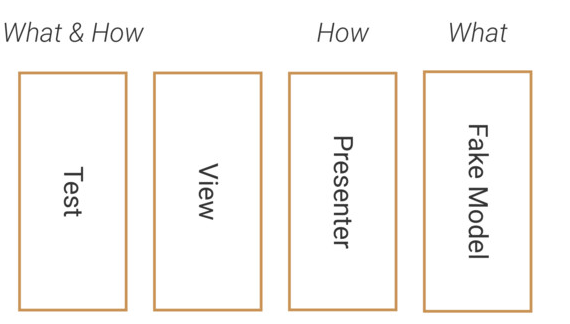
2. Robot思想 在写真正的UI测试的时候,只需要关注要测试什么,而不需要关注需要怎么测试,换句话说就是让测试逻辑与View或Presenter解耦,而与数据产生关系。
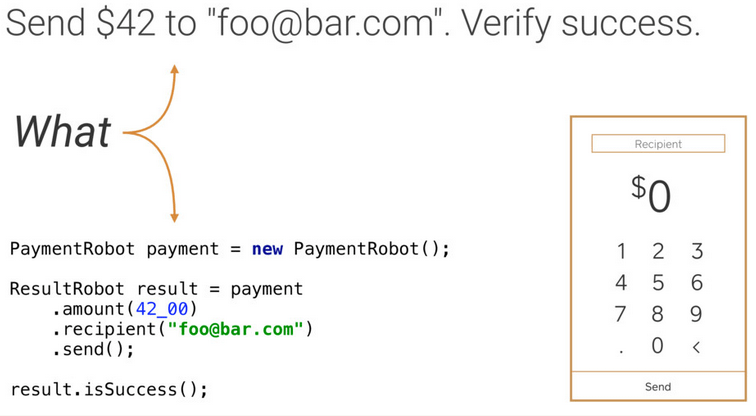
首先通过封装一个Robot去处理How的部分:
然后在写测试的时候,只关注需要测试什么:
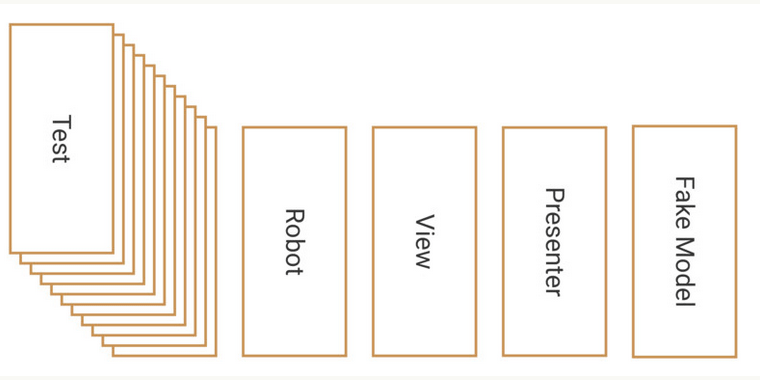
最终的思想原理