近期想要重新再在家里配置一台服务器,作为Truenas Scale的备用,另外也折腾一些GPT相关的东西,因此重新倒腾,服务器上的选择主要从Debian与Ubuntu中选,Debian从Docker、虚拟机还是ZFS上底层支持都比Ubuntu好,因此最终选用了Debian,折腾了几天,Debian的各类网上的资料都比较散,因此做了下整理。
I. 安装 从这里官方 下载amd64的iso文件 用Etcher 写入到磁盘即可,不过我用下来有点问题,最后还是切到windows用UltraISO来写入,简单不出问题 插入U盘,选择u盘启动,然后一步一步根据安装即可,参照这个教程 即可 II. 环境配置 基础环境 源有效性 确定有效的源修改
1 sudo nvim /etc/ apt/sources.list
修改为:
1
2
3
4
5
6
7
8
deb http://deb.debian.org/debian/ buster main contrib non-free
防火墙与开启ssh访问 安装
1
2
3
4
sudo apt-get update
配置防火墙
1
2
3
sudo ufw allow sshenable
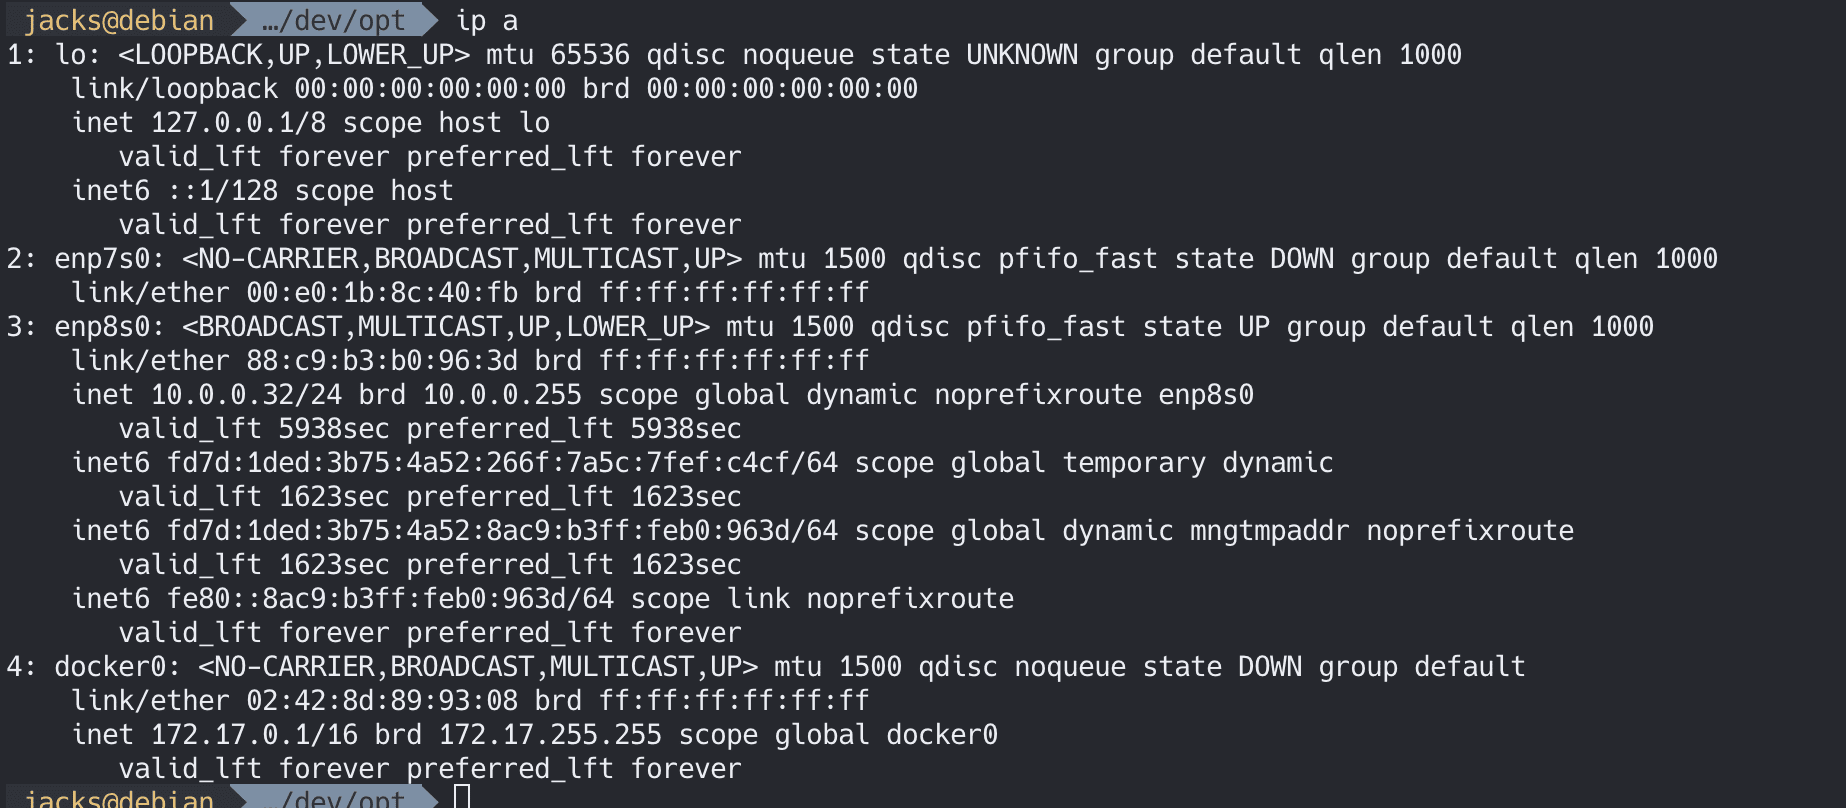
此时就可以远程用ssh访问了,如果你不确定目前的ip是多少可以通过该方式确认下,查看当前接口名称ip a
配置非密码访问,将本地的public key添加到vi ~/.ssh/authorized_keys,确保通过密钥登录有效。
禁止密码访问,并且限制登录账号,编辑/etc/ssh/sshd_config,找到相关字段并修改为:
1
2
3
ClientAliveInterval 600
如果需要禁止root账户ssh访问,需要再添加:
重启服务
1
2
service sshd restart
如果需要执行指令无需sudo密码,全部依赖可信的ssh证书校验,可以考虑参考这里 编辑。
禁止休眠,防止休眠后断网导致远程ssh访问不了,可以参考这个教程 ,具体操作如下:
1 systemctl mask sleep.target suspend.target hibernate.target hybrid-sleep.target
生成sshkey,用于后续使用
终端相关环境配置 安装neovim 1 sudo apt-get install neovim
修改默认编辑器为neovim
1 sudo update-alternatives --config editor
1
2
3
4
sudo apt-get install zsh"$(curl -fsSL https://raw.githubusercontent.com/ohmyzsh/ohmyzsh/master/tools/install.sh) "
1 git clone https://github.com/zsh-users/zsh-autosuggestions ${ZSH_CUSTOM:-~/.oh-my-zsh/custom} /plugins/zsh-autosuggestions
然后在~/.zshrc中修改(我比较习惯用CTRL+SPACE来接受补全建议):
1
2
3
4
5
6
plugins=( bindkey '^ ' autosuggest-accept
1 git clone https://github.com/bhilburn/powerlevel9k.git ~/.oh-my-zsh/custom/themes/powerlevel9k
然后在~/.zshrc中修改:
1 2 3 4 5 6 7 ZSH_THEME="powerlevel9k/powerlevel9k" dir vcs)"%D{%H:%M:%S}" '022'
1 sudo apt install autojump
然后在~/.zshrc中添加:
1 . /usr/share/autojump/autojump.sh
1
2
git clone --depth 1 https://github.com/junegunn/fzf.git ~/.fzf
解决问题中文乱码与编码警告 执行以下命令检查语言环境是否安装: 如果当前语言环境未安装,则需要安装相应的语言支持包。
执行以下命令打开/etc/locale.gen 文件: 1 sudo nvim /etc/locale.gen
将你需要的语言环境取消注释(去掉前面的 #)。
执行以下命令重新生成语言环境: 修改关机等待1min30s超时 一般来说是不建议修改的,因为有些服务在设计之初就会依赖这个等待时间,不过如果你觉得每次关机都得等1min30s超时有点长也可以去修改,参照这里 的教程:
可以先看下系统中这个超时等待是多久:
1 systemctl show sshd -p TimeoutStopUSec
在/etc/systemd/system.conf中修改[Manager]下面:
1 DefaultTimeoutStopSec=30s
III. 挂载与RAID 我的环境是有/dev/sdb2与/dev/sdc2组成的一个RAID1,我是需要将其挂载在/mnt/dev目录下的,这个组RAID1已经在安装的时候已经配置好了。对于RAID1相关的教程这篇文章 也已经写的挺不错的了。
检测与初始化RAID 安装mdadm来进行管理
查看磁盘情况sudo fdisk -l与df -h,如果是之前就已经配置好的RAID1想要恢复:
1 mdadm --create /dev/md0 --level=raid1 --raid-devices=2 /dev/sdb2 /dev/sdc2
查看当前RAID情况cat /proc/mdstat
也可以使用sudo mdadm --detail --scan
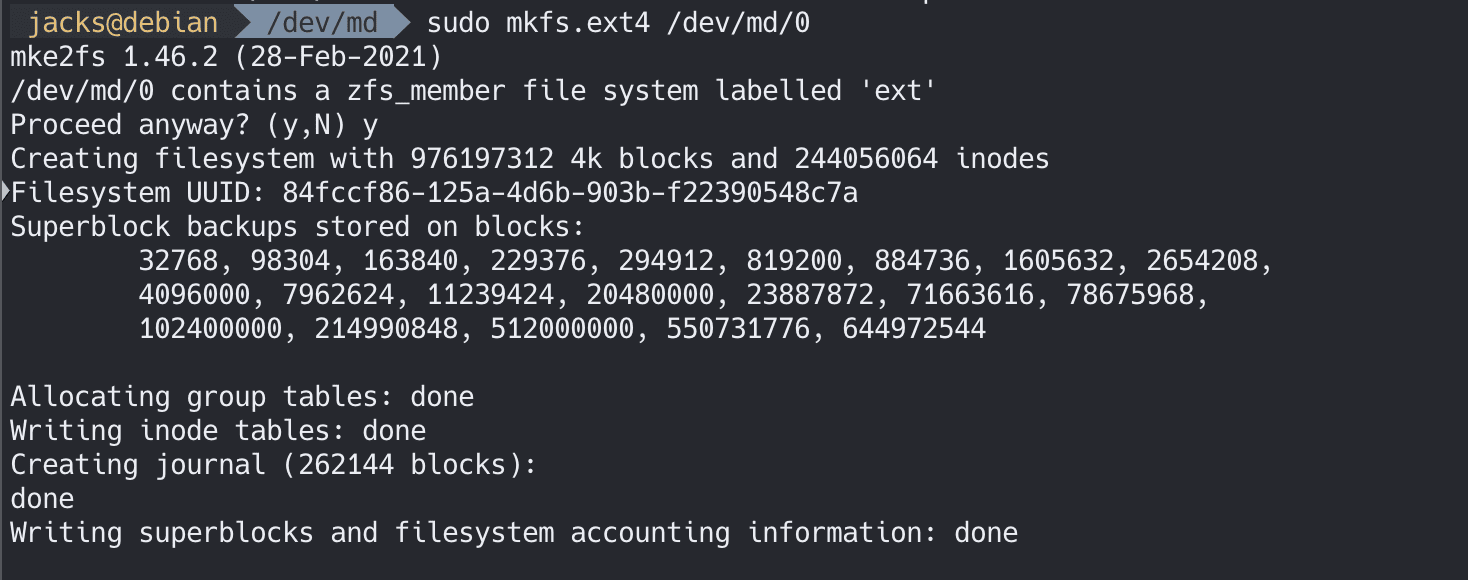
如果是首次,不是恢复,还需要对RAID格式化:
1 sudo mkfs.ext4 /dev/md/0
挂载RAID 创建要挂载的目录
挂载上
1 sudo mount -t ext4 /dev/md/0 /mnt/dev
开机自动挂载,可以参照这个教程 ,使用mdadm来进行操作(这样在关机以及一些系统性操作的时候也会自动关联):
1 2 3 sudo mdadm --detail --scan | sudo tee -a /etc/mdadm/mdadm.confecho '/dev/md0 /mnt/md0 ext4 defaults,nofail,discard 0 0' | sudo tee -a /etc/fstab
IV. Docker与服务 基础配置 参照这个官方教程 就挺好了,不过我记得我就直接这样安装也行:
1 2 sudo apt-get install docker
服务配置 我习惯于用docker-compose管理,这里就简单做两个案例,配置一个ddns-go与traefik
配置Docker-Compose 我们用traefik进行反向代理
先创建一个虚拟网络traefik_net,让相关的服务的网络流量能够被traefik探知:
1 sudo docker network create traefik_net
找一个随意的可以存放docker-compose配置的目录,创建.env文件,添加下你后续想要反向代理用到的域名,以及这个网络名称:
1 2 MY_DOMAIN =yourdomain.comDEFAULT_NETWORK =traefik_net
在docker-compose.yml下添加如下(这里留意这个文件可以放在任意你想放的地方,只是docker-compose指令执行的时候直接在这个目录下可以直接找到比较方便点):
1 2 3 4 5 6 7 8 9 10 11 12 13 14 15 16 17 18 19 20 21 22 23 24 25 26 27 28 29 30 31 32 33 version: "3.7" "8000:80" "5533:443" "8080:8080" /var/ run/docker.sock:/ var/run/ docker.sock:ro/opt/ traefik/certificates:/ opt/traefik/ certificates:ro/opt/ traefik/traefik.yml:/ traefik.yml:ro/opt/ traefik/config.yml:/ etc/traefik/ dynamic_conf/conf.yml:ro"9876" /dev/ opt/ddns-go:/ root"traefik.enable=true" "traefik.http.routers.ddns-go.rule=Host(`ddns.$MY_DOMAIN`)" "traefik.http.routers.ddns-go.entrypoints=websecure" "traefik.http.routers.ddns-go.tls=true" $DEFAULT_NETWORK
这里说明下,最终我需要通过https://traefik.yourdomain.com:5533访问到Traefik,ddns也同理。另外我的所有的配置都放在/opt中。这里的8080端口是访问DashBoard的
防火墙允许访问:
1
2
sudo ufw allow 5533 sudo ufw allow 8080
Traefik与DDNS配置 需要留意的是我使用的是Traefik V2版本,与V1版本的配置互不兼容,相关教程也可以参考这里 。
在/opt/traefik/traefik.yml(这个目录在前面的docker-compose中映射为了该服务的配置了)中编辑如下:
1 2 3 4 5 6 7 8 9 10 11 12 13 14 15 16 17 18 19 20 21 22 23 24 25 log: level: INFO api: insecure: true dashboard: true entryPoints: web: address: ":80" websecure: address: ":443" providers: docker: endpoint: "unix:///var/run/docker.sock" exposedByDefault: false file: directory: "/etc/traefik/dynamic_conf" tls: certificates: - certFile: /opt/traefik/certificates/wildcard.crt keyFile: /opt/traefik/certificates/wildcard.key
然后在/opt/traefik/config.yml(这个路径已经在docker-compose中映射为/etc/traefik/dynamic_conf/config.yml为其文件providers)添加如下:
1 2 3 4 5 6 7 8 9 10 11 12 13 14 15 16 17 18 tls: certificates: - certFile: /opt/traefik/certificates/wildcard.crt keyFile: /opt/traefik/certificates/wildcard.key http: routers: traefik: entryPoints: websecure rule: "Host(`traefik.yourdomain.com`)" tls: true service: traefik services: traefik: loadBalancer: servers: - url: "http://<your_local_ip>:8080" passHostHeader: true
这里如果不清楚your_local_ip是多少,就直接ip a查看下,这里主要就一方面是指定证书地址,另外一个就是配置 https://traefik.yourdomain.com:5533 直接访问Traefik的Dashboard。另外这里也就只是一个案例,后续你可以基于这个为各类ip端口访问做反向代理。
ddns不用配置,默认跑起来后会在我们配置的映射目录/opt/ddns下生成.ddns_go_config.yaml描述文件。
跑起服务 这就比较简单了,到docker-compose.yml所在目录,执行:
1 sudo docker-compose up -d
常用指令 查看traefik日志
1 sudo docker-compose logs traefik
重启traefik服务
1 sudo docker-compose restart traefik
开启整体服务并后台运行(如果没有-d就直接当前指令运行可以实时看日志)
1 sudo docker-compose up -d
关闭整体服务
1 sudo docker-compose down
升级Docker(我们以Plex为例子)
1 2 sudo docker-compose -f ./docker-compose.yml pull plex
V. PVE虚拟机与配置 官网的教程 也没有大错但是有点小问题,整体我们会以这个教程 为主,然后修复下里面的一些小问题
准备工作 必要的系统升级 1 2 sudo apt -y update && sudo apt -y upgrade
设置Proxmox服务域名确保本地访问 这个一定要做 ,否则后面安装会各种提示连接不上
我们假设你的主机名是debian,你的域名是debian.yourdomain.com,你debian系统的ip是<your_local_ip>(这个是局域网的IP如10.0.0.57)。
先通过sudo -i切换到root账户下
设置hostname:
1 sudo hostnamectl set-hostname debian.yourdomain --static
/etc/hosts要添加确保本地能访问:
1 2 3 4 5 6 7 127.0.0.1 localhost
添加相关源 1 2 3 4 5 6 7 8 9 10 echo "deb http://download.proxmox.com/debian/pve bullseye pve-no-subscription" | sudo tee /etc/apt/sources.list.d/pve-install-repo.listmv proxmox-release-bullseye.gpg /etc/apt/trusted.gpg.d/proxmox-release-bullseye.gpgchmod +r /etc/apt/trusted.gpg.d/proxmox-release-bullseye.gpgecho "deb http://download.proxmox.com/debian/ceph-pacific bullseye main" | sudo tee /etc/apt/sources.list.d/ceph.list
安装PVE 1 2 sudo apt update
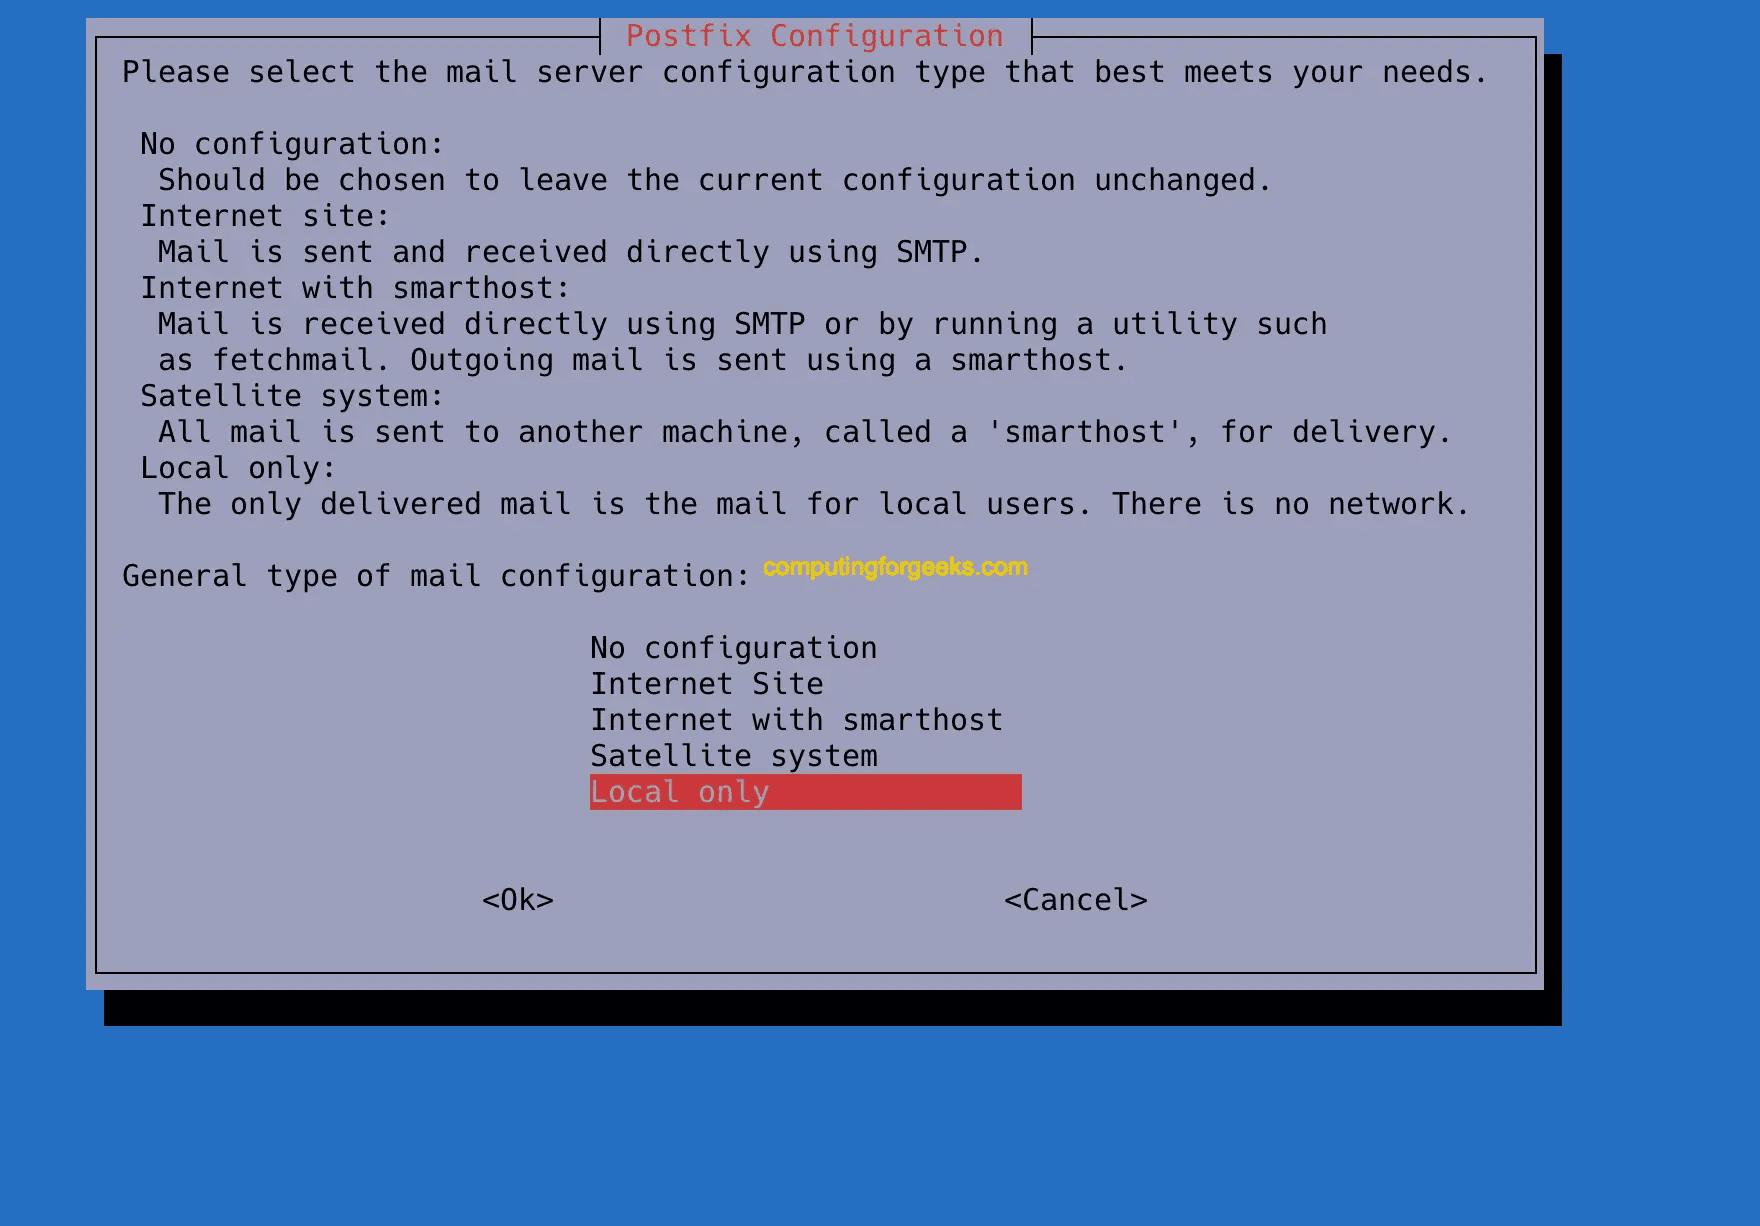
安装过程中提示邮箱服务,如果你debian系统中没有安装没有,就直接选择Local only即可:
过程提示的系统邮箱域名,直接使用前面提到的debian.yourdomain.com即可。
安装完成后重启系统
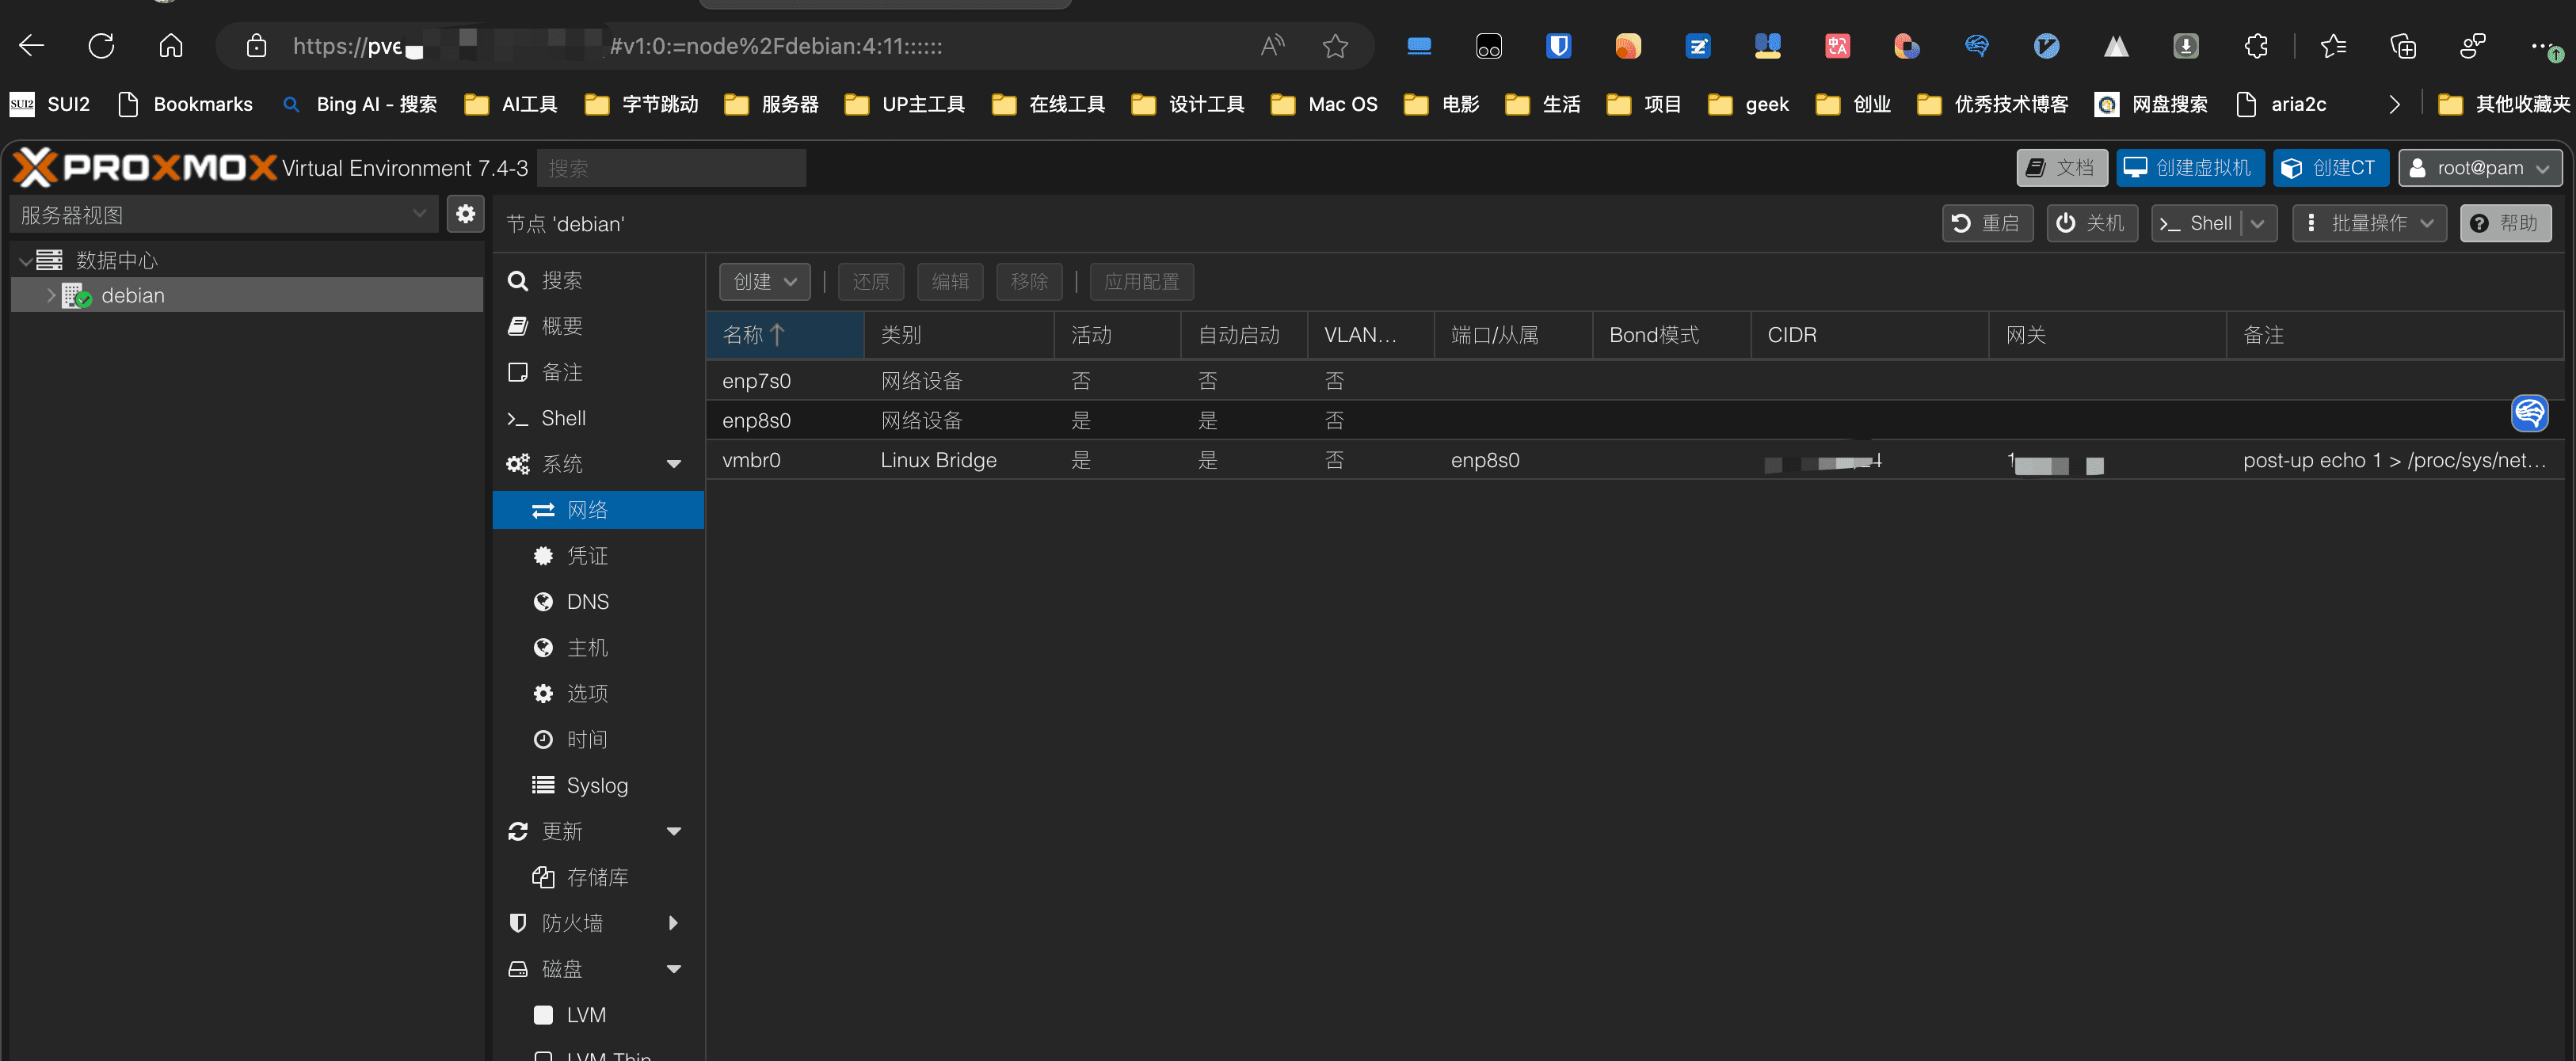
重启后,留意会因为/etc/network/interfaces被修改导致网络无法访问,我们顺便添加一个桥接,从Recovery模式进去,然后编辑/etc/network/interfaces修改成:
1 2 3 4 5 6 7 8 9 10 11 12 13 14 15 16 17 18 19 20 21 22 23 24 25 26 27 28 29 source /etc/network/interfaces.d/*
这里我说明下<your_local_ip>替换成你之前debian的局域网中的ip,<your_gateway>换成你的gateway(大多数情况下是192.168.1.1),这里的vmbr0主要方便后面你创建虚拟机的时候可以对外网可访问。
至此重启可以正常访问网络,并且可以正常访问pve管理网页。
前端网页访问 重启后,检查端口8006,这个是默认的管理面板页面的访问端口,防火墙绕过下:
1 2 ss -tunelp | grep 8006
然后通过https://<your_local_ip>:8006就已经可以整访问了,具体如果域名反向代理,可以使用前面提到的Traefik去做到,这里就不赘述了。
另外需要留意的是,如果你是使用的Nvidia,PVE这边需要做下配置,参考PVE Nvidia教程 :
1 2 3 4 5 suecho "blacklist nouveau" >> /etc/modprobe.d/blacklist.conf
最后我们会发现安装完PVE后,执行sudo apt update总会有这样的错误:
这是因为需要添加PVE License,不过如果你没有License只是免费使用(免费使用已经可以使用大多数PVE的核心能力了),那么请编辑/etc/apt/sources.list.d/pve-enterprise.list,将这个付费license源注解掉即可:
1 #deb https://enterprise.proxmox.com/debian/pve buster pve-enterprise
PVE上安装Openwrt 整体可以考虑参照这个教程 就行,不过这个教程引导会有点小问题,跟着这个教程 就可以完美解决。
首先基本的配置,先准备好vmbr0,这个桥接的网络在前面安装好pve后已经做了说明,然后创建虚拟机整体配置除这里的硬盘外与这个一致即可,前面一步一步的配置随便配置也行,配置完都可以修改,实在不清楚可以参看这个教程 。
配置完后可以先将原本的默认的硬盘分离+删除了,方便接下来写入一个新的openwrt。
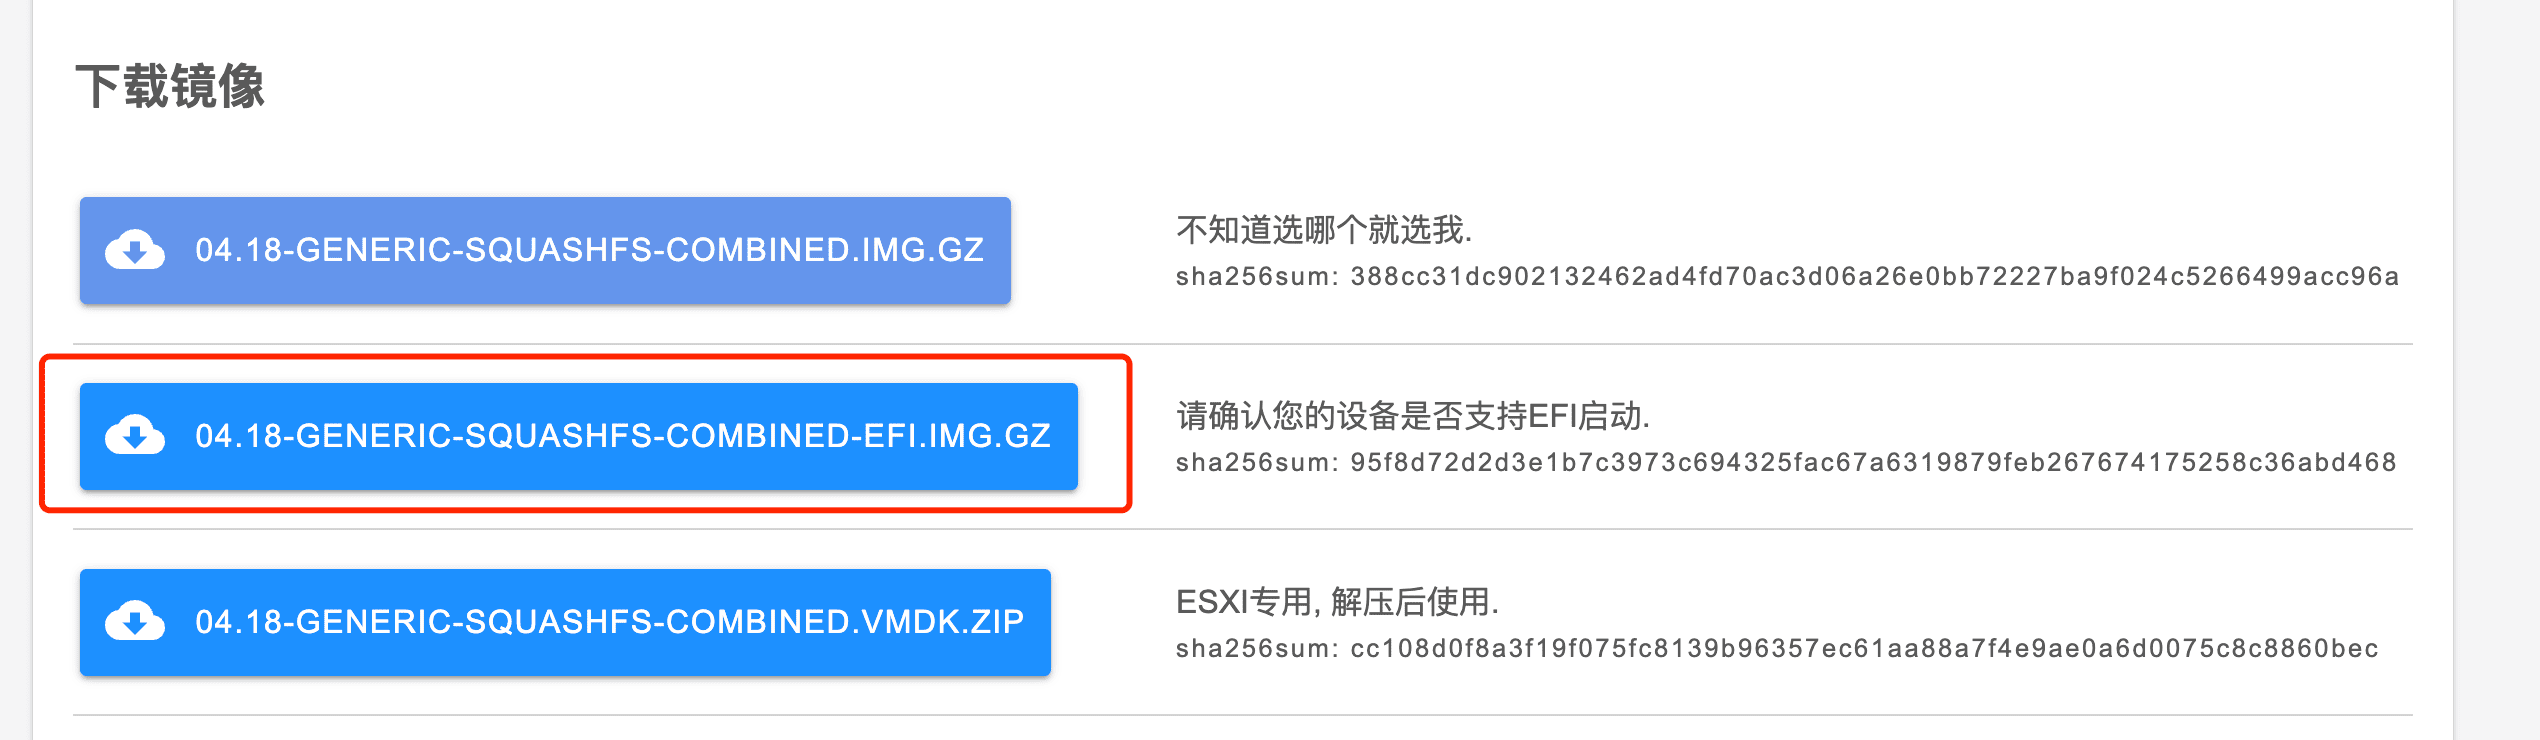
然后下载openwrt固件,下载这里我们下载K9的,可以直接在 这里 下载
选择EFI启动的固件,然后用gunzip解压缩
1 gunzip openwrt-04.18.2023-x86-64-generic-squashfs-combined-efi.img.gz
写入指令
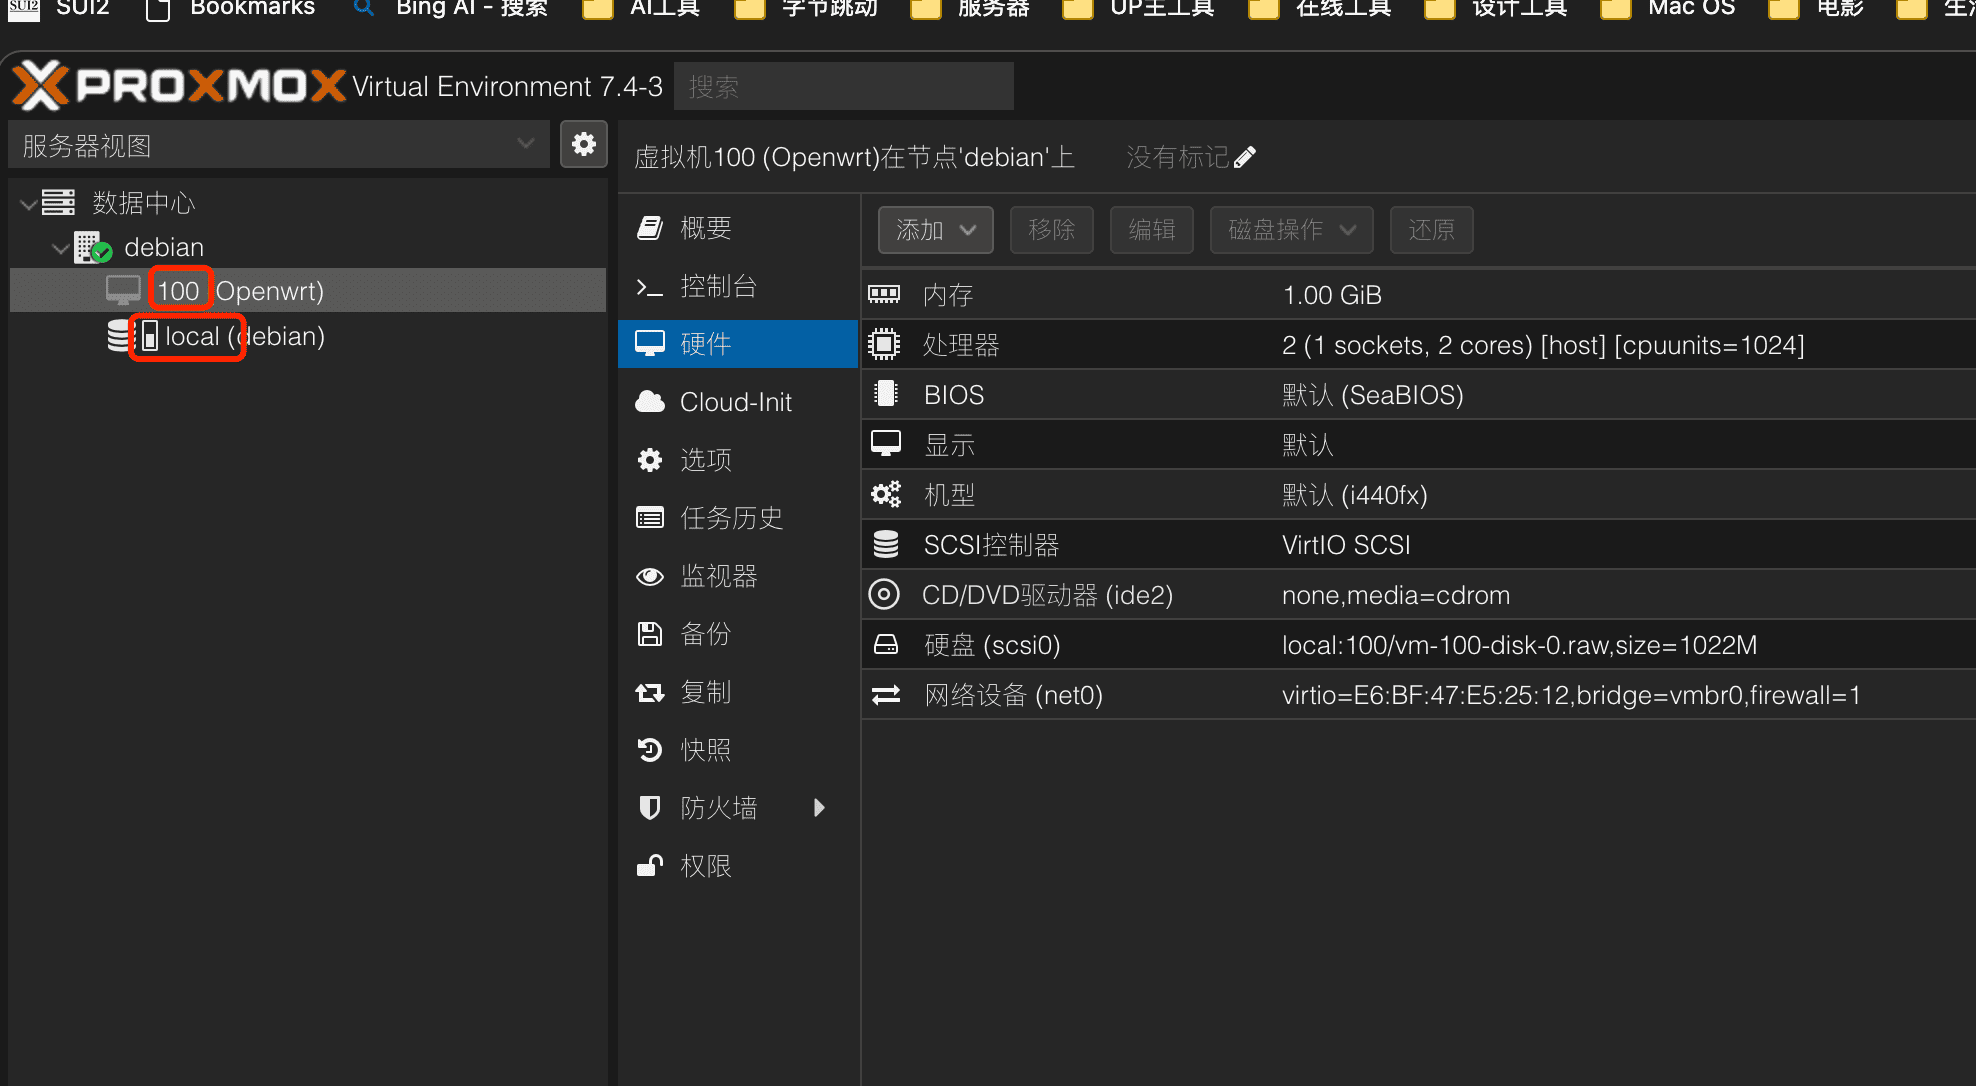
1 sudo qm importdisk 100 openwrt-04.18.2023-x86-64-generic-squashfs-combined-efi.img local
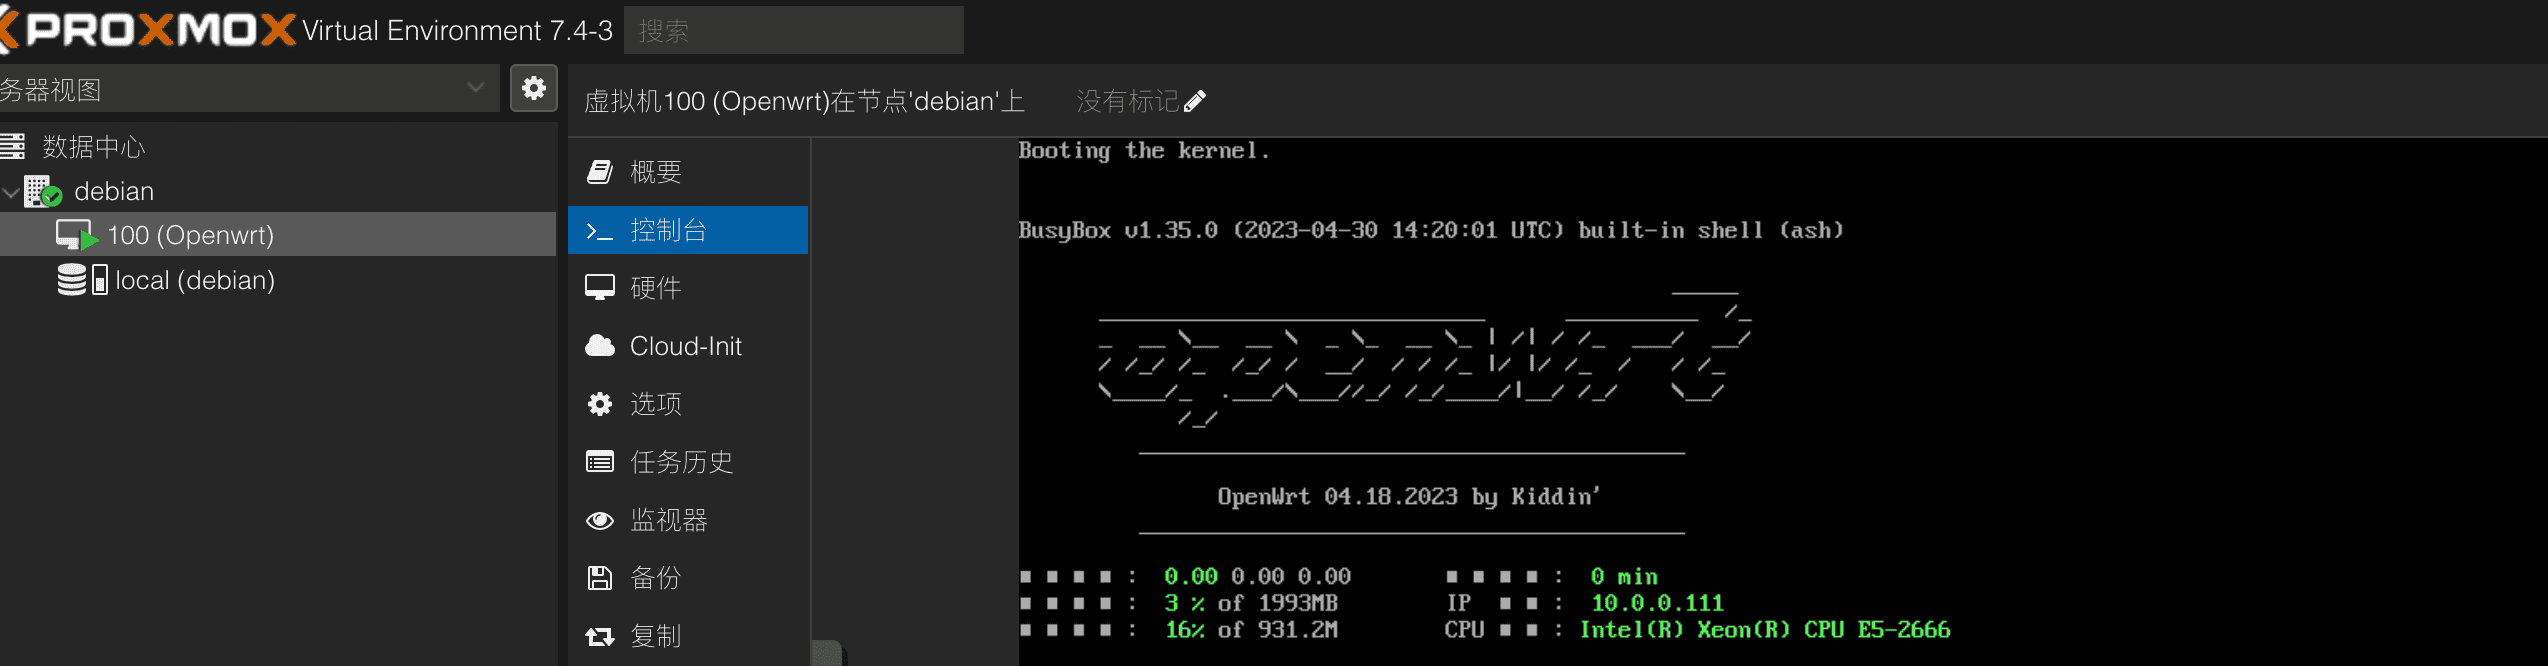
这里的100是虚拟机的id,local是存储名,分别可以在前端页面找到:
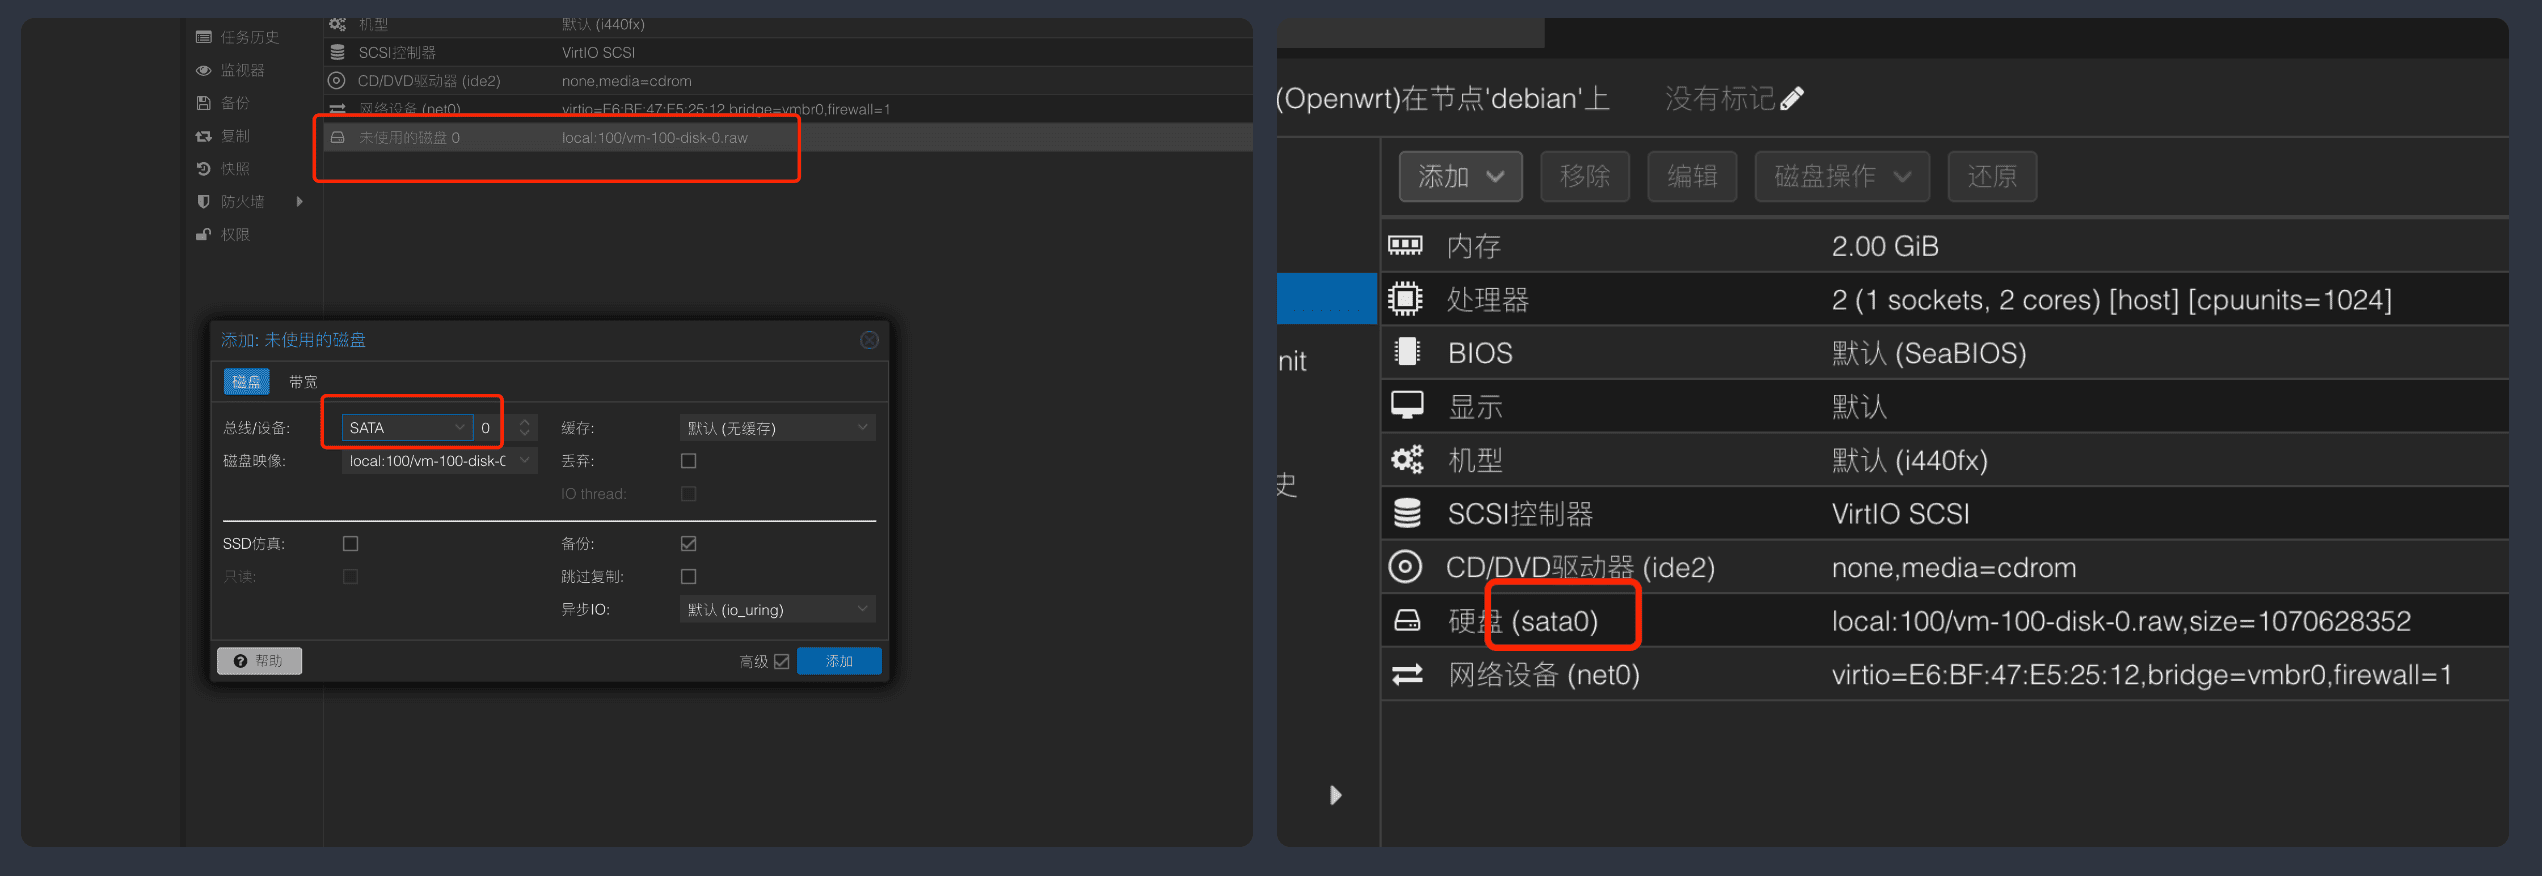
完成后,这里会出现一个新的硬盘,点击后修改为STATA即可,最后的状态如下:
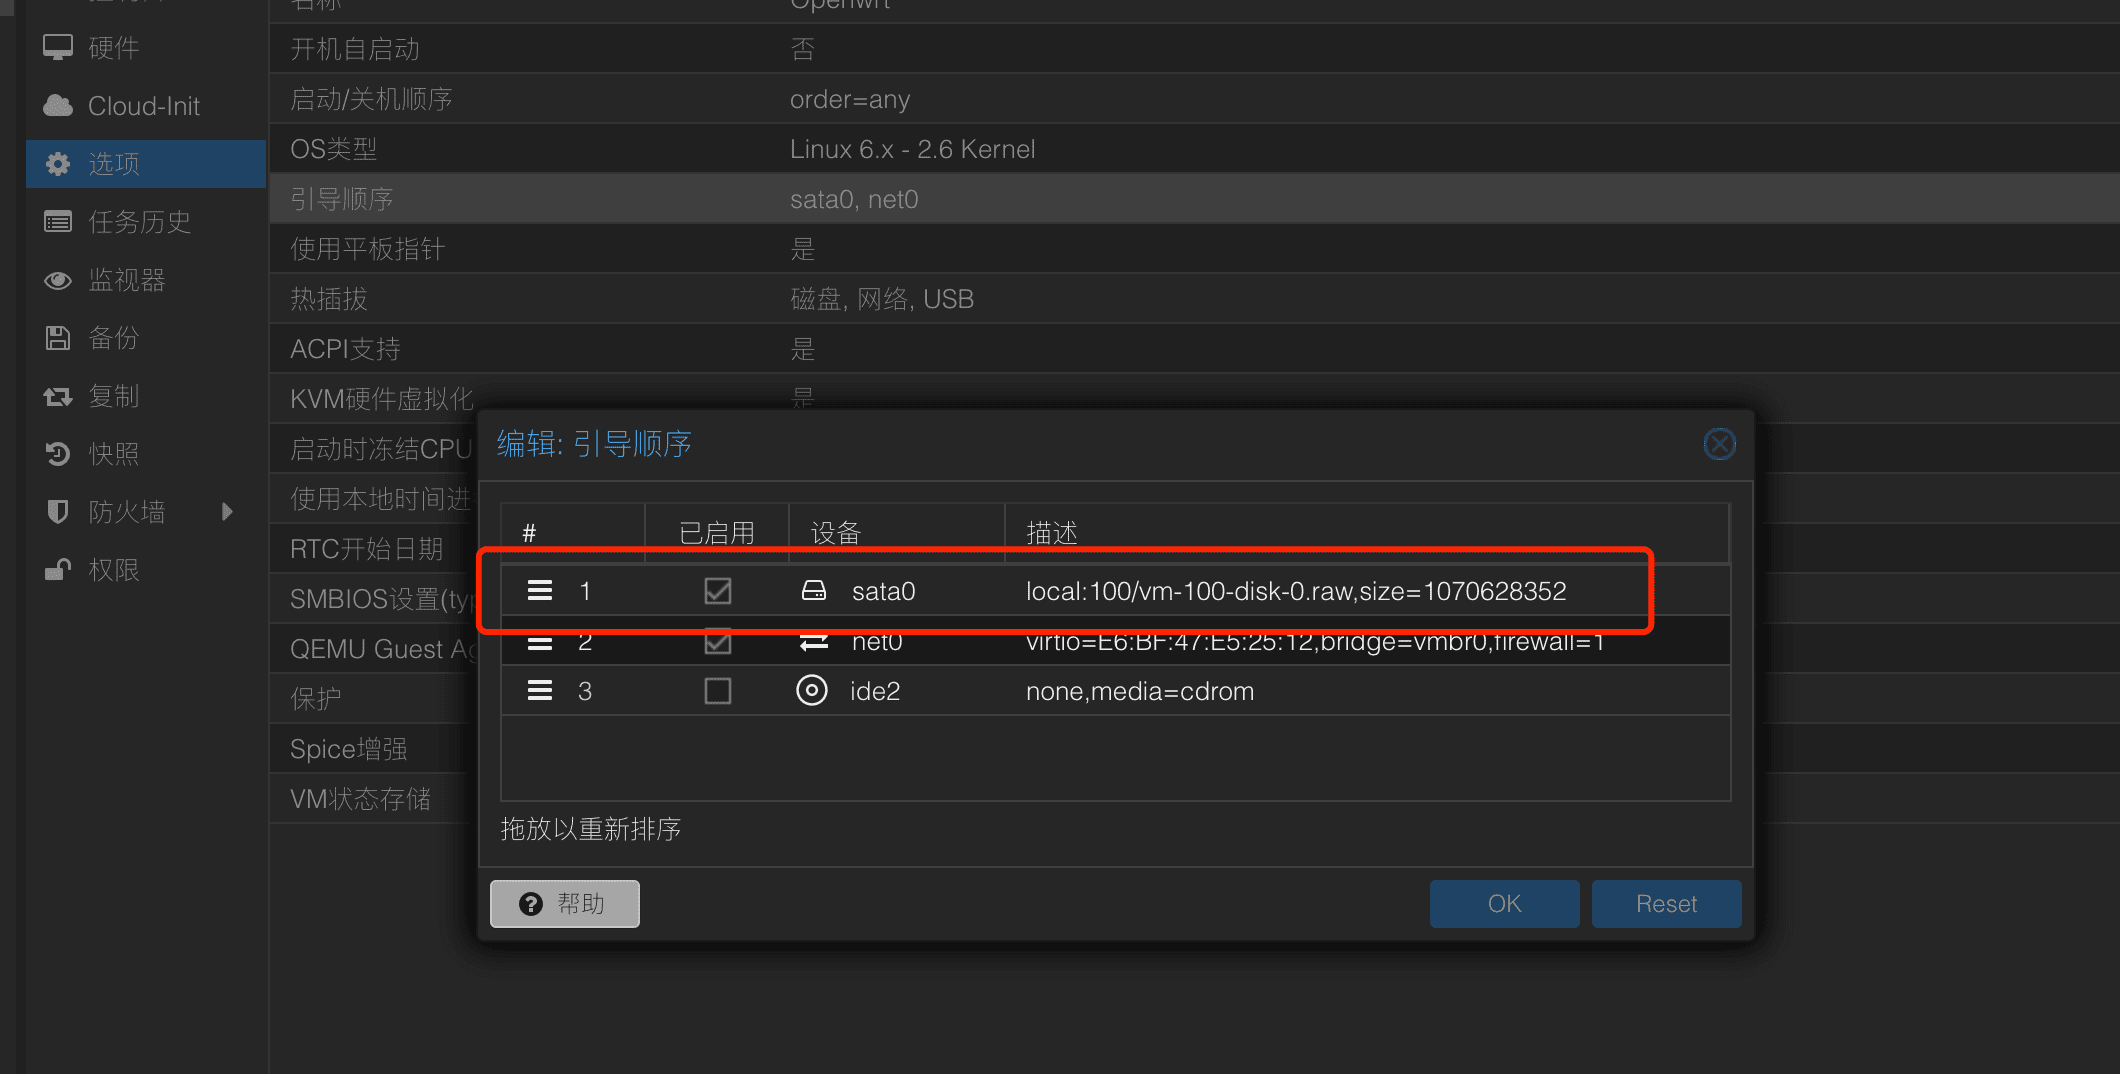
然后将开机引导调整为sata0即可
至此已经安装完成
PVE上安装iKuai 基本上参照这个教程 即可
设置直通 先编辑Linux系统的引导加载器GRUB:
1 sudo nvim /etc/default/grub
找到 GRUB_CMDLINE_LINUX_DEFAULT="quiet",修改为 GRUB_CMDLINE_LINUX_DEFAULT="quiet intel_iommu=on",开启Intel CPU的IOMMU功能,这样可以让虚拟机直接访问物理设备,比如显卡网卡,保存退出后执行update-grub
然后编辑modules确保启动时相关内核模块有被加载
添加以下几行确保启动时PCI的一些设备能被虚拟机识别到:
1 2 3 4 vfio_iommu_type1 vfio_pci vfio_ virqfd
执行 : update-initramfs -u -k all. 然后reboot 重启PVE。
安装ikuai 先从iKuai官方 下载64位ISO文件,然后上传到local上:
创建的时候,由于是64位,需要配置4096M内存,CPU 4核,硬盘1-8G,其他默认即可。
然后通过添加PCI设备,添加WAN口网卡即可:
如我的WAN口是这个千兆的网口:
其余的就根据正常的iKuai安装方法安装即可,当然也可以参考这个教程 。
VI. VNC与远程桌面访问 这里我比较推荐tigervnc,其他的我也用过,不过这里我觉得tigervnc就够用了,所以就不赘述其他的了。
tigervnc是基于tightvnc进行安全以及各方面延伸后的一个VNC工具。
安装 1 2 3 sudo apt-get install tigervnc-standalone-server tigervnc-common
防火墙配置,这里假如说后面是:1屏幕端口就是5901,:2就是5902以此类推,防火墙都要留意配置好。
1 sudo ufw allow from any to any port 5901 proto tcp
支持xfce4桌面的VNC 可以参考这个教程
安装相关桌面
1 sudo apt install xfce4 xfce4-goodies dbus-x11 -y
配置~/.vnc/xstartup:
1 2 3 4 #!/bin/sh unset SESSION_MANAGERunset DBUS_SESSION_BUS_ADDRESSexec /bin/sh /etc/xdg/xfce4/xinitrc
然后启动:
这里简单提下,如果没有-localhost no本地访问以外的都会被拒绝。
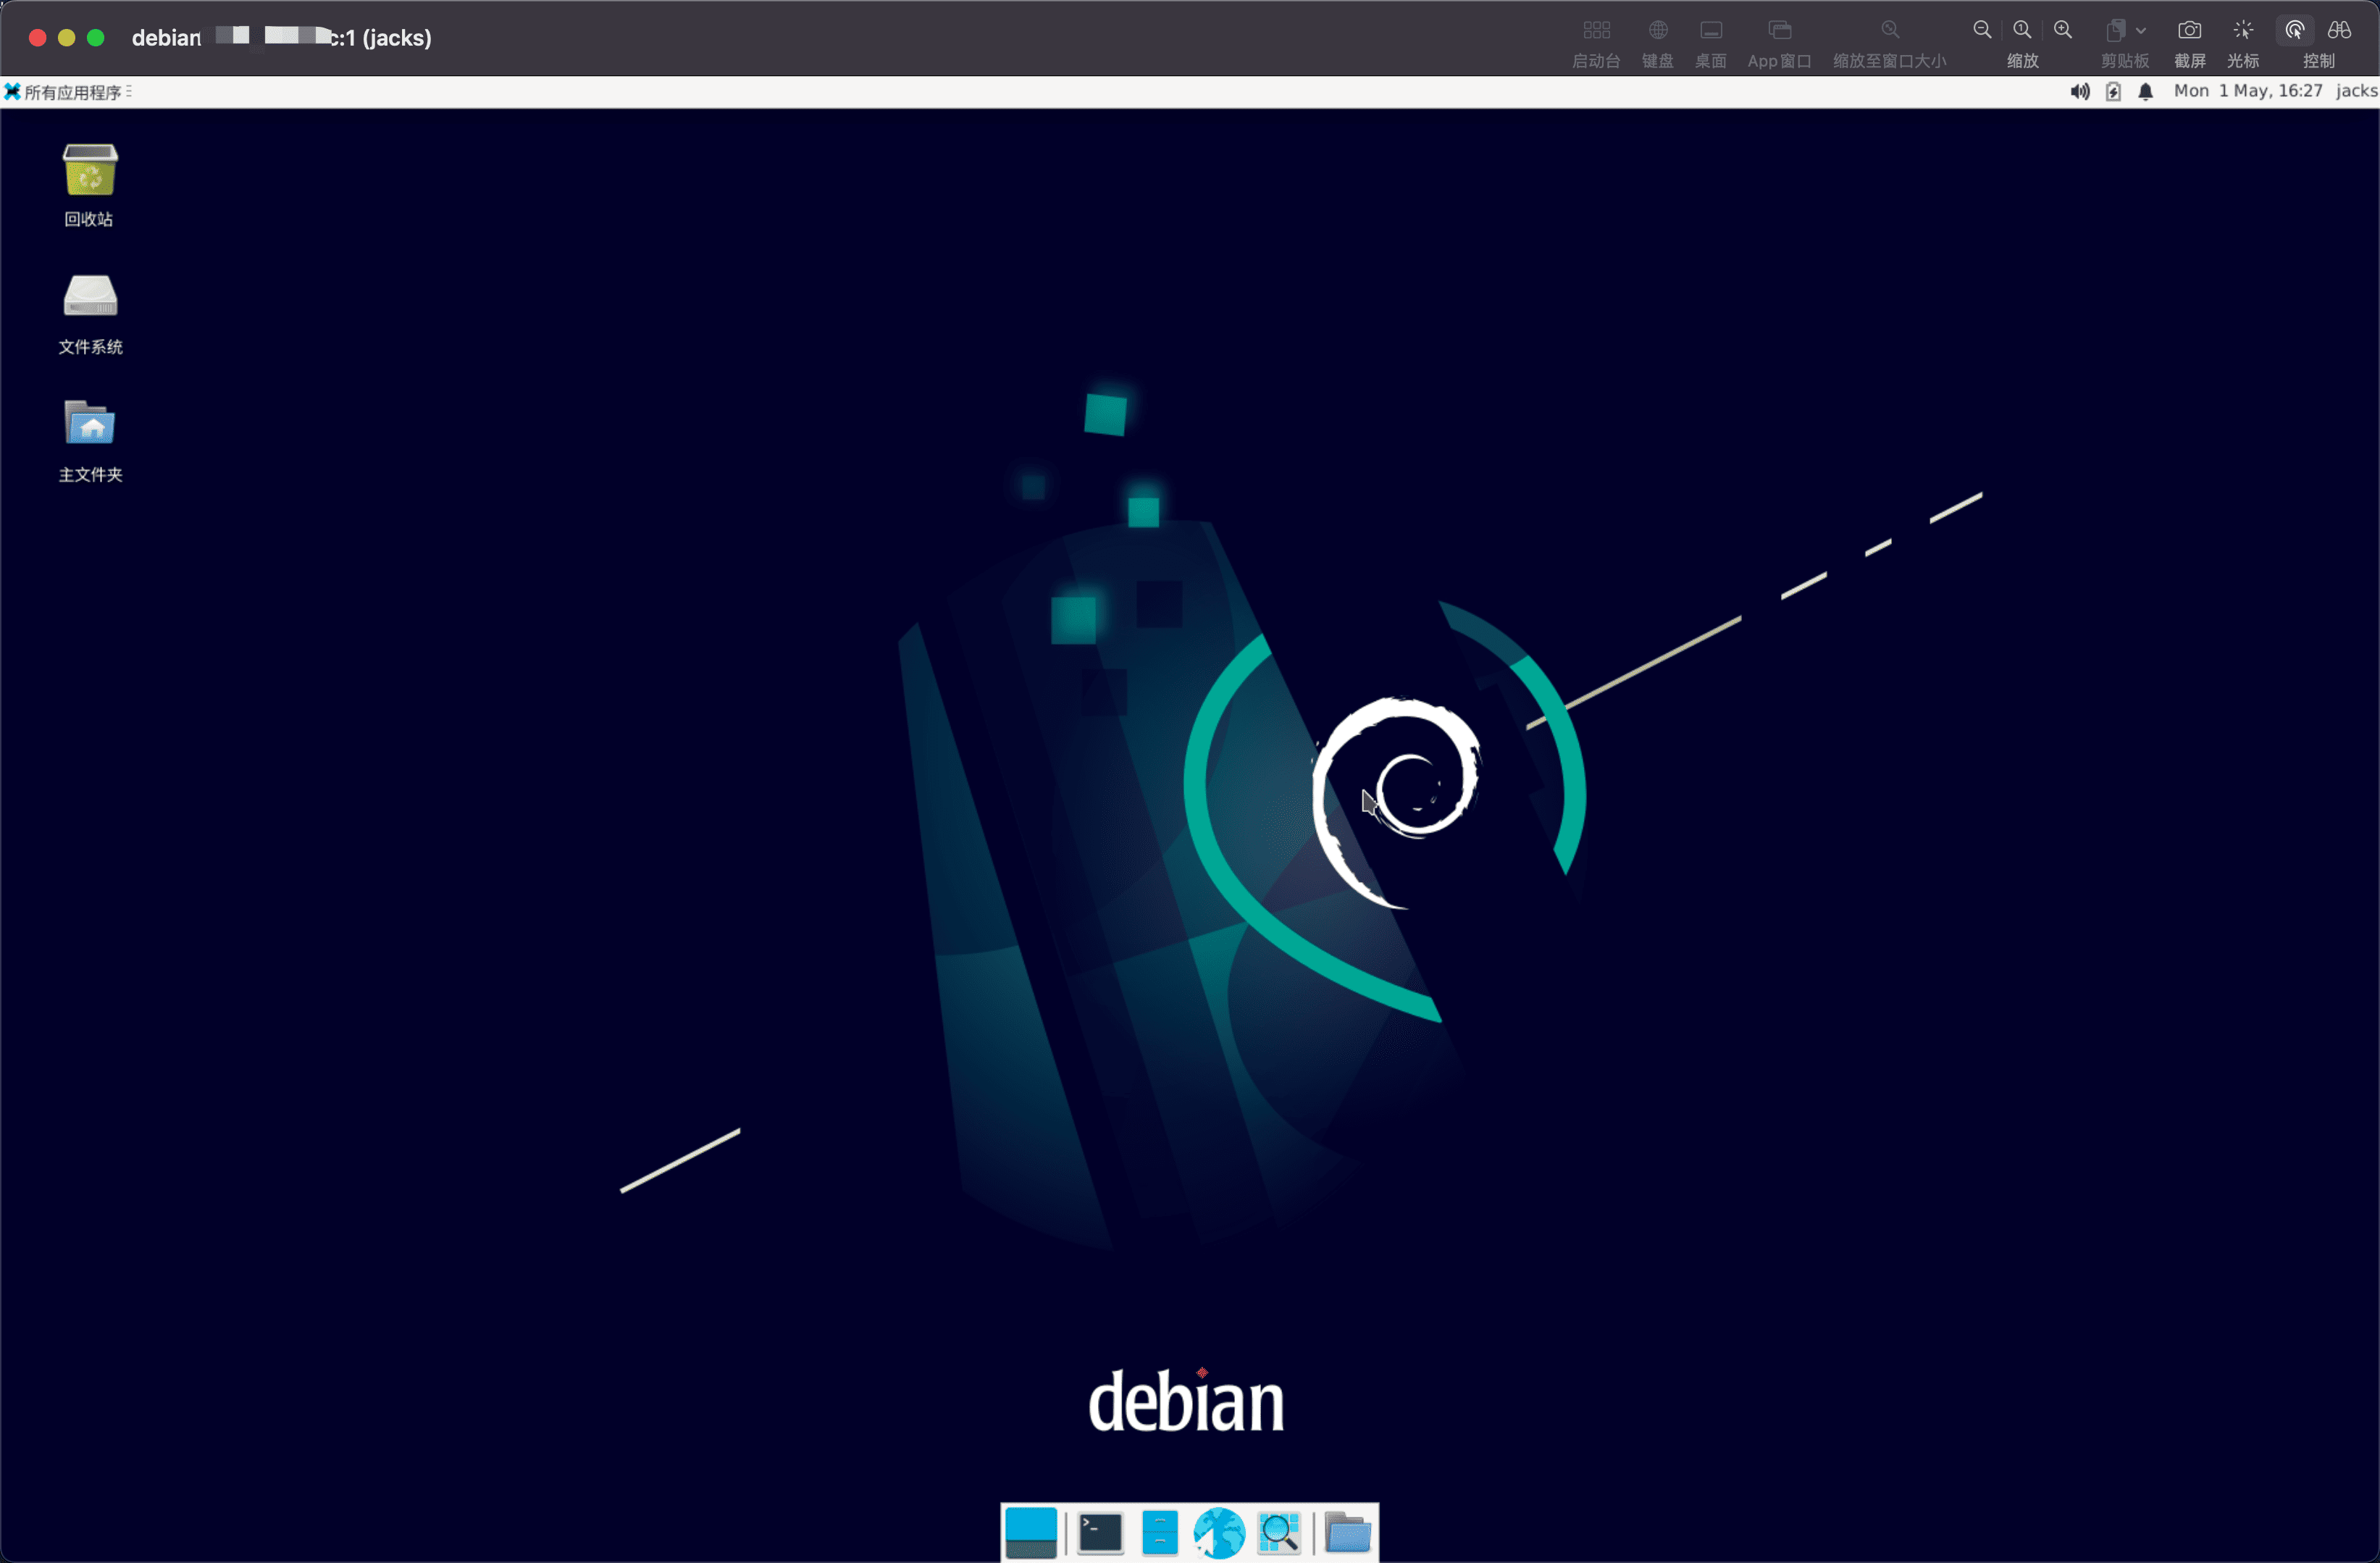
支持gnome桌面的VNC 安装相关桌面
1 sudo apt install task-gnome-desktop dbus-x11
由于这个不用怎么特殊配置,直接启动即可
1 vncserver -xstartup /usr/bin/gnome-session -localhost no
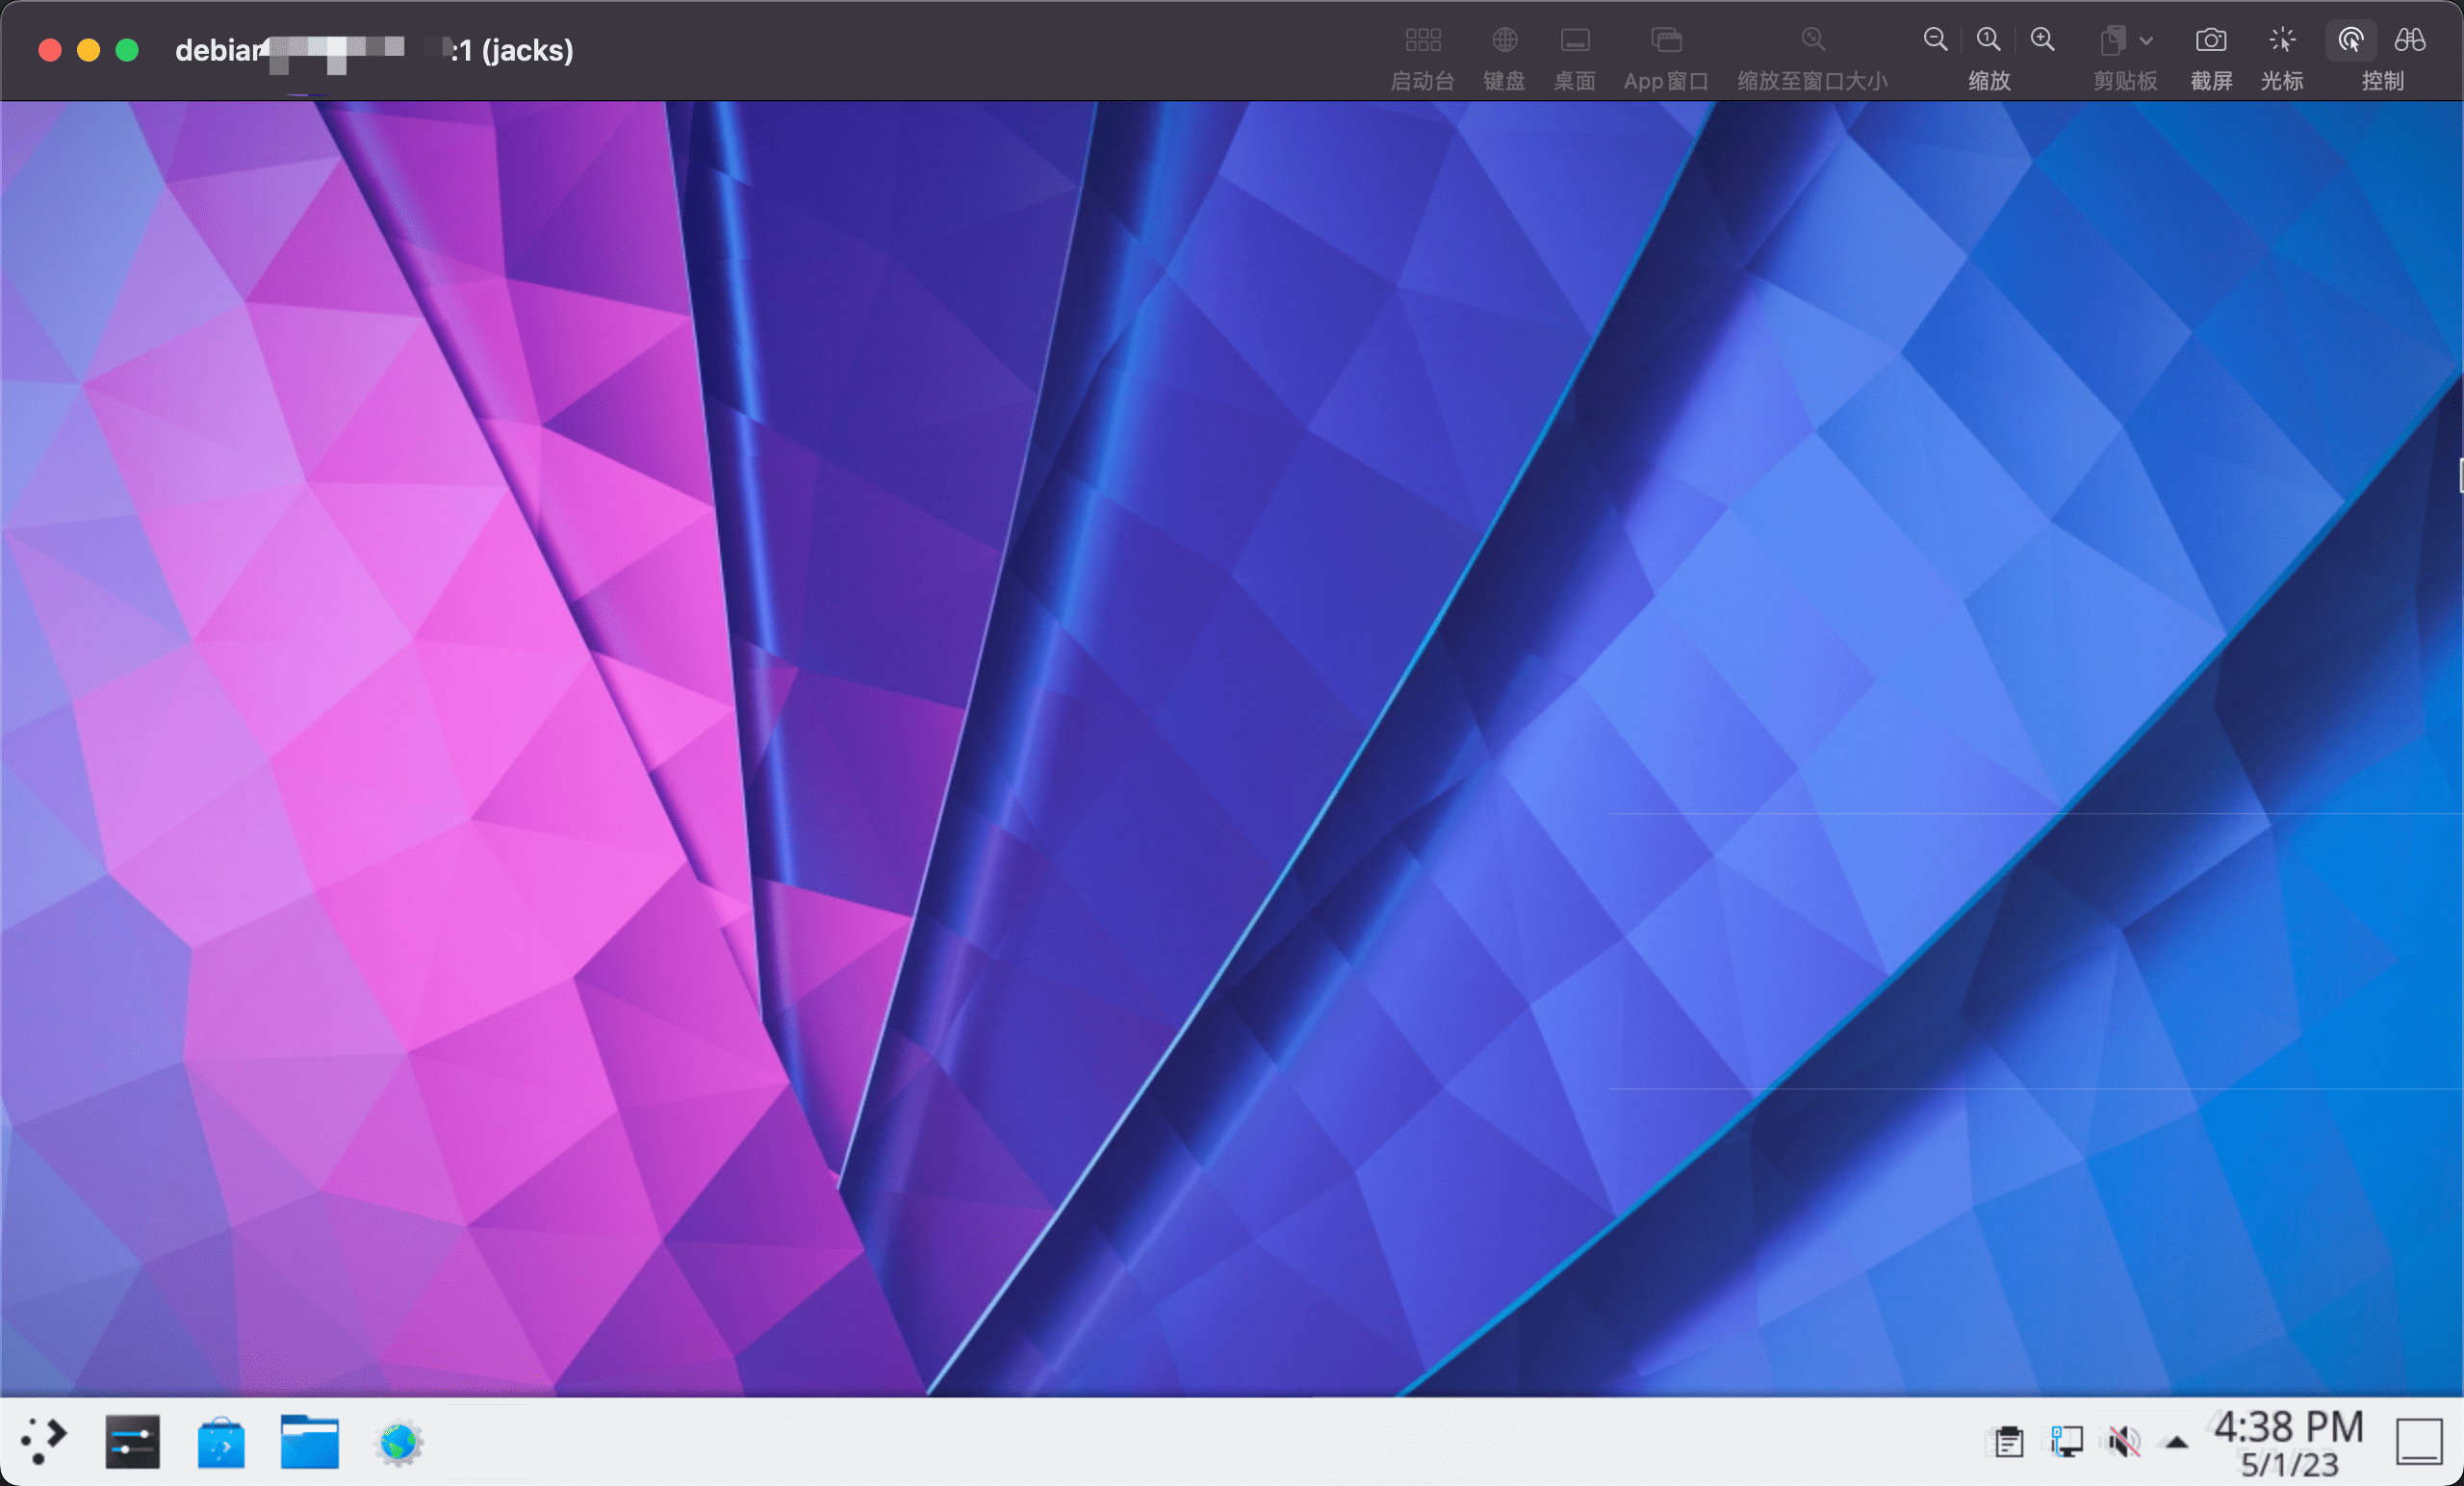
支持KDE桌面的VNC 参照这个教程
安装相关桌面
1 sudo apt install kde-plasma-desktop dbus-x11
配置~/.vnc/xstartup
1 2 3 4 5 6 7 8 9 10 11 12 13 14 15 16 17 18 19 20 21 #!/bin/sh if [ -z "$MODE " ]then export XKB_DEFAULT_RULES=base & export QT_XKB_CONFIG_ROOT=/usr/share/X11/xkb & fi
然后启动:
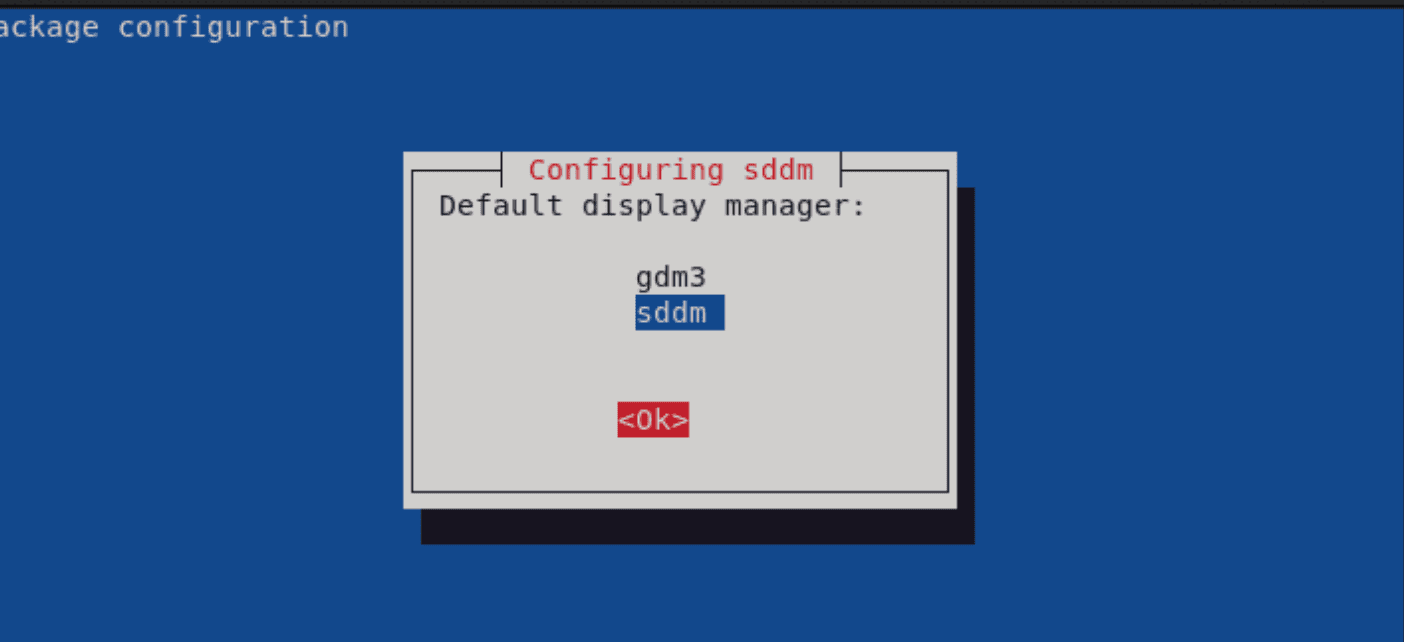
日常维护 检查当前是什么桌面:
切换默认显示管理器
1 sudo dpkg-reconfigure lightdm
检查当前有没有在跑的列表
关闭:1屏幕服务
VII. 驱动 网卡 参考这个 教程也可以
检查网卡型号:
1 lspci | grep -i ethernet
比如我这个RTL8125B的驱动,可以参考这个 ,留意如果正在用到这个网卡,需要本地物理机接入进去更新。
在这里 下载2.5G Ethernet LINUX driver r8125 for kernel up to 5.19这个驱动 解压缩后,执行目录下的autorun.sh后重启即可。 特别注意如果执行autorun.sh的时候遇到问题,可以尝试先用sudo apt install linux-headers-4.19.0-20-amd64安装前置编译依赖后再试。这里的4.19.0-20-amd64是根据报错提示的文件目录版本来决定的,比如我在一台Debian上安装就一直报/lib/modules/5.10.0-25-amd64/build 文件不存在的问题,这种情况下,我需要先到/etc/apt/sources.list添加对应包依赖:
1 2 deb http://ftp.de.debian.org/debian bullseye main
然后安装:
1 2 3 sudo apt update
搞定这一切后,再执行sudo bash autorun.sh虽然有一些警告,但是还是安装完成。
检测是否安装正确:
1 2 sudo apt install ethtool
显卡 官方说明参考这里
查看显卡型号
1 lspci -nn | egrep -i "3d|display|vga"
我是Nvidia的显卡,可以参考这个 教程,留意源和文章开头提到的源保持一致,需要有non-free
1 2 3 sudo apt update
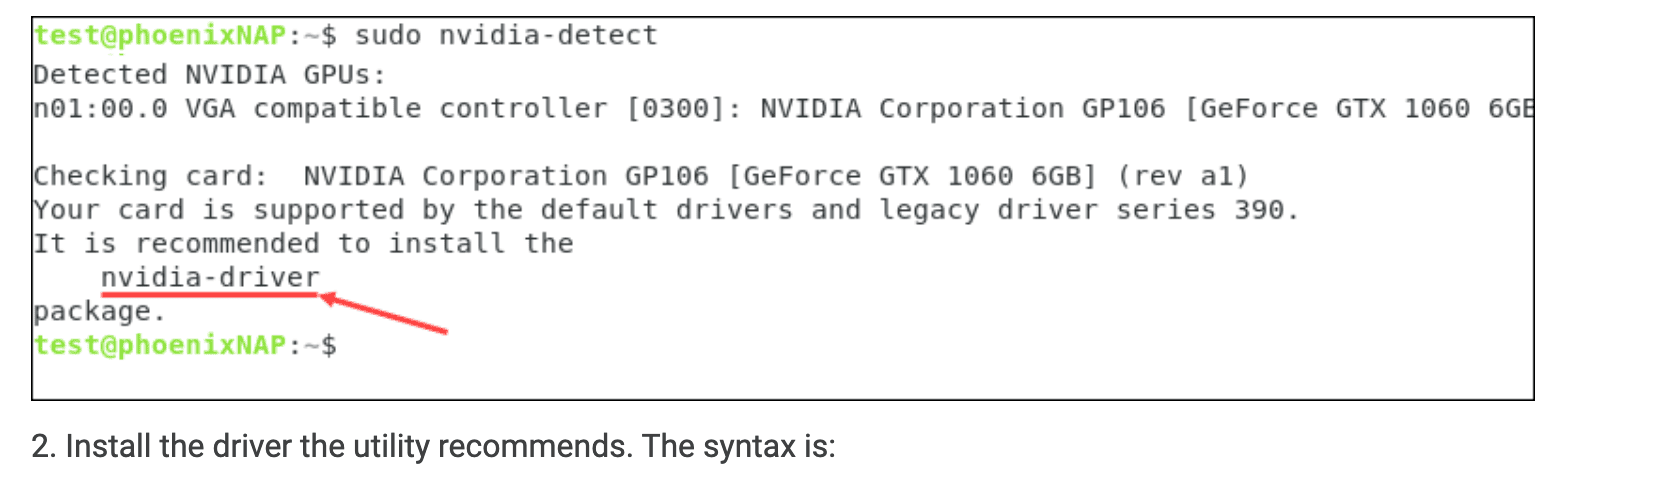
执行sudo apt install [driver name],通常如下:
1 2 3 sudo apt install nvidia-driver
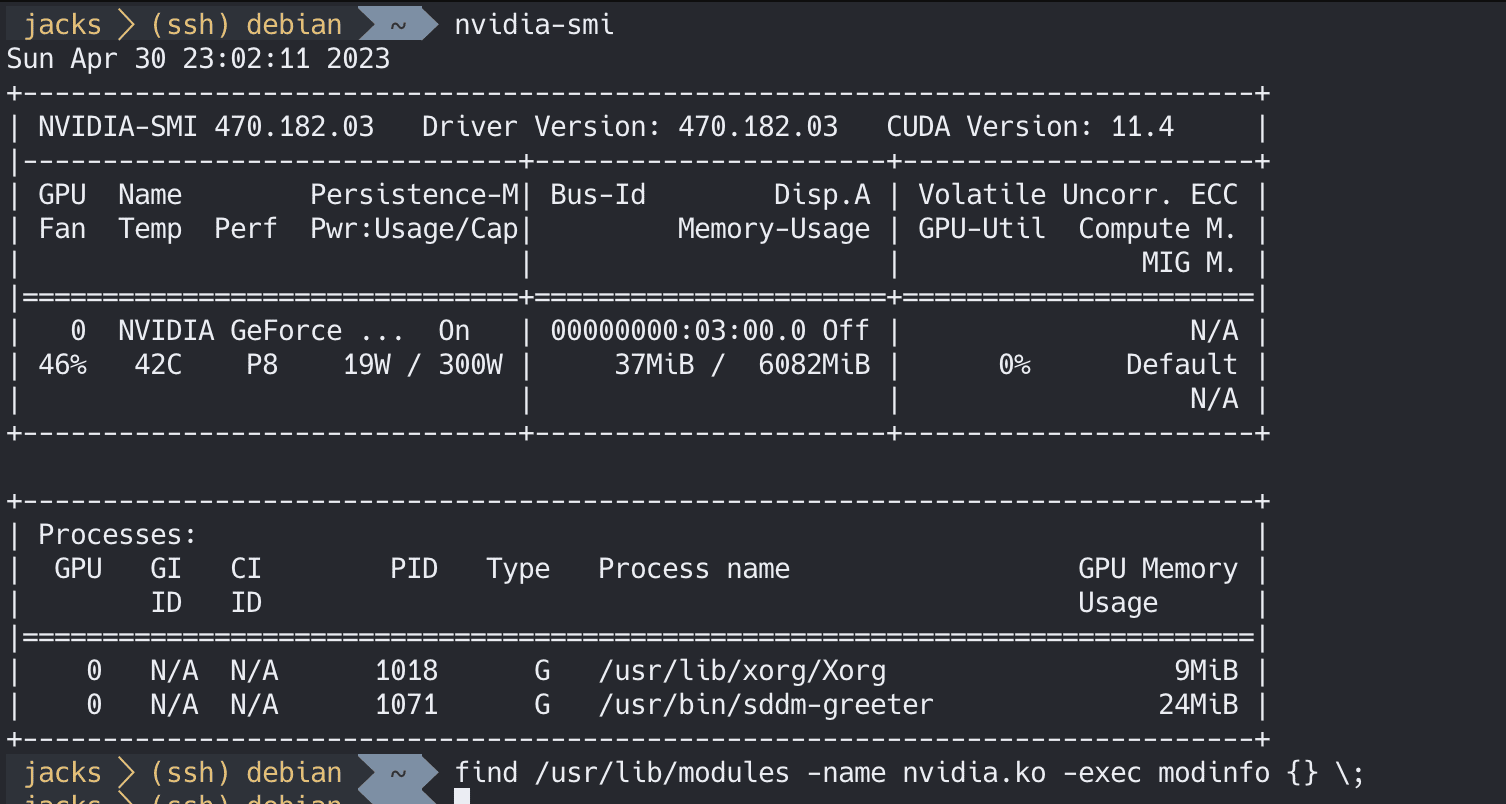
检查状态nvidia-smi
Docker里面支持Nvidia解码 可以参考这里的官方教程
设置软件包存储库:
1 2 3 4 5 distribution=$(. /etc/os-release;echo $ID$VERSION_ID ) \$distribution /libnvidia-container.list | \'s#deb https://#deb [signed-by=/usr/share/keyrings/nvidia-container-toolkit-keyring.gpg] https://#g' | \tee /etc/apt/sources.list.d/nvidia-container-toolkit.list
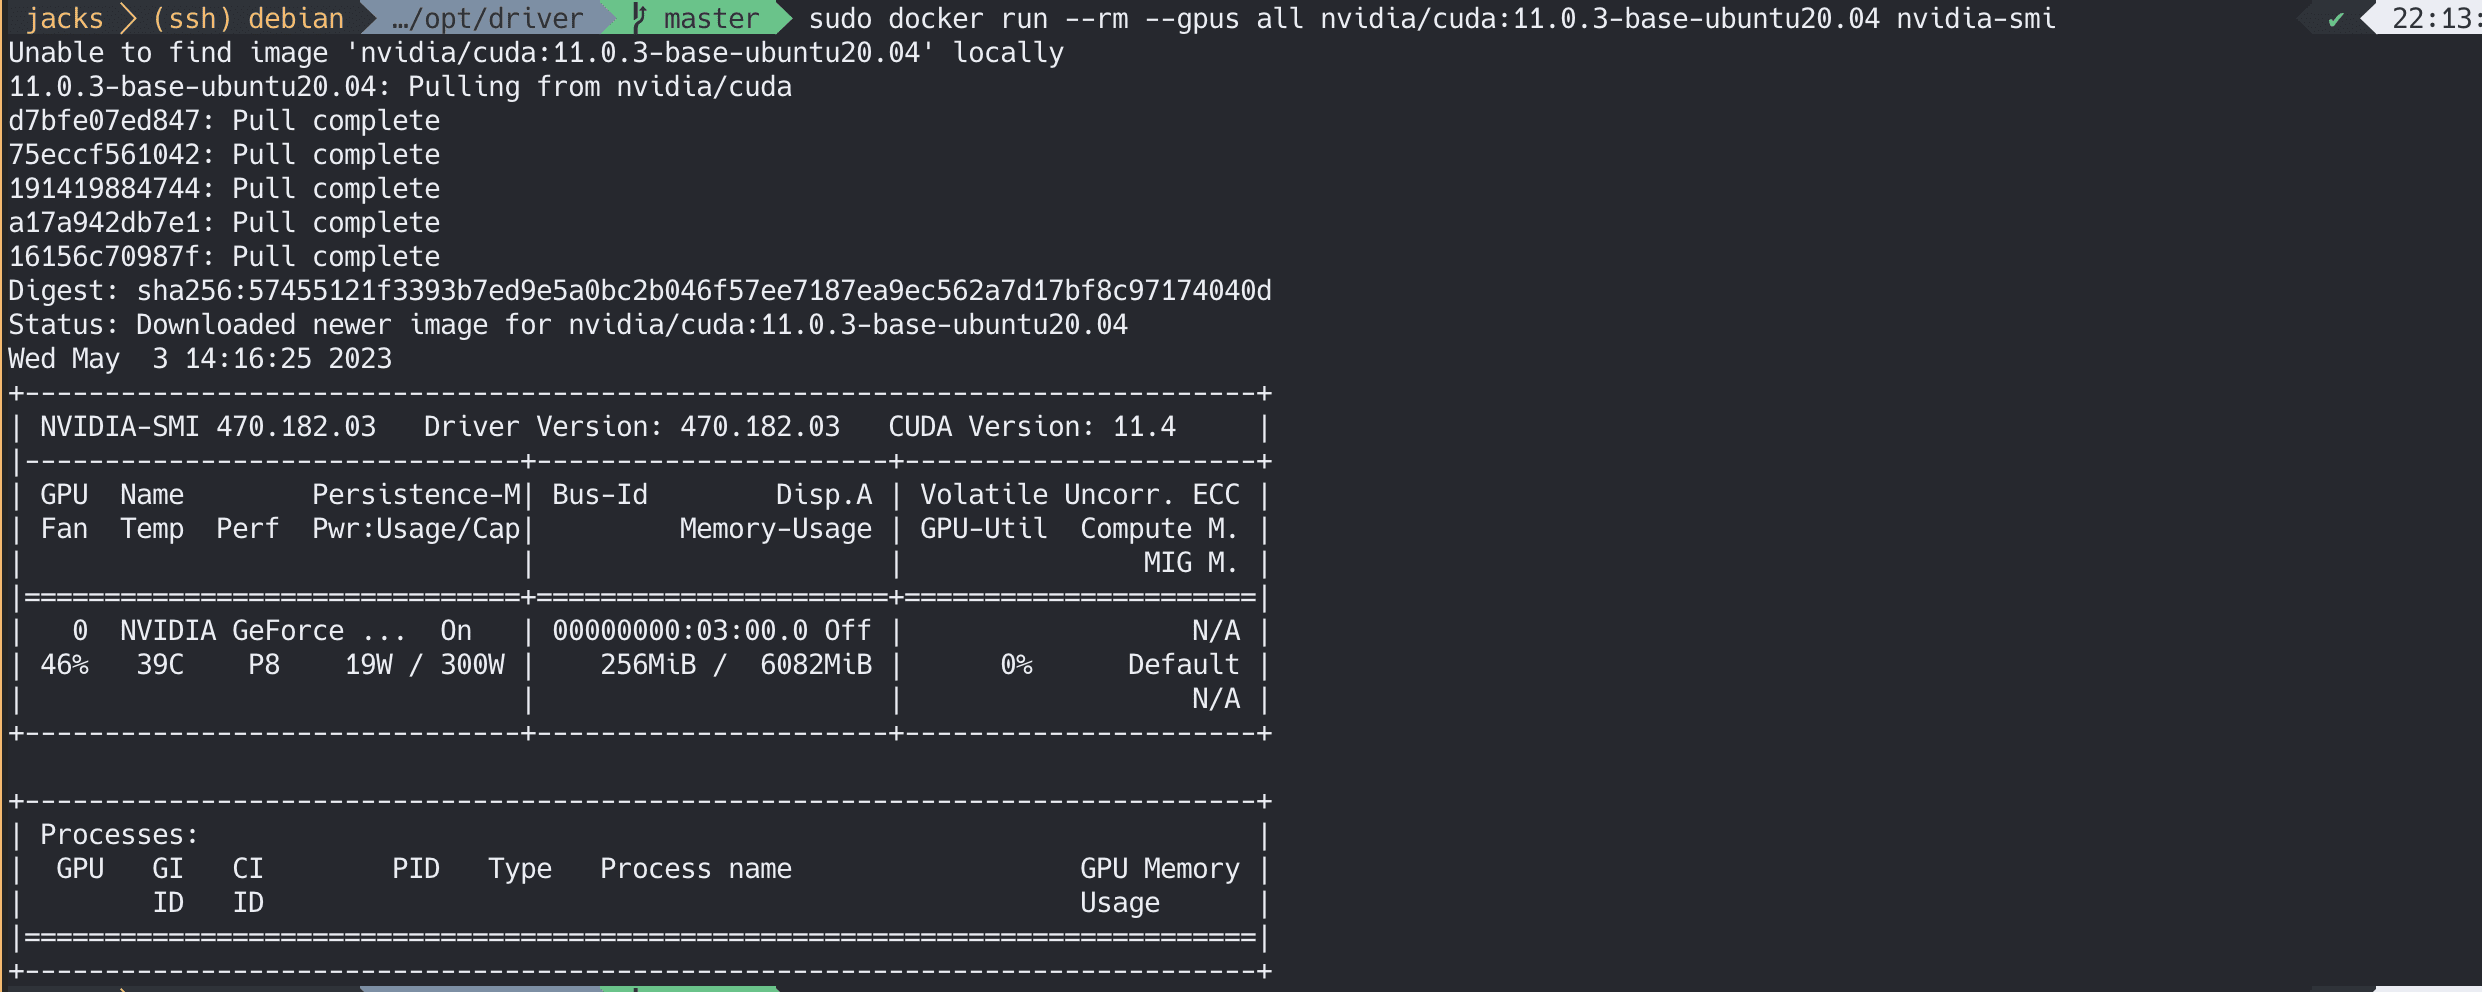
安装Nvidia容器工具包
1 2 3 4 5 6 7 8 9 10 11 rm --gpus all nvidia/cuda:11.0.3-base-ubuntu20.04 nvidia-smi
具体的案例可以参考运行在Docker上的Plex的使用:
整体可以根据这里 的教程
参考这里 需要升级docker-compose以支持devices指定资源关键字
1 2 3 sudo curl -L "https://github.com/docker/compose/releases/download/1.29.2/docker-compose-$(uname -s) -$(uname -m) " -o /usr/local/bin/docker-composechmod +x /usr/local/bin/docker-compose
对应的Docker Compose配置可以参考如下:
1 2 3 4 5 6 7 8 9 10 11 12 13 14 15 16 17 18 19 20 21 22 23 24 25 26 27 28 29 30 plex: image: lscr.io/linuxserver/plex:latest container_name: plex restart: unless-stopped deploy: resources: reservations: devices: - capabilities: [gpu ]driver: nvidia ports: - "7109:32400" environment: - TZ=Asia/Shanghai - PUID=1000 - PGID=1000 - VERSION=docker - PLEX_CLAIM=<genereate by plex claim> - NVIDIA_VISIBLE_DEVICES=all - NVIDIA_DRIVER_CAPABILITIES=compute,video,utility - ADVERTISE_IP=https://plex.$MY_DOMAIN:2443 volumes: - /mnt/dev/opt/plex:/config - /mnt/nas/movie:/movies labels: - "traefik.enable=true" - "traefik.http.routers.plex.rule=Host(`plex.$MY_DOMAIN`)" - "traefik.http.services.plex.loadbalancer.server.port=32400" - "traefik.http.routers.plex.entrypoints=websecure" - "traefik.http.routers.plex.tls=true"
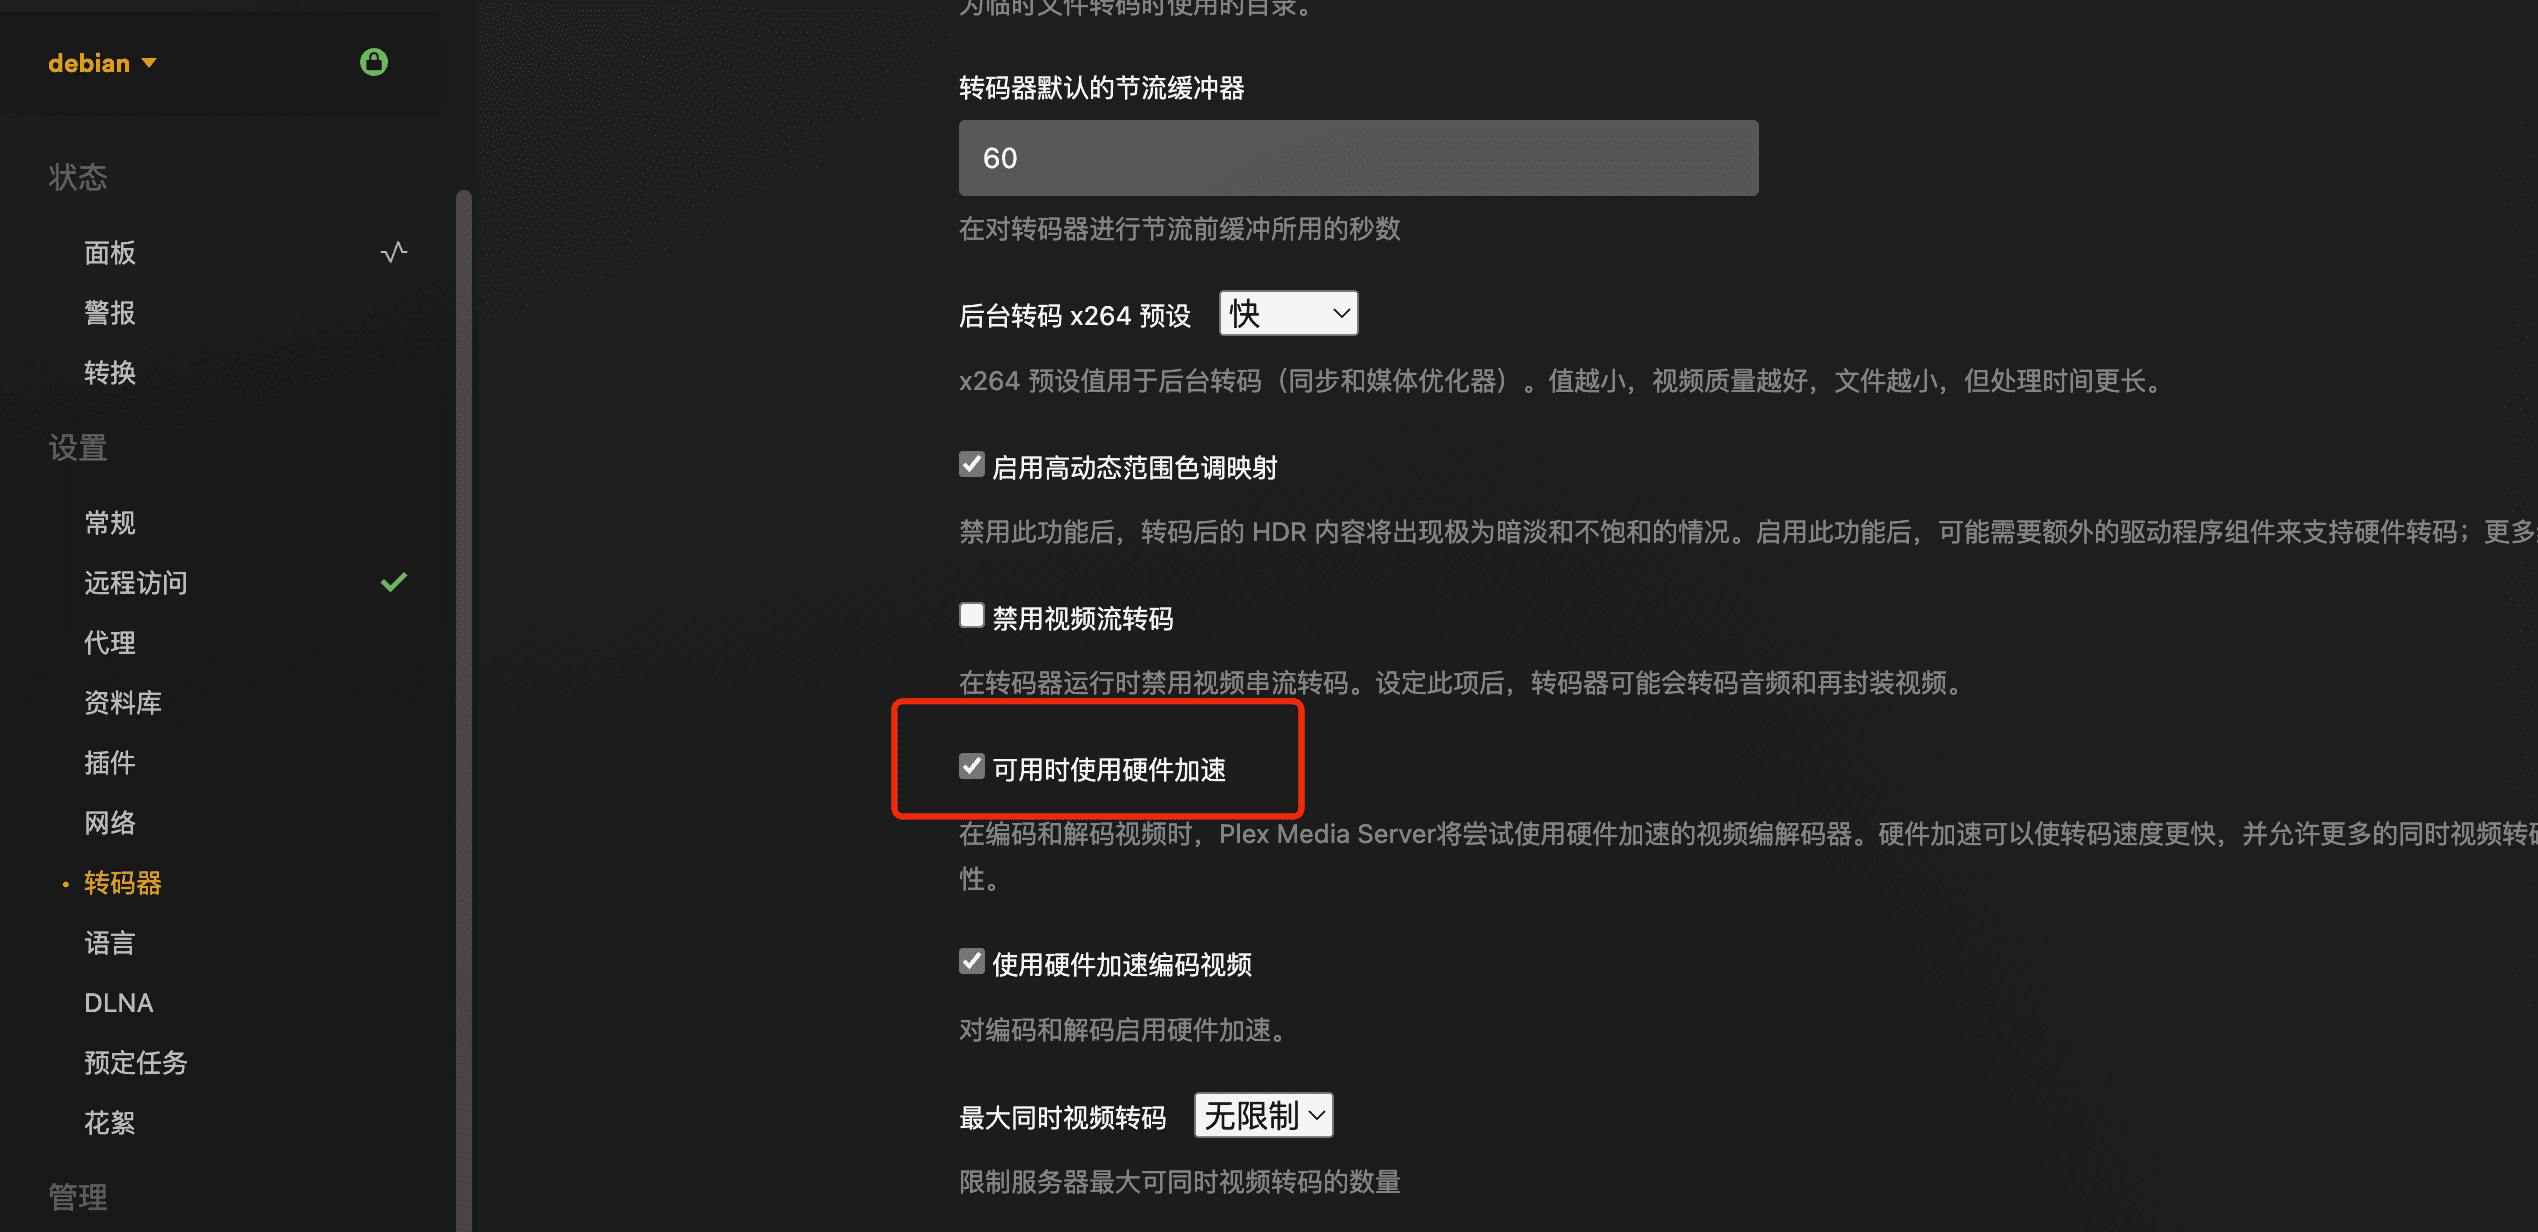
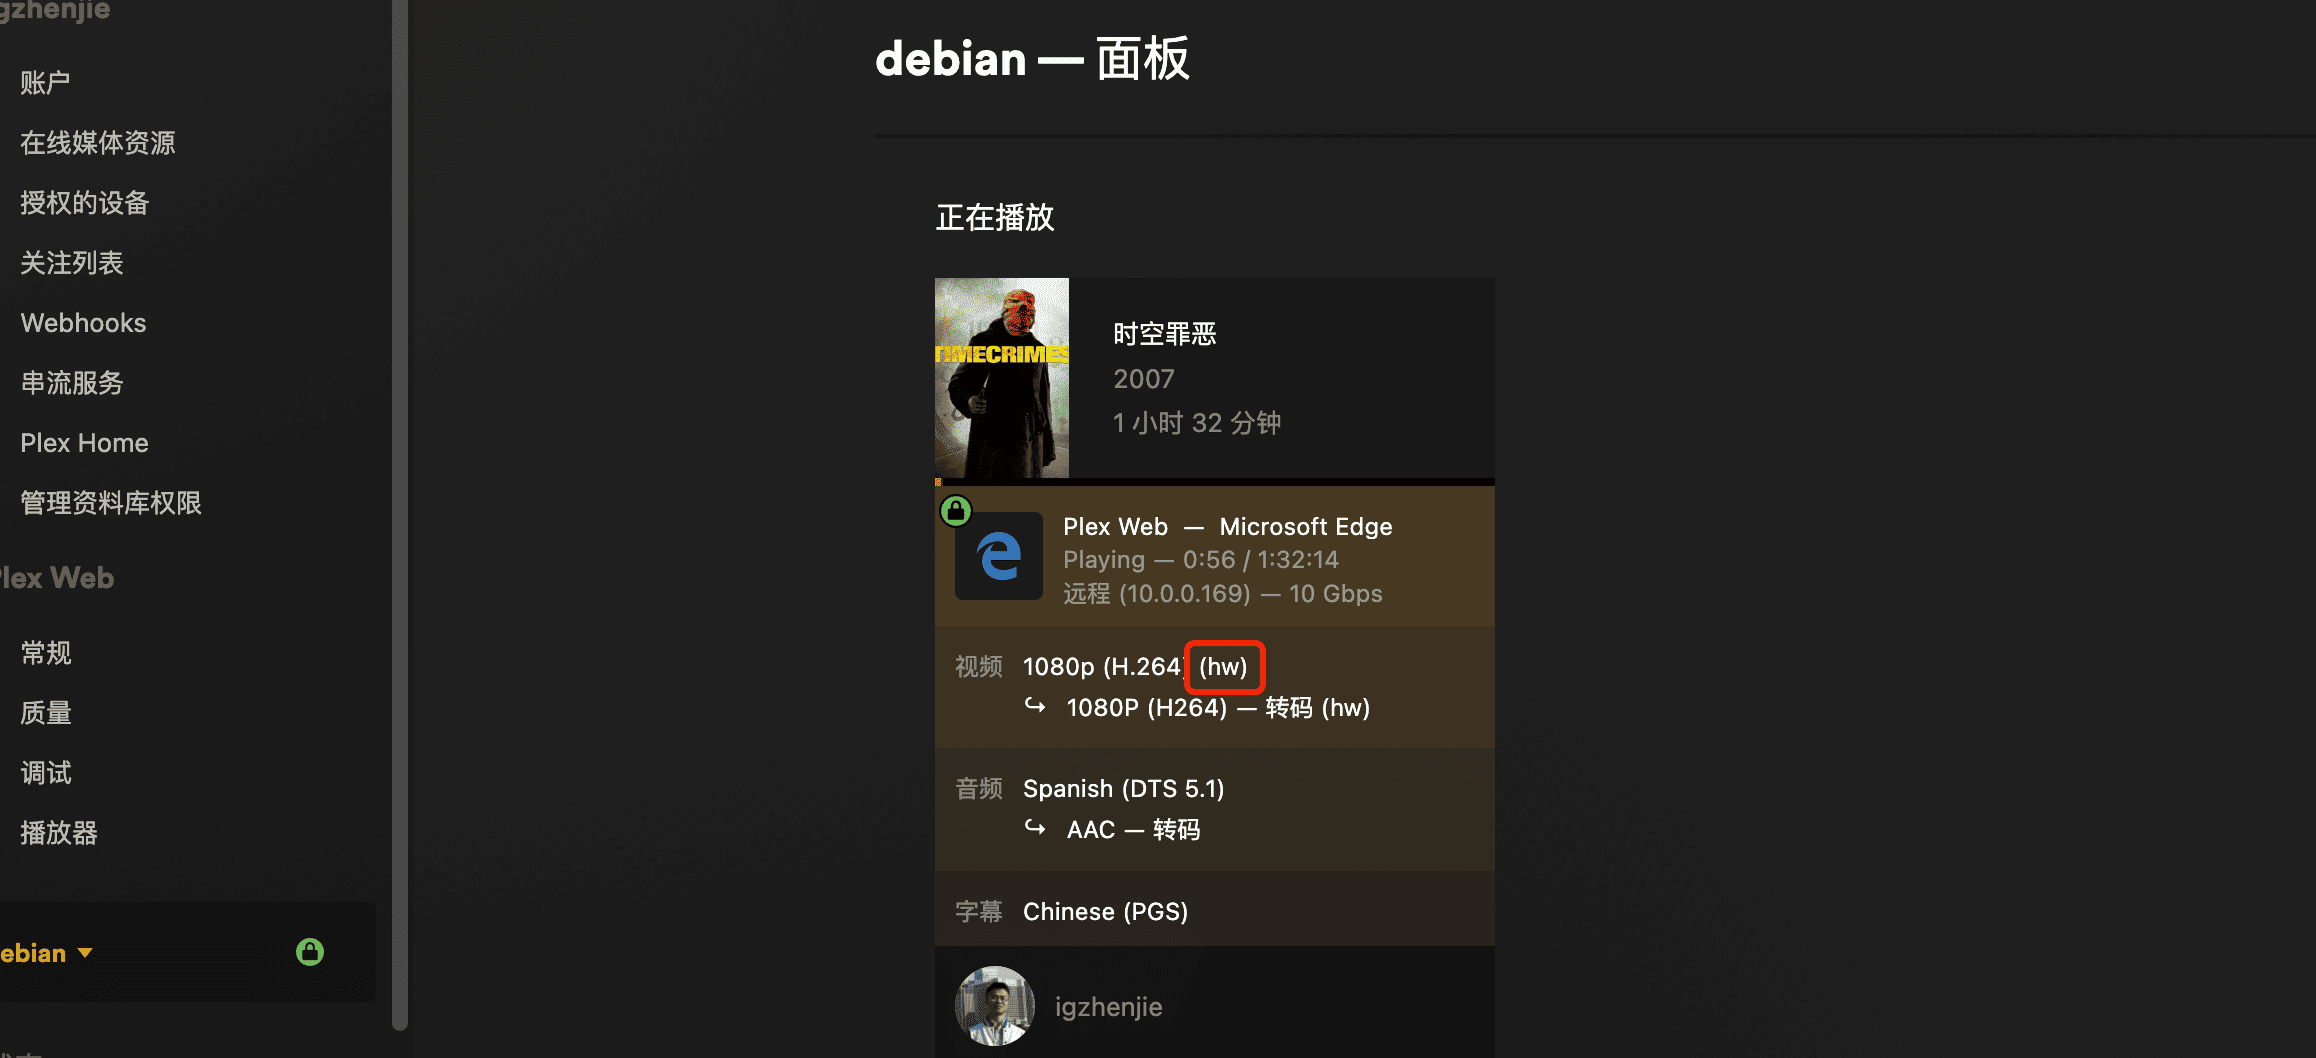
开通Plex PASS后,在转化器中开启硬解:
开启后播放一个需要转码的影片,可以看到[hw]标记,说明已经在使用
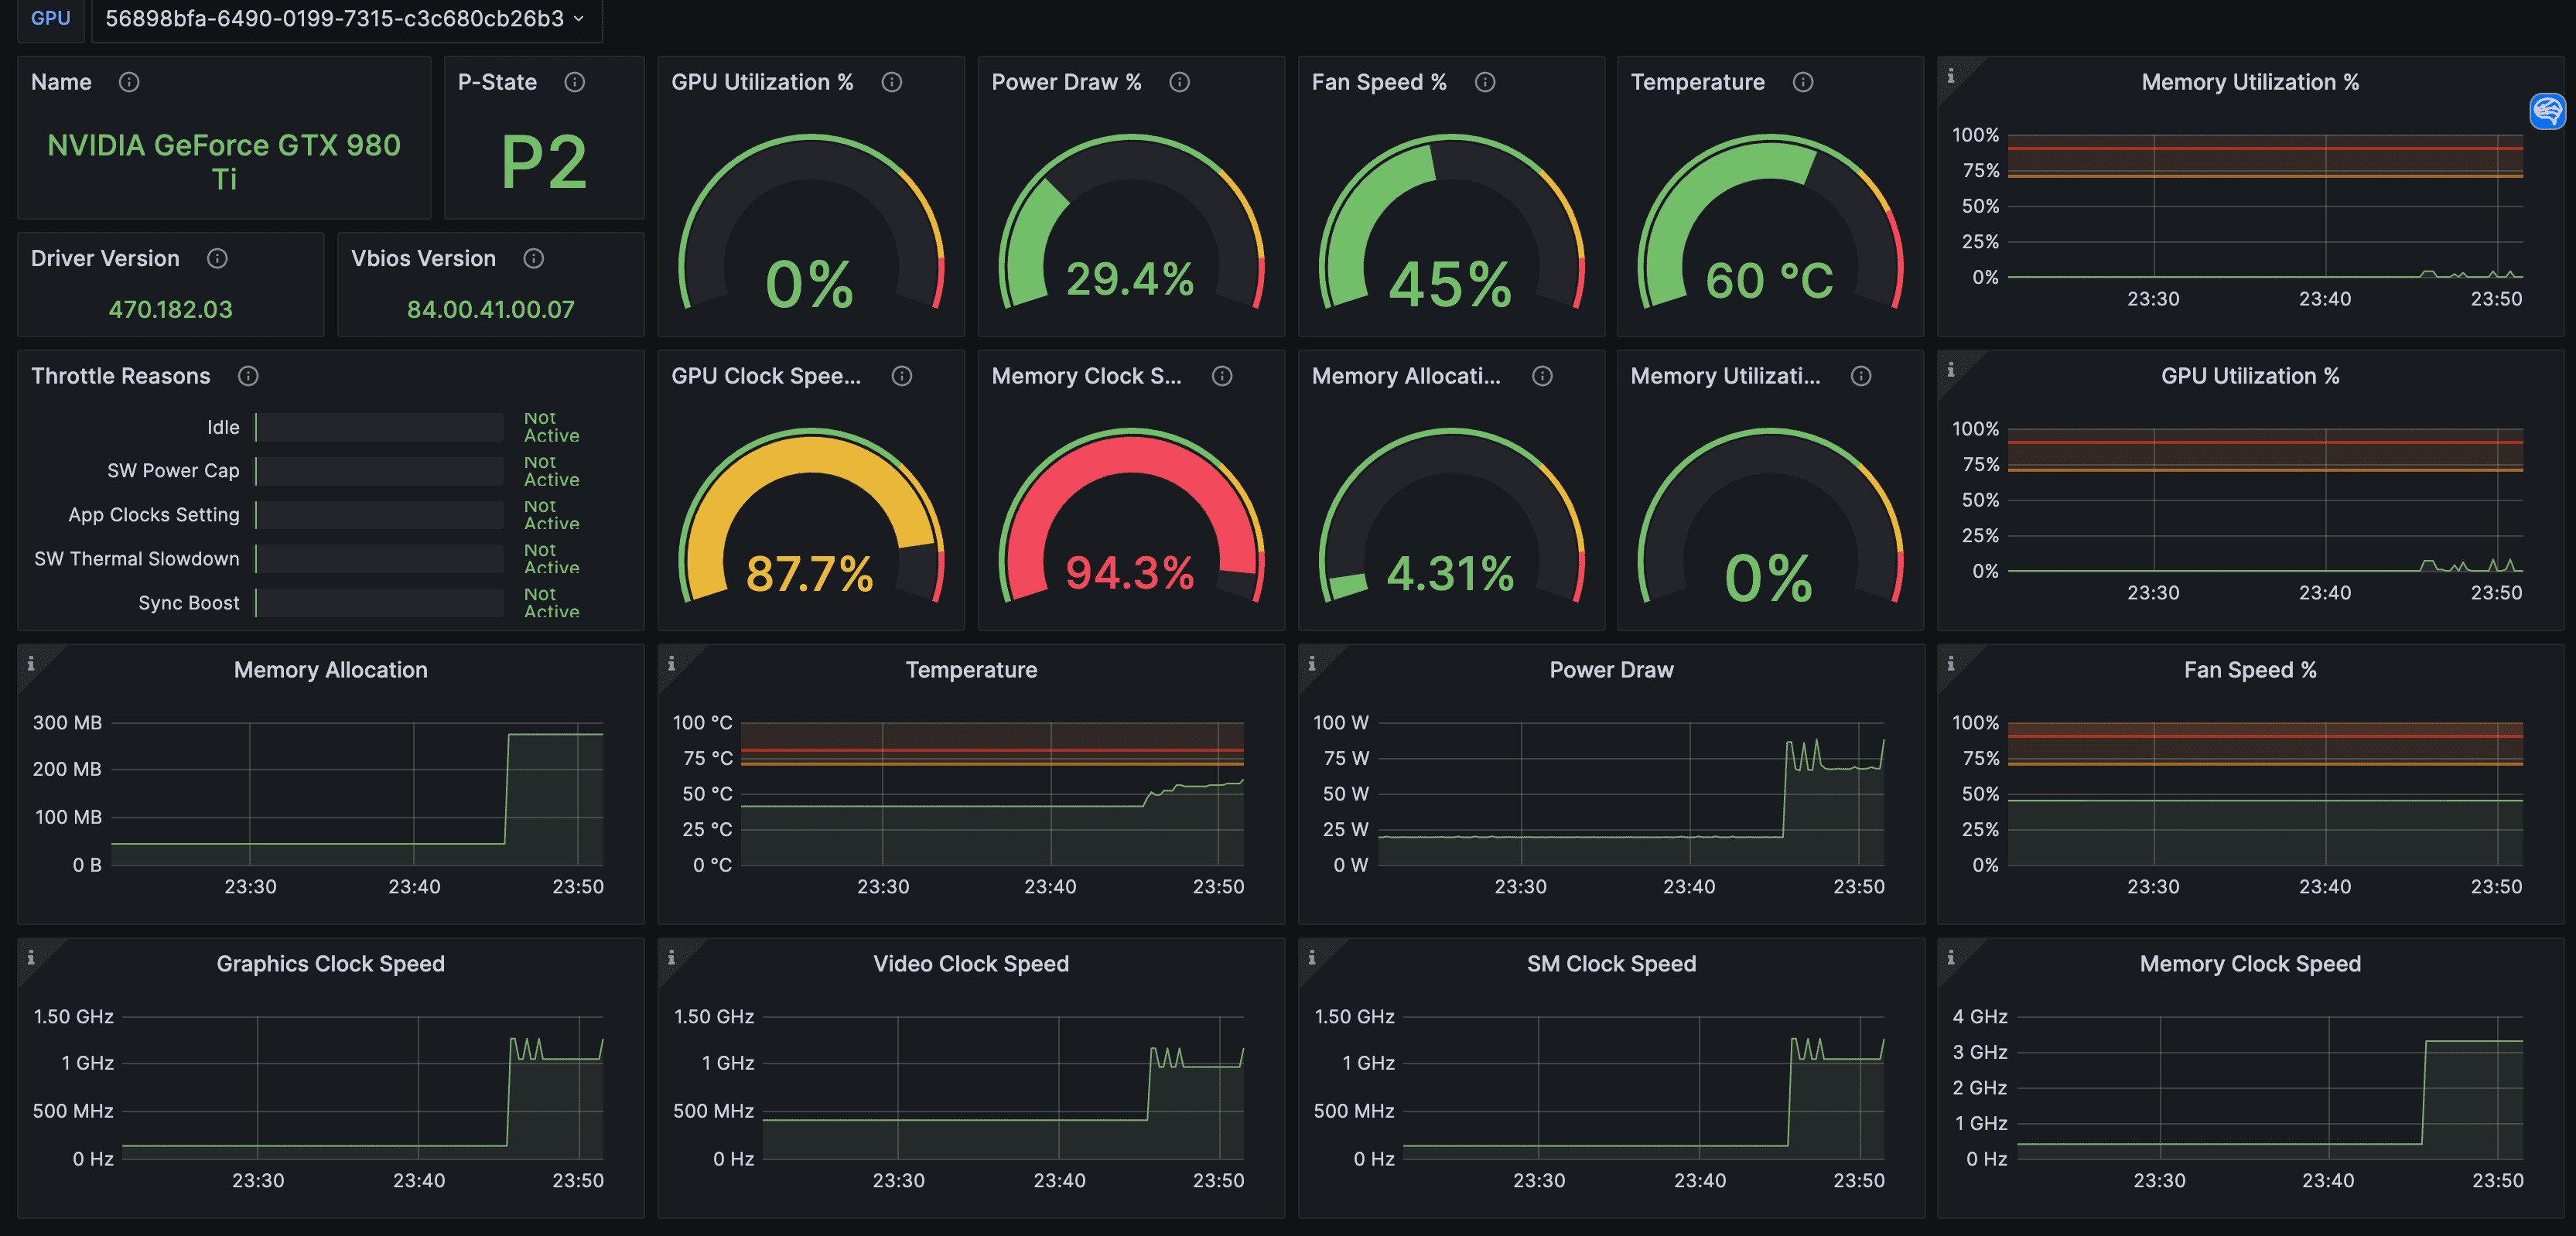
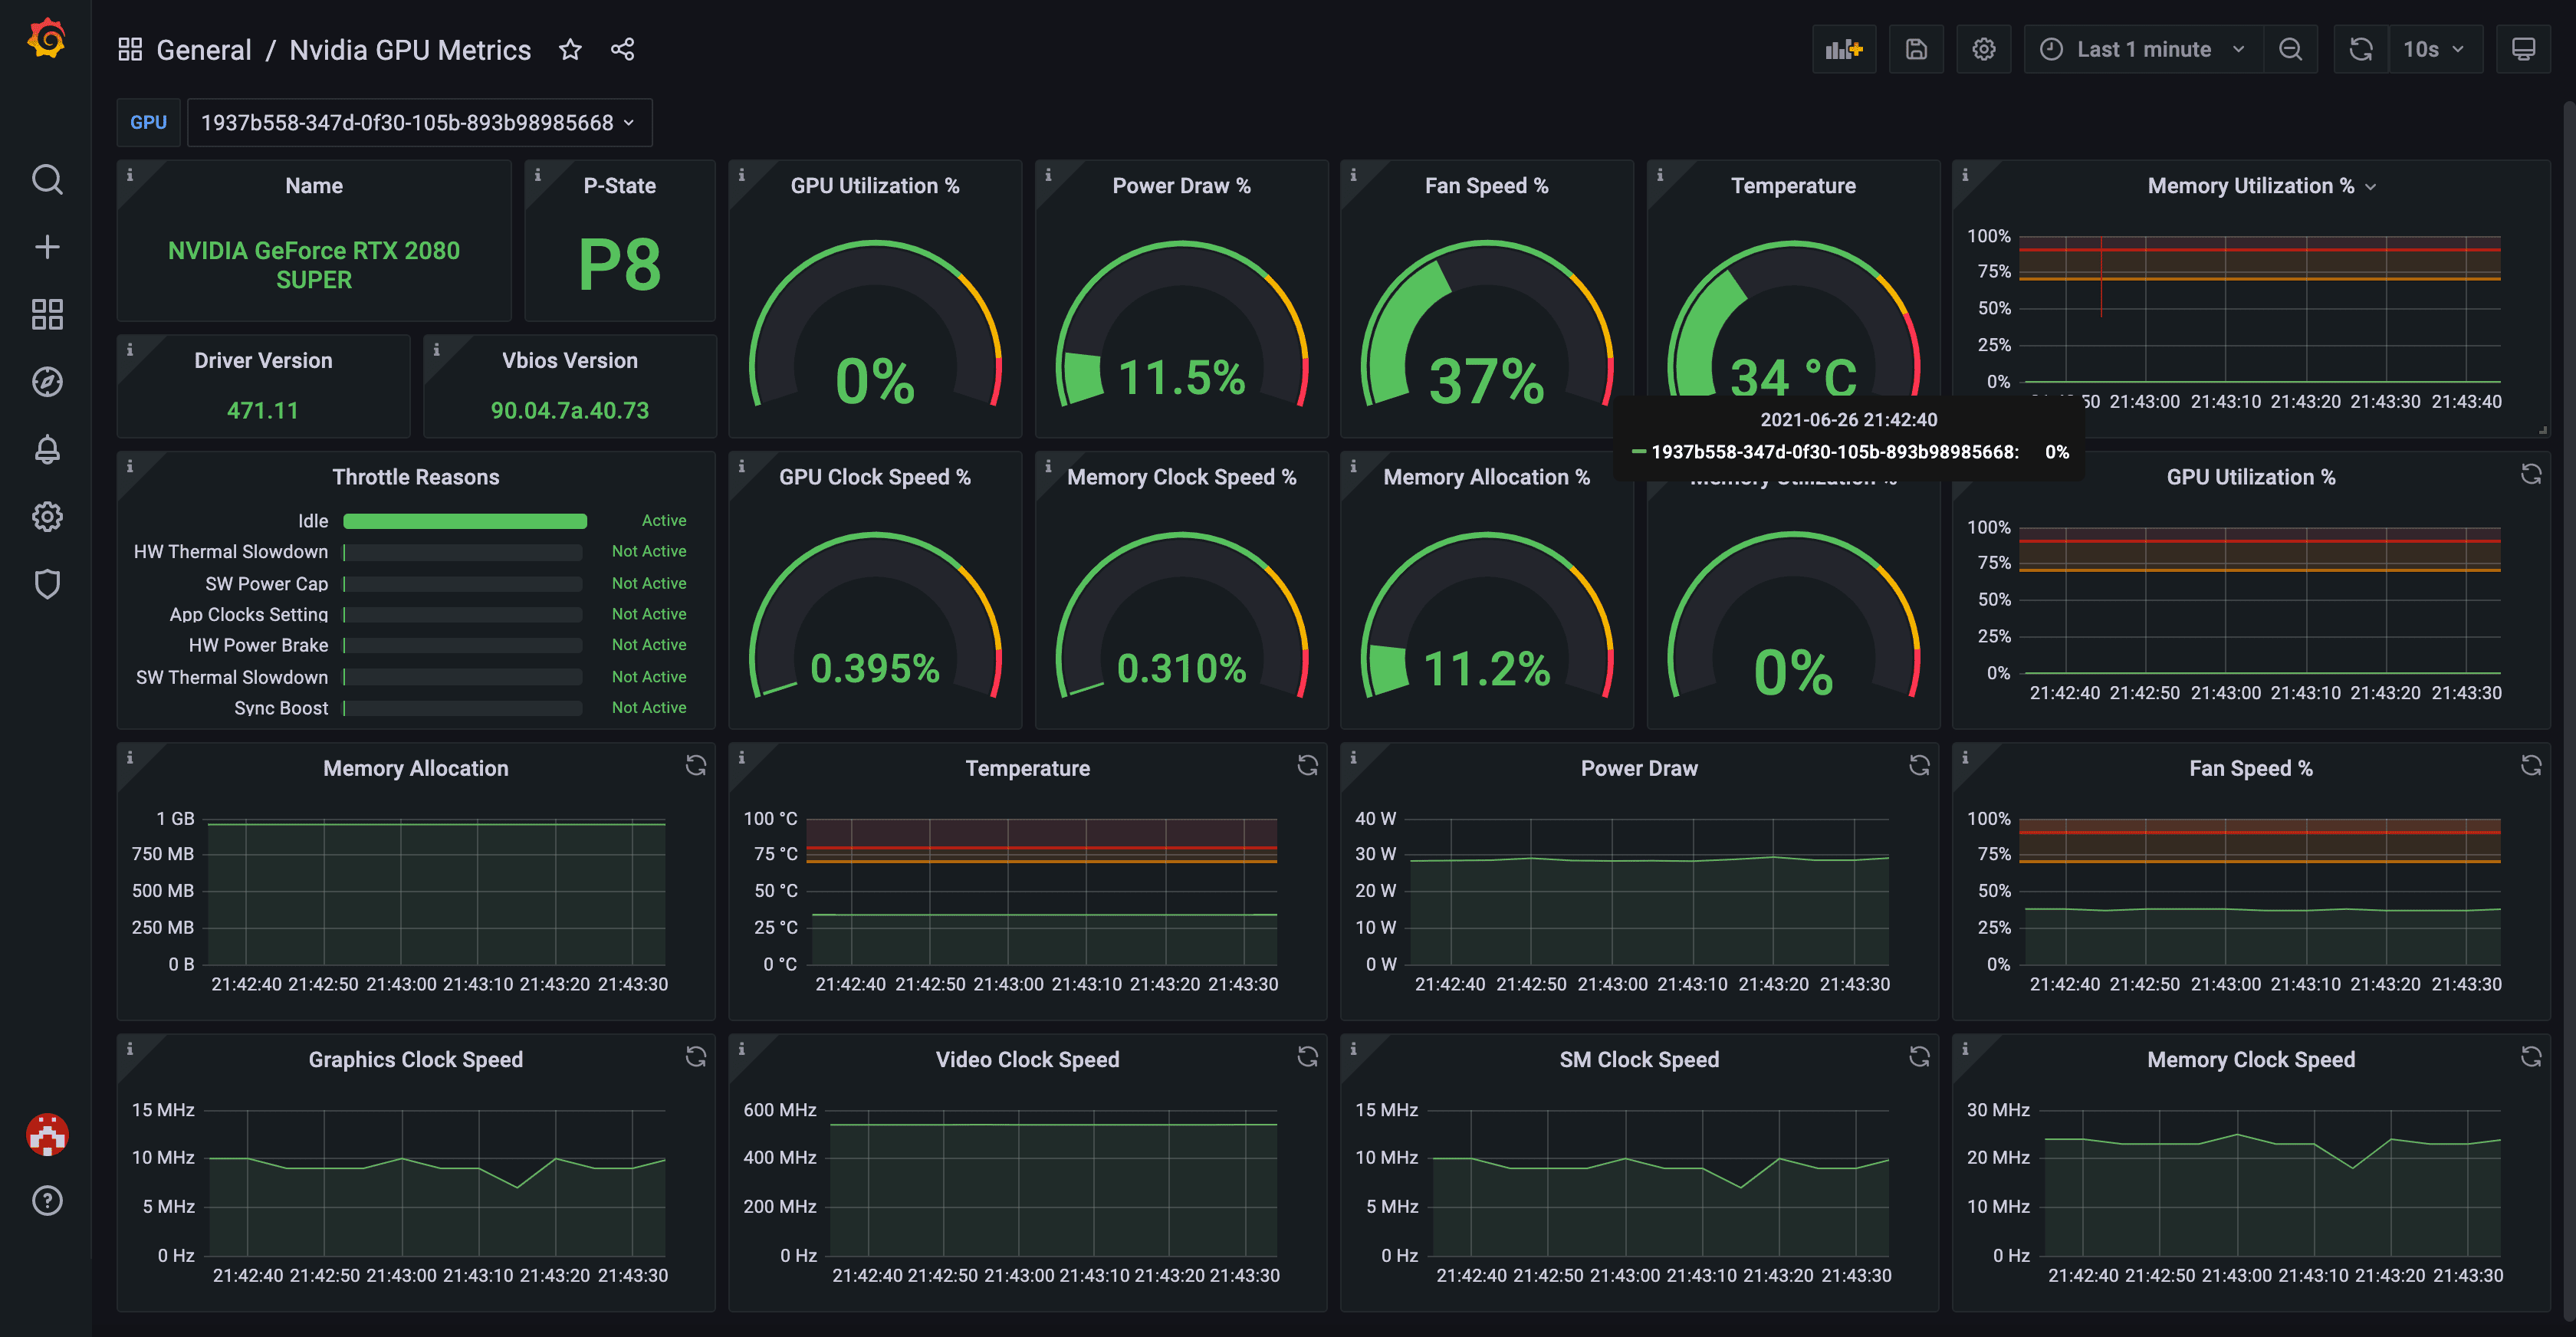
还不确定,可以到监控面板查看Nvidia的情况
VIII. 监控与管理 系统&显卡情况 主要是通过node_exporter与nvidia-gpu-exporter来拉取系统与GPU情况,用prometheus来进行数据存储与查询,用grafana来展现,其中exporter使用systemctl来进行管理,prometheus与grafana服务用docker-compose管理,接来来开始配置。
准备Prometheus与Grafana 在docker-compose.yml文件添加如下:
1 2 3 4 5 6 7 8 9 10 11 12 13 14 15 16 17 18 19 20 21 22 23 24 25 26 27 28 29 services: .. grafana: image: grafana/grafana container_name: grafana restart: always user: '1000' ports: - 3000 :3000 volumes: - /opt/grafana:/var/lib/grafana labels: - "traefik.enable=true" - "traefik.http.routers.grafana.rule=Host(`grafana.$MY_DOMAIN`)" - "traefik.http.routers.grafana.entrypoints=websecure" - "traefik.http.routers.grafana.tls=true" prometheus: image: prom/prometheus container_name: prometheus restart: always ports: - 9090 :9090 volumes: - /opt/prometheus:/etc/prometheus labels: - "traefik.enable=true" - "traefik.http.routers.prometheus.rule=Host(`prom.$MY_DOMAIN`)" - "traefik.http.routers.prometheus.entrypoints=websecure" - "traefik.http.routers.prometheus.tls=true"
添加/opt/prometheus/prometheus.yml文件,并添加如下内容:
1 2 3 4 5 6 7 8 9 10 11 12 13 14 15 16 17 18 19 20 21 22 23 24 25 26 27 28 29 30 31 32 33 34 35 36 global: scrape_interval: 10s evaluation_interval: 15s alerting: alertmanagers: - static_configs: - targets: rule_files: scrape_configs: - job_name: "prometheus" static_configs: - targets: ["localhost:9090" ]- job_name: 'node' static_configs: - targets: ['<your_local_ip>:9100' ]- job_name: 'nvidia' static_configs: - targets: ['<your_local_ip>:9835' ]
这里简单解释下,全局10s刷新一次,9090端口访问prometheus,9100是node_exporter对外暴露的端口,9835是nvidia_gpu_exporter对外暴露的端口。
开放端口
准备Nvidia GPU Exporter 到这里 下载最新的amd64.deb,然后执行安装sudo dpkg -i nvidia-gpu-exporter_1.2.0_linux_amd64.deb
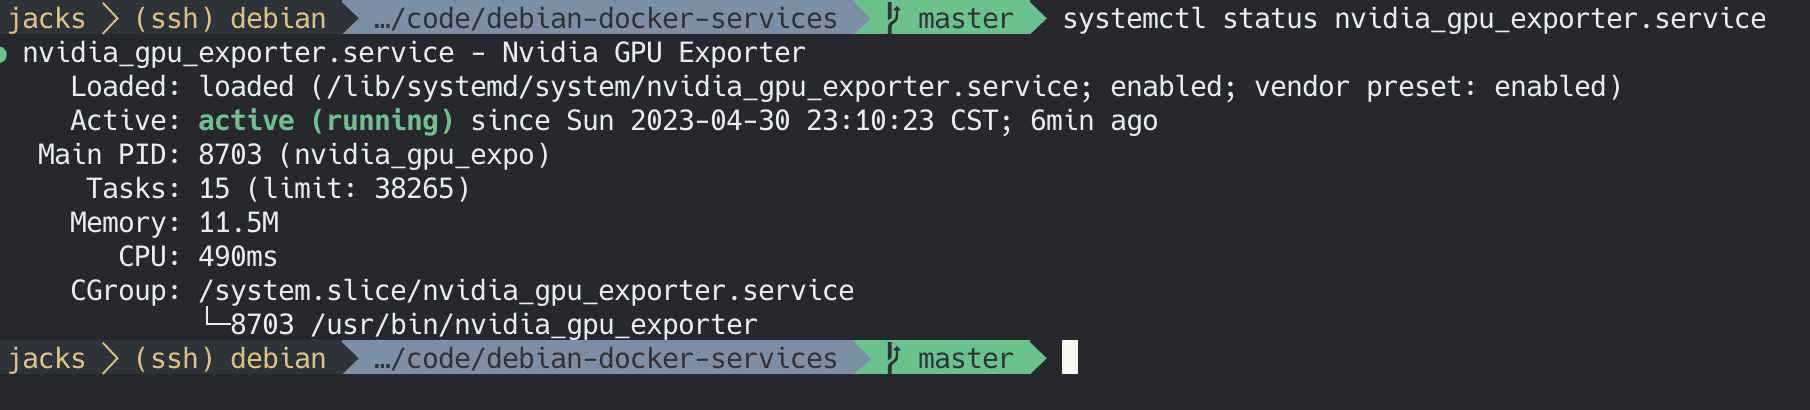
安装后可以检查下其状态
1 systemctl status nvidia_gpu_exporter.service
检查下端口情况
1 sudo lsof -i -P -n | grep LISTEN
开放端口
准备Node Exporter 到[这里](Releases · prometheus/node_exporter (github.com) )下载最新的amd64.tar.gz包,解压缩以后,里面有一个可执行的指令node_exporter
然后nvim /etc/systemd/system/node_exporter.service添加文件:
1 2 3 4 5 6 7 8 9 10 11 12 13 [Unit]
这里的/opt/node-exporter/node_exporter-1.5.0.linux-amd64/node_exporter假设就是你下载解压缩后的那个指令的路径
1 2 3 4 sudo systemctl daemon-reload enable node_exporter
开放端口
检测与添加到Grafana 到docker-compose.yml的目录下执行sudo docker-compose up -d启动刚刚的Grafana与Prometheus,然后访问prometheus检查是否有正常链接上,搜索up如果后面数值是1则表示数据正常,连接成功。
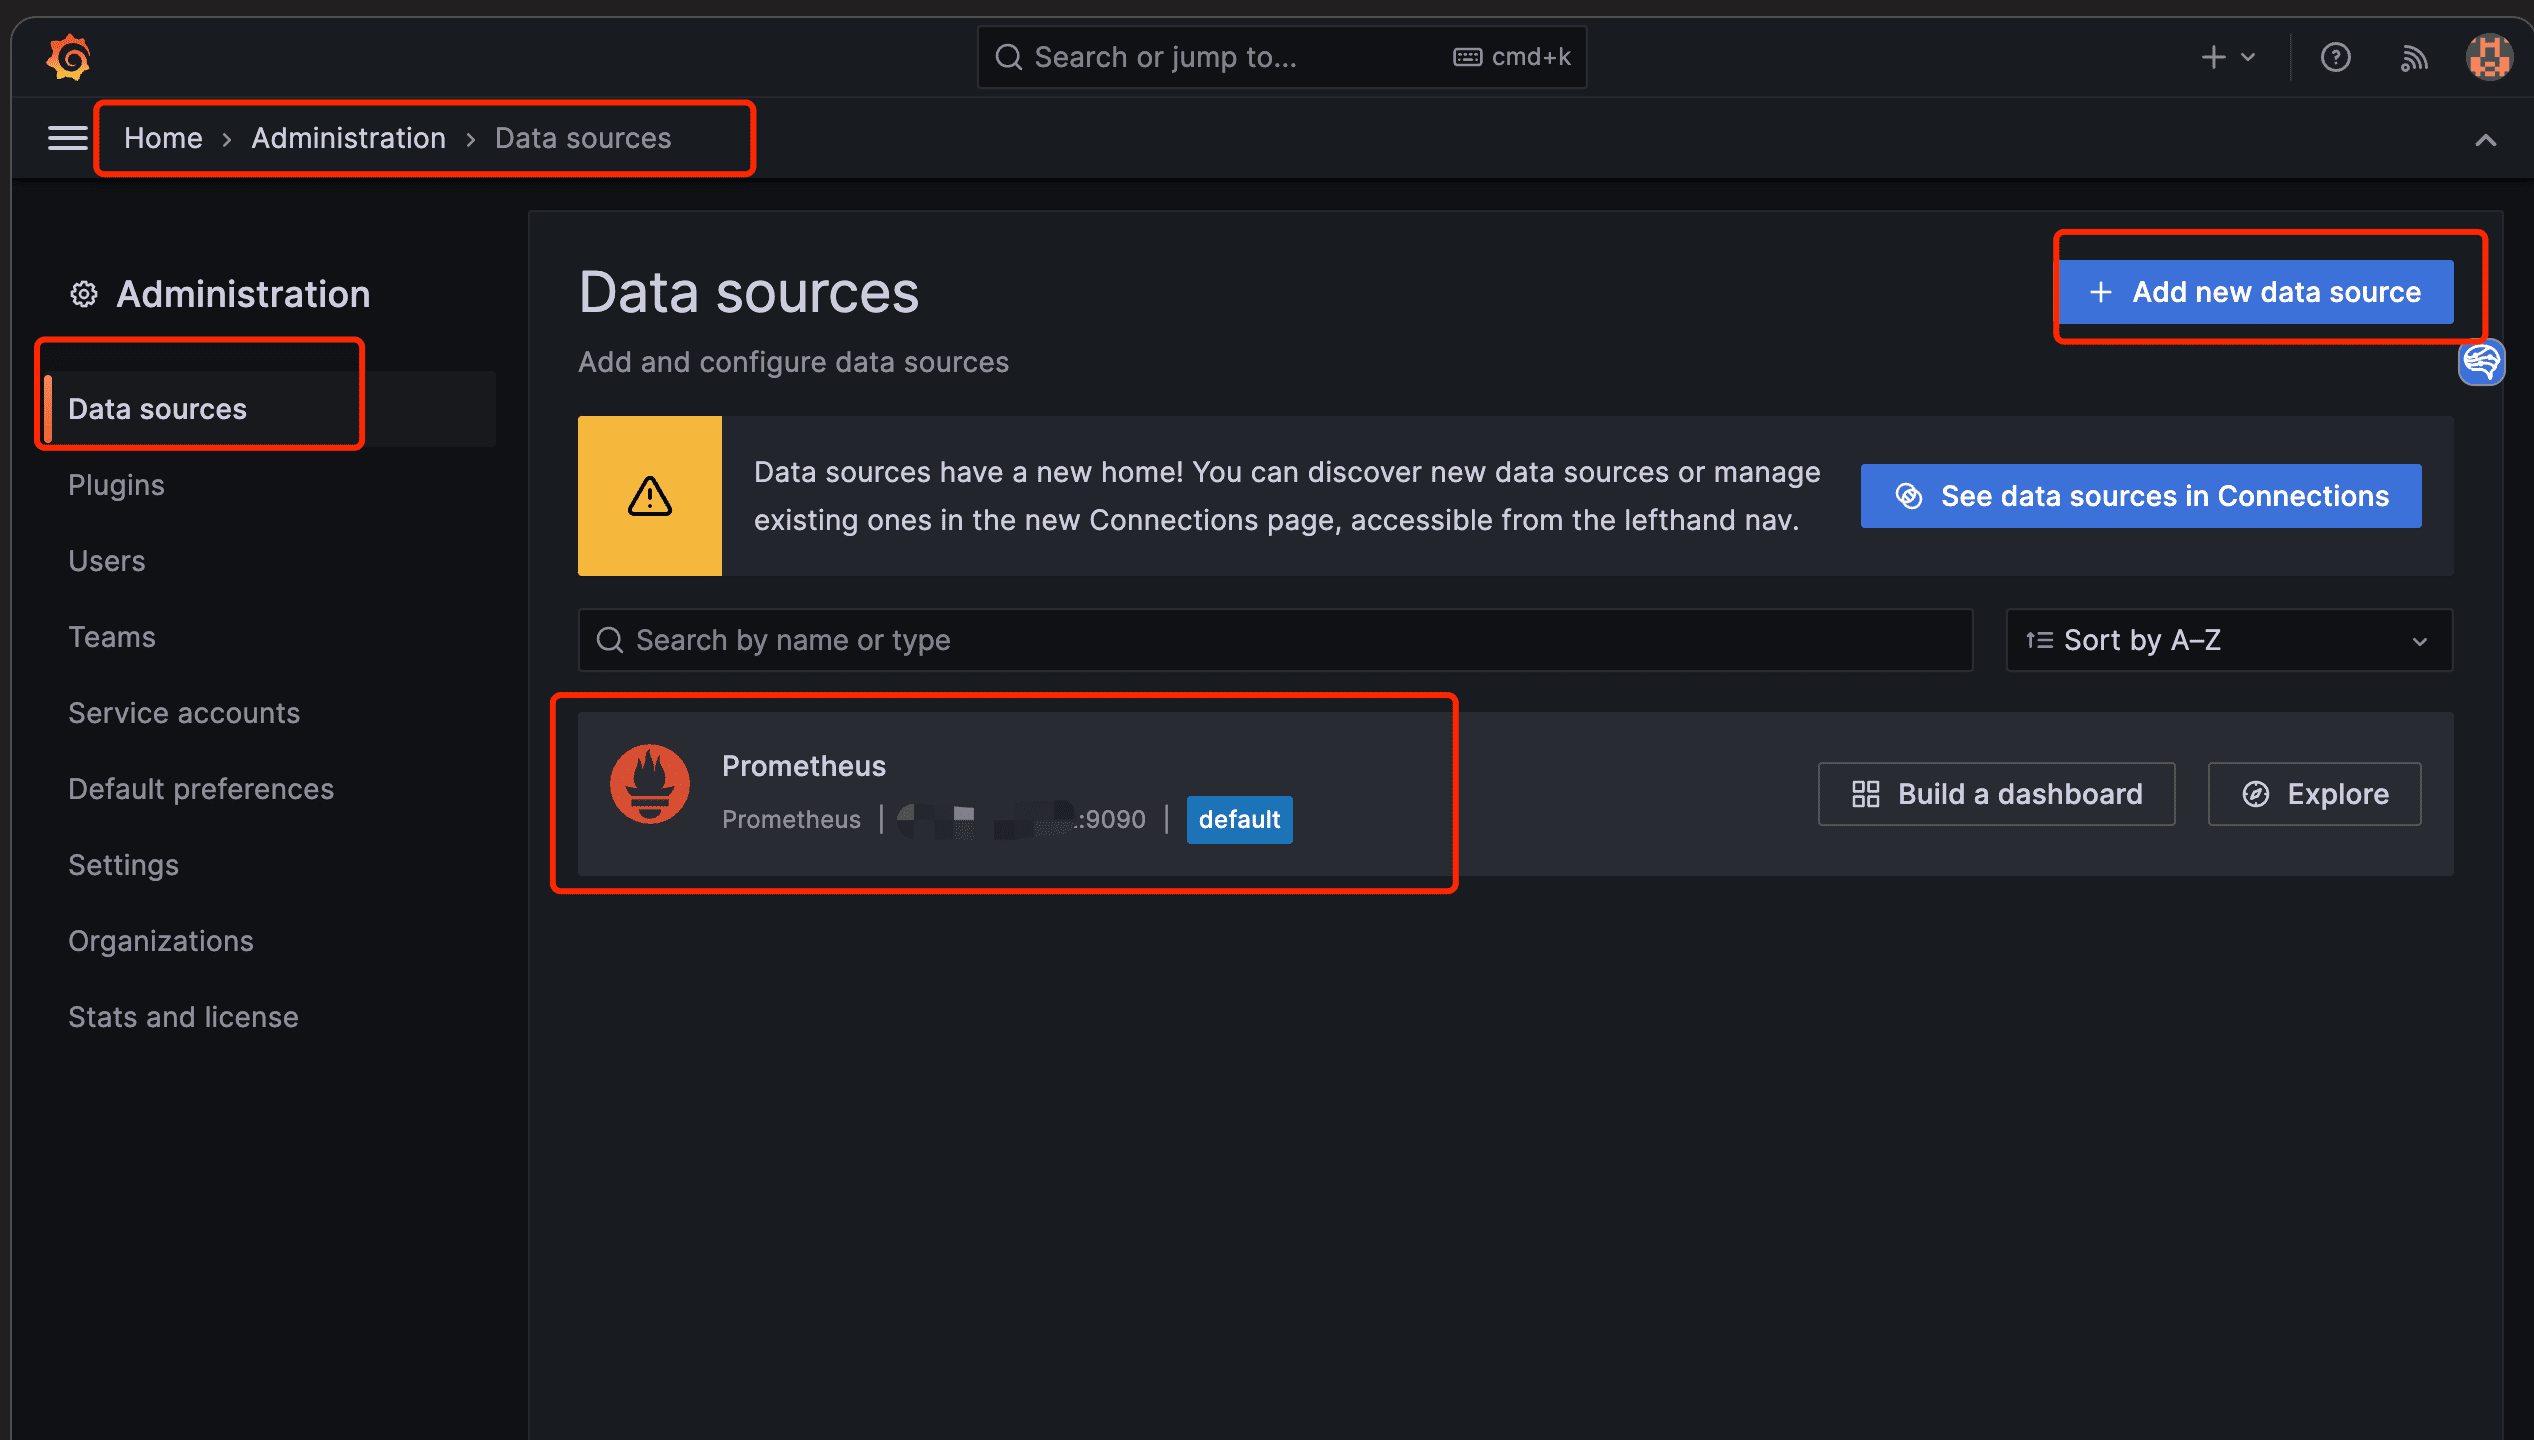
登录Grafana添加Prometheus作为其数据源,我就不过多赘述这里。
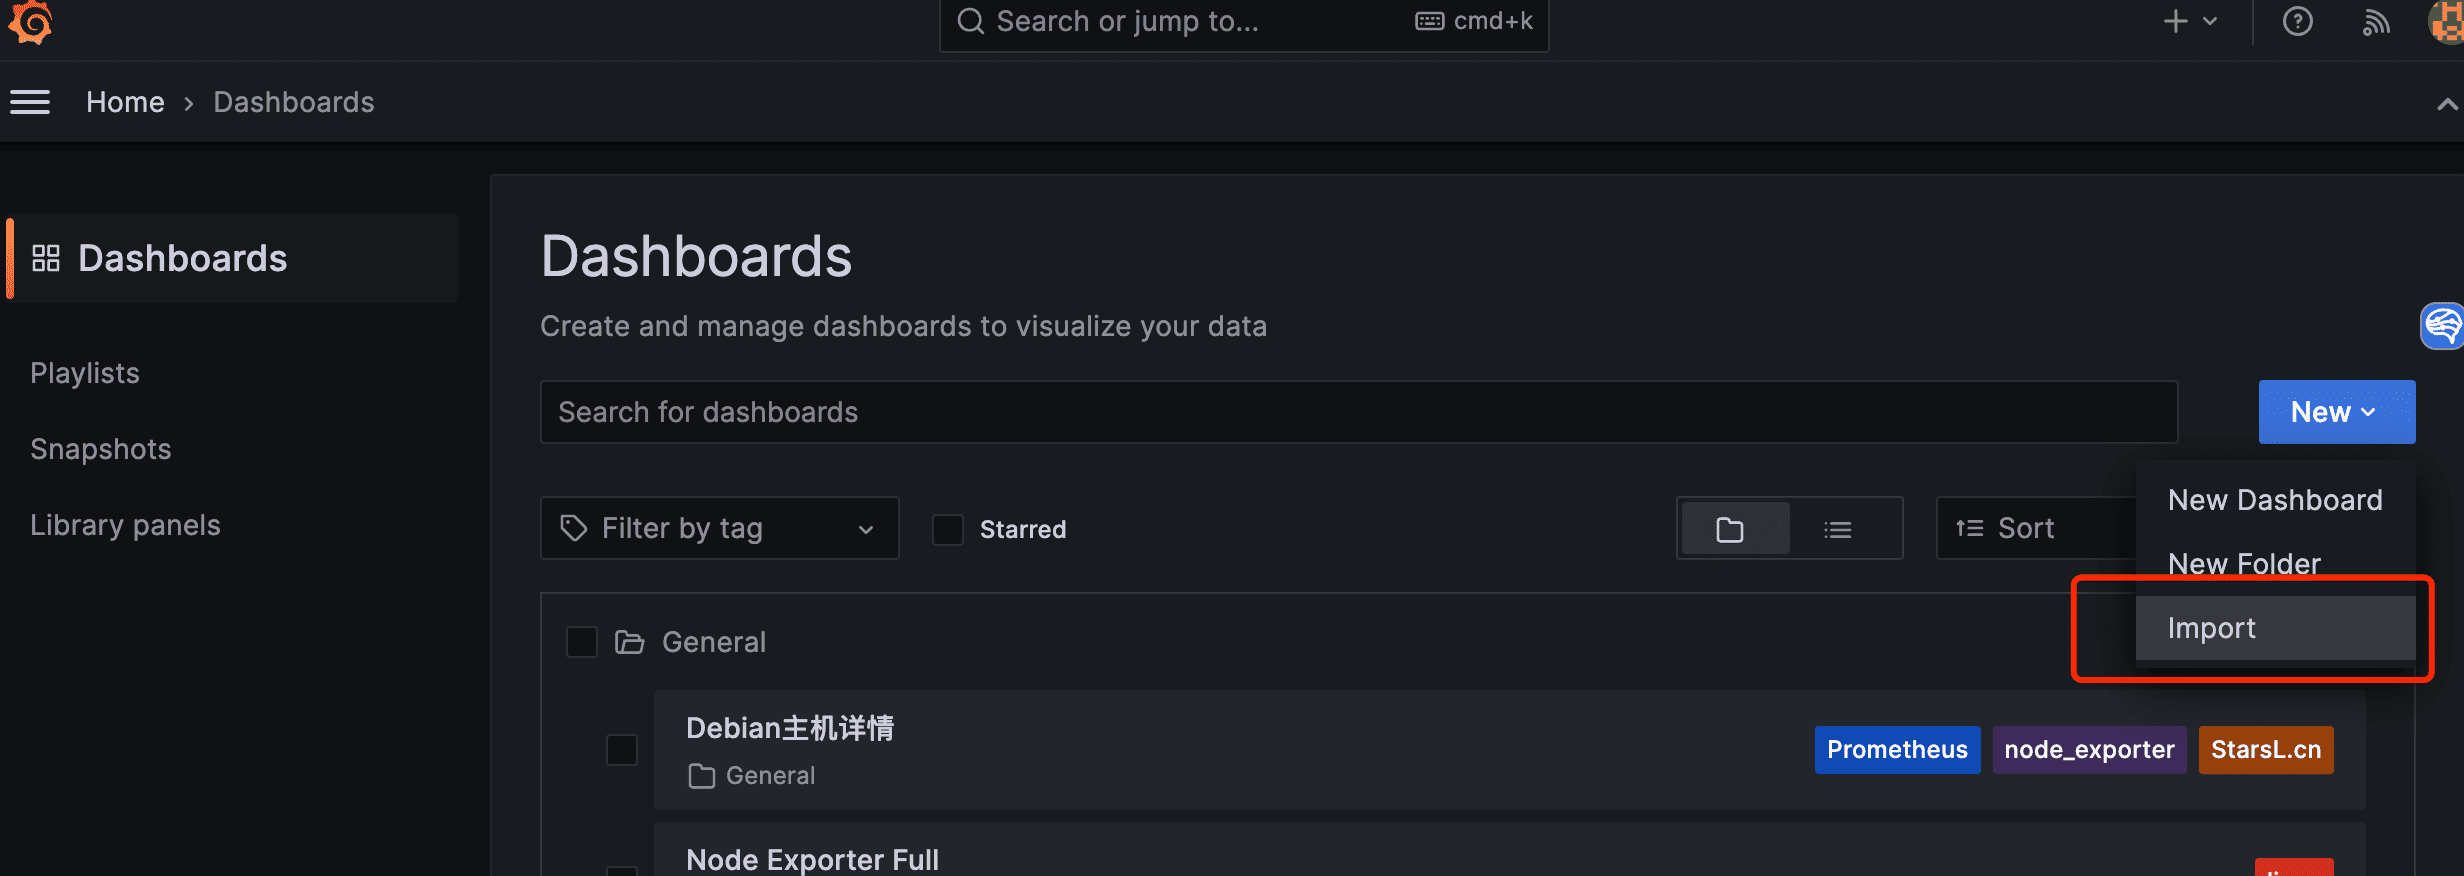
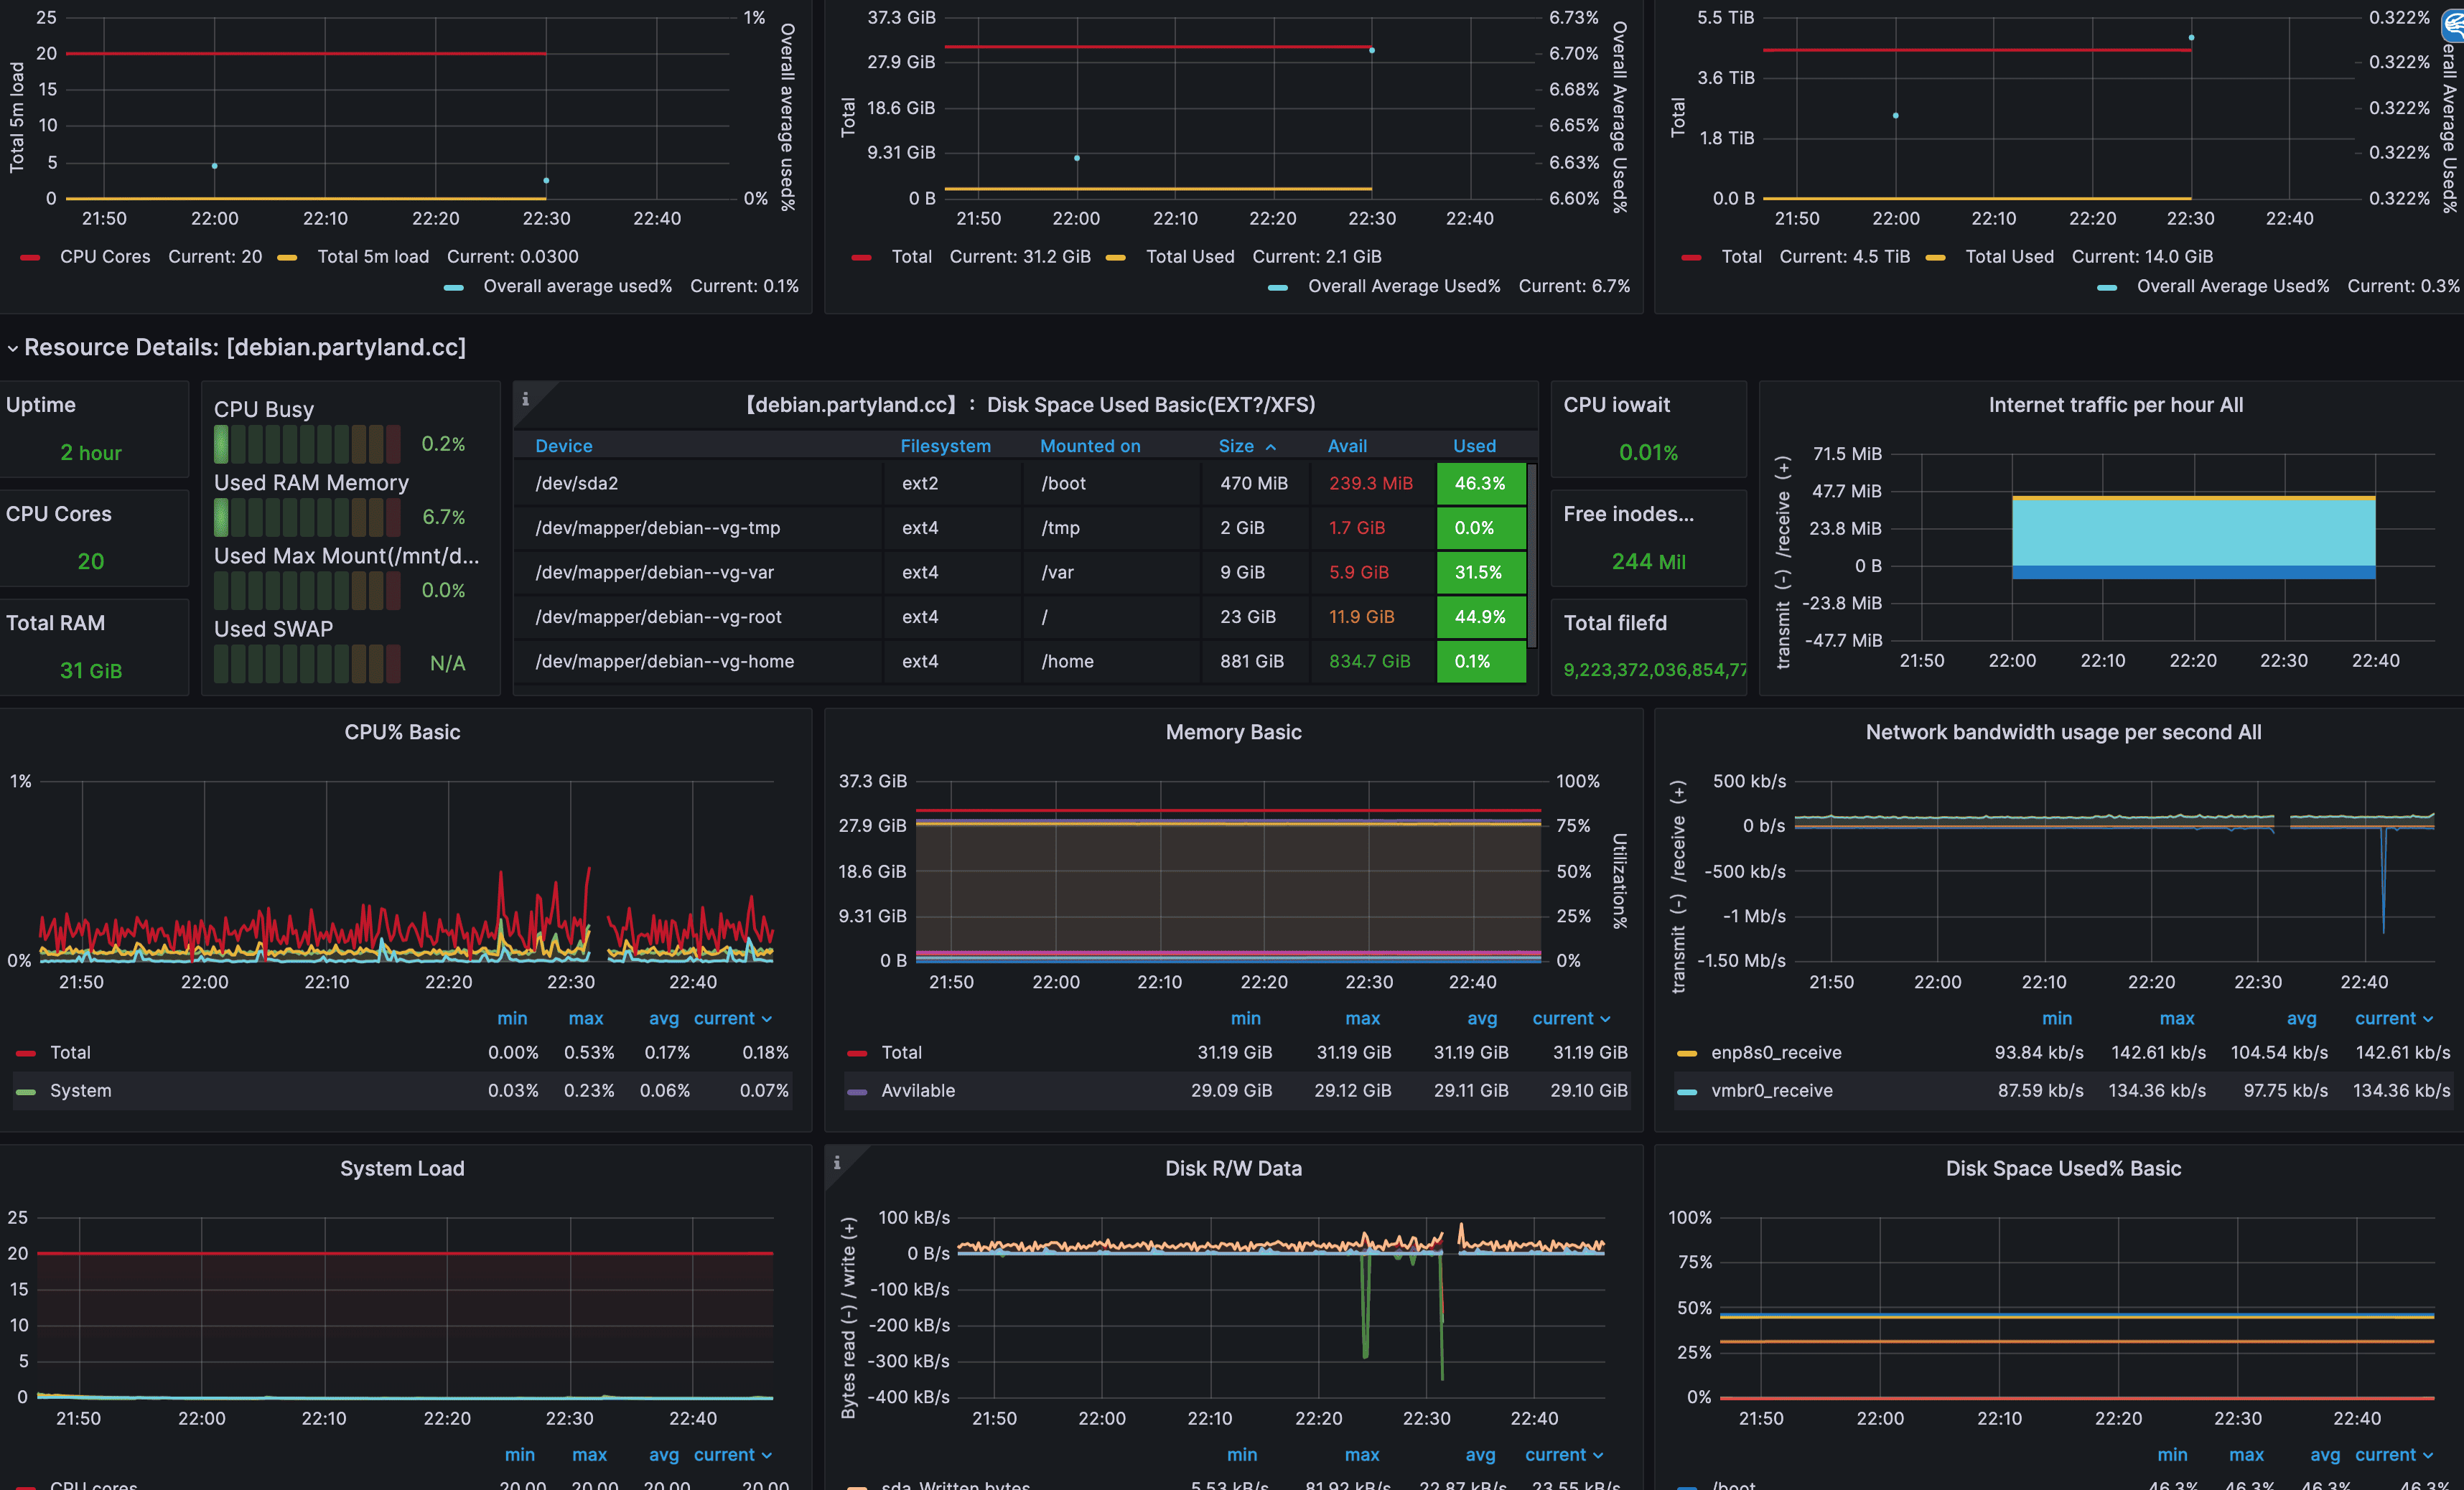
添加系统监控到Grafana 添加系统监控,可以考虑使用这个 。
然后拷贝这个ID: 15172,选用好数据源为刚刚创建的Prometheus的,即可
添加GPU监控到Grafana 添加Nvidia GPU监控,可以考虑使用这个 ,添加方法和上面一样不赘述了
Docker情况 docker情况建议直接使用Portainer ,在docker-compoase.yml中添加:
1 2 3 4 5 6 7 8 9 10 11 12 13 14 15 services: ... portainer: image: portainer/portainer container_name: portainer restart: always volumes: - /var/run/docker.sock:/var/run/docker.sock - /opt/portainer:/data labels: - "traefik.enable=true" - "traefik.http.routers.portainer.rule=Host(`portainer.$MY_DOMAIN`)" - "traefik.http.services.portainer.loadbalancer.server.port=9000" - "traefik.http.routers.portainer.entrypoints=websecure" - "traefik.http.routers.portainer.tls=true"
然后启动下sudo docker-compose up -d,搞定,这里我们使用portainer.yourdomain.com访问
IX. 最后附录 为什么选用Debian Debian和Ubuntu在磁盘的读写速度,Docker不同的存储驱动方式,虚拟化的方式上的性能差别可能不是很大,因为它们都是基于Linux内核的操作系统,都可以调整和优化这些方面的参数。但是,根据不同的硬件配置和使用场景,可能会有一些细微的差异。
共同点 它们都是开源的,都使用APT包管理器,都支持多种硬件架构,都有大量的用户和开发者社区。
不同点 它们的稳定性、更新频率、软件支持和安装方式有所差别。一般来说,Debian更倾向于稳定性和简洁性,而Ubuntu更倾向于新颖性和易用性。
系统更新上 Debian有三个分支,分别是稳定版(stable)、测试版(testing)和不稳定版(unstable)。稳定版的更新周期很长,一般是两年左右,但也更加稳定和安全。测试版和不稳定版的更新周期更短,但也更容易出现问题。Ubuntu有两种版本,分别是长期支持版(LTS)和非长期支持版(non-LTS)。LTS版本的更新周期是五年,非LTS版本的更新周期是九个月。Ubuntu的更新速度一般比Debian快,但也可能带来一些兼容性或稳定性的问题。
软件支持 Debian和Ubuntu都使用APT包管理器,但它们的软件源不完全相同。Debian完全基于自由软件,所以它的软件源只包含自由软件。Ubuntu同时使用免费和专有软件,所以它的软件源包含了一些Debian没有的专有软件,例如NVIDIA驱动、Steam等。另外,Ubuntu还有一些自己开发或维护的软件,例如Unity桌面环境、Snap包格式等。这些软件可能在Debian上不容易安装或使用。
性能稳定性考虑 Debian和Ubuntu在RAID,Docker和虚拟机这三者上的区别可能不是很明显,因为它们都是基于Linux内核的操作系统,都可以支持这些技术。但是,根据不同的使用场景和需求,可能会有一些细微的差异。
RAID上差异 RAID是一种磁盘阵列技术,可以提高磁盘的性能和可靠性。Debian和Ubuntu都可以使用RAID,但是它们的安装方式可能不同。Debian的安装过程中需要手动配置RAID,而Ubuntu的安装过程中可以自动检测RAID。另外,Debian和Ubuntu可能支持不同的RAID级别,例如Debian支持RAID 0、1、5、6、10等,而Ubuntu支持RAID 0、1、5等。
Docker上差异 Docker不同的存储驱动方式会影响容器的数据层的管理和性能。Debian默认使用overlay2存储驱动,而Ubuntu默认使用aufs存储驱动。overlay2和aufs都是基于联合文件系统(Union File System)的存储驱动,它们都可以实现容器之间的数据共享和隔离。一般来说,overlay2比aufs有更高的性能和稳定性,但是aufs可能对一些旧版的内核或文件系统有更好的兼容性。
虚拟化上差异 虚拟化的方式会影响虚拟机的资源分配和性能。Debian和Ubuntu都可以使用KVM、Xen、VirtualBox等虚拟化软件,而Ubuntu还可以使用VMware等虚拟化软件。KVM和Xen都是基于内核模块(Kernel Module)的虚拟化软件,它们都可以实现虚拟机之间的资源隔离和高效利用。一般来说,KVM比Xen有更高的性能和易用性,但是Xen可能对一些特殊的硬件或场景有更好的支持。VirtualBox和VMware都是基于用户空间(User Space)的虚拟化软件,它们都可以实现虚拟机之间的资源共享和灵活配置。一般来说,VirtualBox比VMware有更低的资源消耗和更好的免费版功能,但是VMware可能对一些专业的功能或场景有更好的支持。