Notification最佳实践

本文最后更新于:2017年4月24日 凌晨

I. 原则

1. 别干扰你的用户

1
2
3
4
5
6
7
8
9
// 之所以用NotifcationCompat,因为这个可以直接兼容到API4
new NotificationCompat.Builder(this)
.setSmallIcon(...)
.setContentTitle(senderName)
.setContentText(msgText)
.setCategory(
// CATEGORY_ALARM(alarms or timers), REMINDER(user requested reminder),EVENT,MESSAGE,CALL,EMAIL,SOCIAL,RECOMMENDATION(TV?)
)
.build();

2. 尊重你的用户

1
2
3
4
5
6
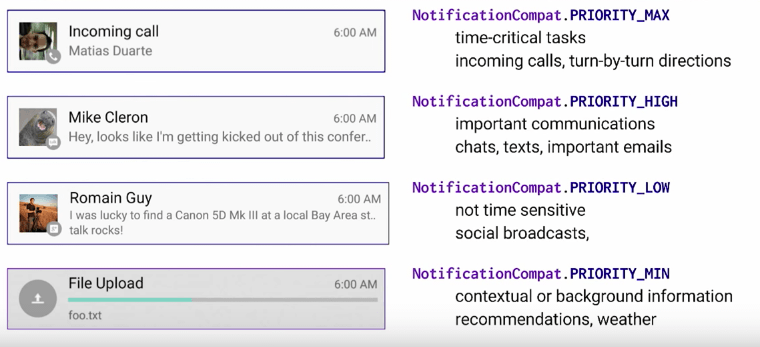
// MAX(time-critical tasks, incoming calls, turn-by-turn directions)
// HIGH(important communications, chats, texts, important emails)
// LOW(not time sensitive, social broadcasts)
// MIN(contextual or background infomation, recommendations wechther), not show when locked screen
// setPriority
NotificationCompat.PRIORITY_

同id的notification, 声音、振动、ticker 仅第一次

1
2
3
4
5
NotificationCompat.Builder builder =
new NotificationCompat.Builder(c)
// Set this flag if you would only like the sound, vibrate and ticker to be played if the notification is not already showing.
.setOnlyAlertOnce(true)
.setProgress(100, 50, false);

notification一段时间后自动干掉

好吧。只是用了alarm service

1
2
3
4
ctxt.getSystemService(Context.ALARM_SERVICE)
.set(AlarmManager.ELAPSED_REALTIME,
SystemClock.elapsedRealtime() + ONE_HOUR,
makeCancelAllPendingIntent(ctxt));

Peak显示

条件: PRIORITY_HIGH && (sound || vibration)

3. 授权你的用户便于设置

长按通知以后进入自定义设置页面

1
2
3
4
5
6
7
8
9
10
<activity android:name="SettingsActivity"
android:label="@string/app_name">
<intent-filter>
<action android:name="android.intent.action.MAIN" />
<category android:name=
"android.intent.category.DEFAULT" />
<category android:anme=
"android.intent.category.NOTIFICATION_PREFERENCES" />
</intent-filter>
</activity>

作者顺便推广了一把通过PreferenceFragmentPreference xml很简单就实现一个设置页面.

添加尽可能的交互在Notification上

1
2
3
4
5
6
7
8
9
10
11
new NotificationCompat.Builder(this)
.setSamllIcon(...)
.setContentTitle(title)
.setContentText(text)
.addAction(R.drawable.ic_answer,
getString(R.string.call_answer),
answerPendingIntent)
.addAction(R.drawable.ic_ignore,
getString(R.string.call_ignore),
ignorePendingIntent)
.build();

1
2
3
4
5
6
7
8
9
10
11
12
13
14
15
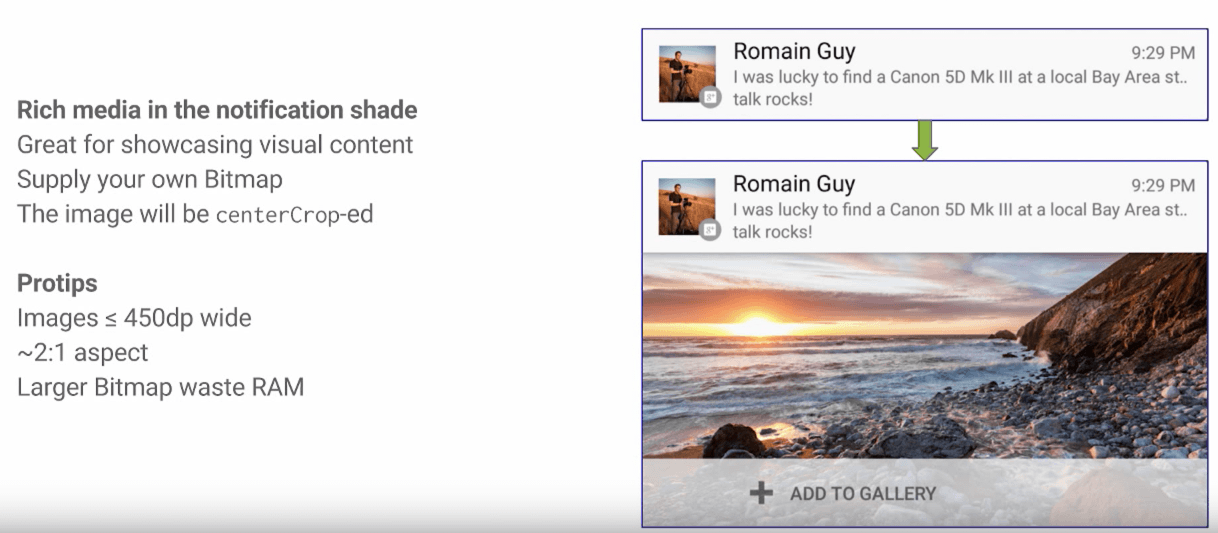
new Notification.Builder(this)
.setSmallIcon(...)
.setContentTitle(title)
.setContentText(text)
// started in Jelly Bean
.setStyle(
new Notification.BigPictureStyle()
.bigPicture(photoBitmap))
.build();

// rich text?
.setStyle(
new Notification.BigTextStyle()
.bigText(longText))
.build();

多端同步,如果一端的notification被干掉,同步到其他端也将其干掉。

onGoing Notification

用户无法划掉

  • startForeground()
  • incoming calls
  • prefer snooze-and-repost pattern

需要给用户可以划掉/干掉的机会

如:音乐播放器在播放的时候无法划掉,在暂停/停止的时候,允许用户划掉(改优先级)(Google Music目前的做法)
如: SSH/VPN连接在连接上的时候无法划掉,但是提供Action断开链接就自动干掉

4. 取悦你的用户

两种用户:

  • 从来都不开声音,要不只开振动
  • 始终都开通知声音,并且喜欢去设置声音类型针对不同的应用

设置通知声音

1
2
3
4
5
6
<RingtonePreference
android:persistent="true"
android:key="sms_sound"
android:denpendency="sms_enable"
android:ringtoneType="notification"
android:title="@string/sms_sound" />
1
2
3
4
5
6
SharedPreferences prefs = PreferenceManager
.getDefaultSharedPreferences(context);
String url = prefs.getString(SOUND, null);
if(uri != null){
builder.setSound(Uri.parse(uri));
}

5. Connect them to the people they love

系统提供指定联系人(星标) ,其余联系人不打扰的模式,因此我们可以在不请求获取联系人权限的情况下通过以下的方式进行对通知绑定

1
2
3
4
5
6
7
8
9
10
11
12
13
14
15
16
new Notification.Builder(this)
.setSmallIcon(...)
.setLargeIcon(...)
.setContentTilte(senderName)
.setContentText(msgText)
.addAction(...)
// email
.addPerson(Uri.fromParts("mailto",
"igzhenjie@gmail.com", null)
.toString())
.build();

// tel
.addPerson(Uri.fromParts("tel",
"1(617) 555-1212", null)
.toString())

II. 技巧

1. 直接回复

在Notification的Action上面直接回复消息

1
2
3
4
5
6
7
8
9
10
11
12
13
14
15
16
17
18
19
20
21
22
23
24
25
26
27
28
29
private static final String KEY_TEXT_REPLY = "key_text_reply";

// 1. 创建一个RemoteInput来处理这个输入Action
String replyLabel = getString(R.string.reply_label);
RemoteInput remoteInput = new RemoteInput.Builder(KEY_TEXT_REPLY)
.setLabel(replyLabel) // 设置默认显示的hint
.build();

// 2. 添加RemoteInput到Notification上,并且使其生效
NotificationCompat.Action action =
// 由于在Android M或更低版本的设备不支持直接回复,因此在这些设备上这里的pendingIntent的Action必须是Activity
// 在Android N或者更高版本的设备支持直接回复,因此在这些设备上这里的pendingIntent的Action应该是Service或者是BroadcastReceiver用于处理消息
new NotificationCompat.Action.Builder(R.drawable.reply, replyLabel, pendingIntent)
.addRemoteInput(remoteInput)
.setAllowGeneratedReplies(true) //允许在Android Wear 2.0上生成Smart Reply
.build();

// 3. 获取在Notification上输入的信息
private CharSequence getMessageText(Intent intent) {
Bundle remoteInput = RemoteInput.getResultsFromIntent(intent);
if (remoteInput != null) {
return remoteInput.getCharSequence(KEY_TEXT_REPLY);
}
return null;
}

// 4. 在处理完输入内容(如已经发送出去),之后必须使用创建相同的id与tag(如果有设置的话)的Notification对象,
//并调用notify()方法, 以刷新Notification上的事件,告知用于输入的内容已经完成处理。
notification.notify();

2. 使用MessagingStyle

在一个Notification上显示多条消息。

1
2
3
4
5
6
7
8
9
// 这里的"You"是设置我的消息的时候,显示的昵称。这个昵称会以特殊的颜色显示,通常是
//结合Notification上的直接回复组件使用的,比如回复还没有完成处理之前,这条消息就会以You发送
//的样式显示在Notification上
builder.setStyle(new NotificationCompat.MessagingStyle("You")
//.setConversationTitle("Team lunch") // 可以考虑设置一个标题,这个标题会以BigTextStyle的风格显示在Notification上
.addMessage("Hi", timestampMillis1, "Adrian") // Adrian 在timestampMillis1的时候发过来一条消息
.addMessage("Ready fro lunch?", timestampMillis2, "Adrian")
.addMessage("Sure!", timestampMillis3, null) // 我 在timestampMillis3的时候回了一条消息
.addMessage("I'll meet you downstairs", timestampMillis4, null));

需要注意的是,在Android N之前的设备,对MessagingStyle是不兼容的,因此如果使用MessagingStyle,需要对Android N之前的设备进行单独处理。

3. Bundled Notification

将多个相同性质的Notification打包成一个Notification,并且在用户需要的时候可以展开看到每个单独的Notification。

  • Group中的Notification个数没有限制。
  • 对于某一个独立的Notification,只需要通过setGroup()方法就可以将其打包到Group Message中。
  • 通过setGroupSummary(true)指定折叠起来的时候所显示的Notification,在Android M或更低版本的设备上默认只显示这个Notification。

III. 其他

  • 当Target Api指向25的时候,默认情况下Notification上面的Notification更新时间会被隐藏,如果需要显示,需要显式的调用setShowWhen(true)
  • 在Android N的设备上,如果同一个应用Notification的个数大于等于4个并且没有Group,就会自动将其Bundled。


Notification最佳实践
https://blog.dreamtobe.cn/2016/01/09/notification_best_practise/
作者
Jacksgong
发布于
2016年1月9日
更新于
2017年4月24日
许可协议